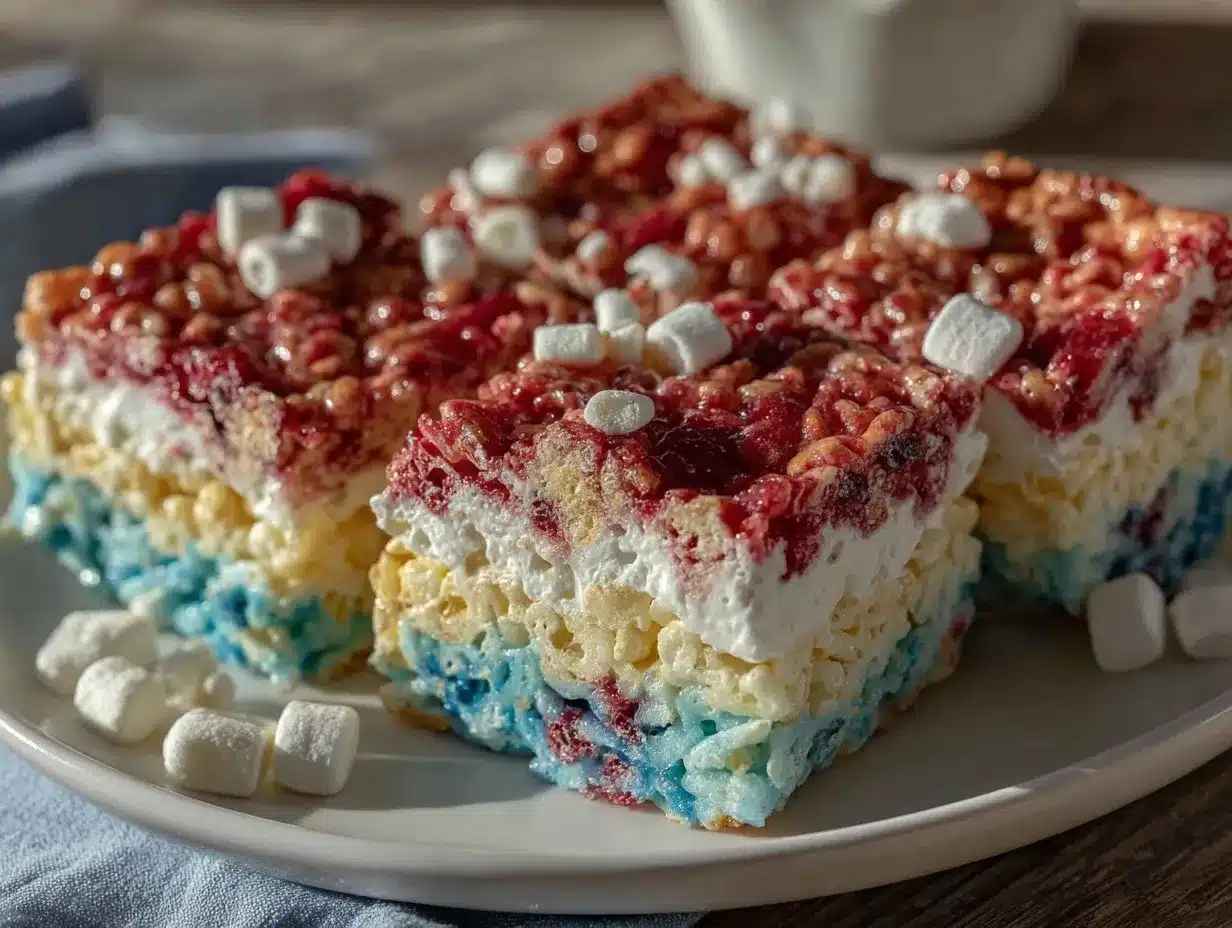
I thought coloring Rice Krispie treats for a patriotic snack would be a hassle—lots of messy dye, uneven color, and a sticky disaster waiting to happen. It took about ten minutes into the process for the red dye to stain my fingers and the white marshmallow mix to start looking more pink than white. Honestly, I was ready to toss the whole batch and order cupcakes instead. But then, as I layered the blue, white, and red treats in a simple pan, something clicked—the colors held, the texture stayed perfect, and the end result actually looked festive without the fuss.
The smell of melted marshmallows mingling with crisp cereal and a hint of vanilla brought back memories of summer barbecues and holiday potlucks where these treats always disappeared first. Somehow, this recipe manages to be both kid-friendly and crowd-pleasing, a rare combo when you’re trying to keep things colorful but simple. Plus, you don’t need to be a pro baker to pull this off; it’s really about patience, timing, and not sweating the little sticky bits on your hands.
These Festive Red White and Blue Rice Krispie Treats stuck with me because they’re a no-fuss way to bring a splash of celebration to any gathering, whether it’s July 4th, Memorial Day, or just a summer picnic. It’s a recipe that reminds me that sometimes the easiest ideas turn out to be the most memorable ones, and that a little color can brighten more than just your plate—it lifts the whole mood.
Why You’ll Love This Recipe
- Quick & Easy: Ready in under 30 minutes, perfect for last-minute holiday gatherings or spontaneous festive fun.
- Simple Ingredients: Pantry staples like marshmallows, butter, and cereal—no need for fancy shopping trips or obscure ingredients.
- Perfect for Patriotic Occasions: Ideal for 4th of July, Memorial Day, or any red, white, and blue-themed celebration.
- Crowd-Pleaser: Kids adore the colorful layers, and adults appreciate the nostalgic, chewy texture, making it a universal favorite.
- Unbelievably Delicious: The classic marshmallow-sweetened crunch with a festive twist—this isn’t just any Rice Krispie treat, it’s a party on a plate.
This recipe stands apart because it carefully balances the colors without overwhelming the flavor or texture. Instead of mixing all the colors together and ending up with a questionable purple mess, the treats are layered thoughtfully, giving that sharp red, bright white, and vibrant blue that really pops. I also swap in just the right amount of vanilla extract to deepen the flavor without making it overly sweet.
What makes this recipe even more special is how forgiving it is. Even if your timing is a bit off or the colors bleed a little, these treats still taste fantastic. And let’s be honest—it’s the perfect recipe when you want to impress without stressing, turning a simple dessert into a centerpiece that feels festive and fun.
What Ingredients You Will Need
This recipe uses simple, wholesome ingredients to deliver bold flavor and satisfying texture without the fuss. Most of these are pantry staples, and the food coloring is easy to find in any grocery store, making this a straightforward recipe to whip up anytime.
- For the Base:
- 6 cups Rice Krispies cereal (or any crispy rice cereal you prefer for crunch)
- 4 tablespoons unsalted butter (adds richness and helps melt the marshmallows evenly)
- 1 (10 oz) bag mini marshmallows (or about 4 cups large marshmallows, chopped)
- 1 teaspoon pure vanilla extract (for extra flavor depth)
- For Coloring:
- Red gel food coloring (use gel for vibrant color without thinning the mixture)
- Blue gel food coloring (same as above, gel works best)
- Optional:
- Non-stick cooking spray or extra butter (for greasing pans and hands)
- Pinch of salt (to balance sweetness)
I recommend using trusted brands like Kellogg’s for the Rice Krispies cereal to keep that classic crisp texture. For food coloring, gels from Wilton or AmeriColor have always given me the brightest and most consistent shades. If you want to skip artificial colors, you can experiment with natural alternatives like beet powder for red and spirulina powder for blue, but be aware that the colors won’t be as vibrant.
Substitution tips: If you need gluten-free options, make sure to select certified gluten-free crispy rice cereal. For dairy-free, swap butter for coconut oil and use vegan marshmallows. These swaps still work surprisingly well in this recipe!
Equipment Needed
- Large mixing bowl (for combining cereal and marshmallow mixtures)
- Medium saucepan (to melt butter and marshmallows)
- Spatula (preferably silicone, heat-resistant, for stirring and pressing)
- 9×13 inch baking pan (glass or metal works fine; glass helps you see the layers better)
- Knife or bench scraper (to cut treats cleanly)
- Measuring cups and spoons (for accuracy)
If you don’t have a 9×13 pan, a slightly smaller or larger pan works too; just adjust the thickness of the layers accordingly. I once used a square Pyrex dish when I was out of my usual pan, and while it changed the shape, the treats stayed just as tasty. For greasing, using a bit of butter on your hands helps keep the mixture from sticking—trust me, sticky fingers are part of the fun but less so when you’re trying to shape neat layers.
Preparation Method
- Prep your pan: Lightly grease your 9×13 inch baking pan with butter or non-stick spray. This helps release the treats easily once they’ve set. Set aside.
- Melt the marshmallow base: In a medium saucepan over low heat, melt 4 tablespoons of unsalted butter. Once melted, add the entire bag of mini marshmallows. Stir constantly with a heat-resistant spatula until the marshmallows fully melt and the mixture is smooth (about 3-5 minutes). Remove from heat and stir in 1 teaspoon of vanilla extract.
- Divide the mixture: Quickly divide the melted marshmallow mixture into three equal portions (about 1 1/3 cups each). Work fast because marshmallow sets quickly.
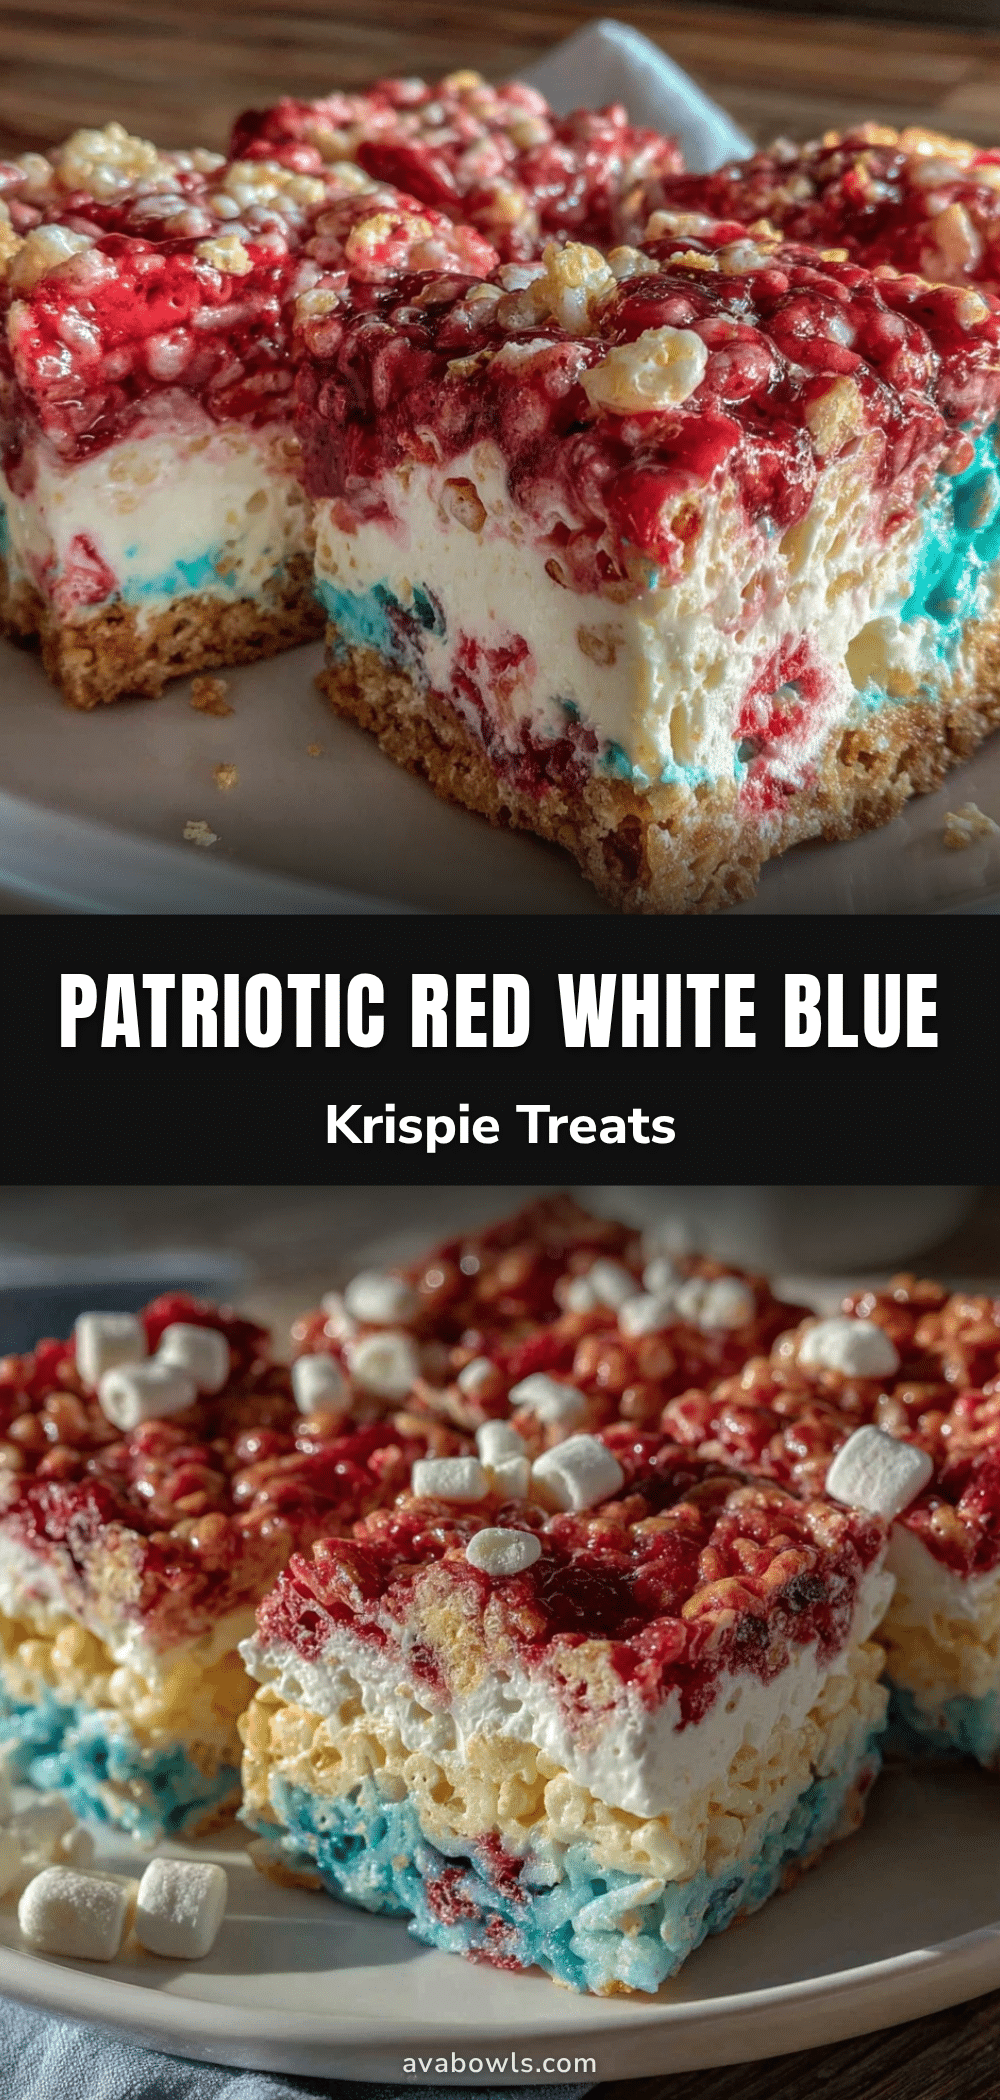
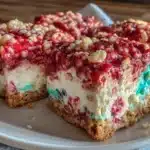
- Color each portion: To the first portion, add red gel food coloring a little at a time, stirring well until you get a bright red color. For the second portion, leave it plain (this will be the white layer). For the third portion, add blue gel food coloring gradually until a vibrant blue is reached.
- Mix with cereal: Working one portion at a time, add 2 cups of Rice Krispies cereal to each colored marshmallow mixture. Fold gently until all cereal is coated evenly but don’t overmix or it will get mushy.
- Layer the treats: Press the red mixture evenly into the bottom of your prepared pan using a buttered spatula or greased hands. Let it set for about 5 minutes (not fully hard, just firm enough). Repeat with the white mixture, pressing gently on top of the red layer, then finish with the blue mixture on top. Press all layers firmly but gently to avoid crushing the cereal.
- Let it cool: Allow the layered treats to cool completely at room temperature for about 1 hour. This helps the layers set without mixing colors.
- Cut and serve: Once set, remove the block from the pan by lifting with parchment paper edges or loosening with a knife around the sides. Cut into squares or fun shapes using cookie cutters for a festive touch. Wipe your knife with a warm damp cloth between cuts to keep edges clean.
Common issue: If your marshmallow mixture starts to harden while dividing and coloring, gently rewarm it in the saucepan over the lowest heat setting, stirring carefully to avoid burning. That sticky stage is tricky but manageable with a little patience.
Cooking Tips & Techniques
Working with marshmallows can be a bit unpredictable, so here are some tips I’ve picked up from trial and error. First, low and slow is your friend when melting butter and marshmallows; high heat can scorch the mix and ruin the flavor. Stirring constantly prevents clumps and helps achieve that smooth, glossy texture that binds the cereal well.
When coloring, gel food coloring is way better than liquid. Liquids can thin your mixture and make the treats soggy, which is no fun. Also, adding color gradually keeps you in control—trust me, a little too much red can look like a Halloween treat rather than a patriotic one.
Pressing the layers firmly (but not too hard) helps the treats hold together well, especially since you’re stacking three layers. Don’t skip the setting time between layers; it makes all the difference in keeping colors from bleeding into each other.
Another trick is greasing your spatula or hands with butter when pressing the treats into the pan. It cuts down on stickiness and helps you shape the layers neatly. I learned this the hard way during my first batch, when everything stuck and looked like a colorful mess!
Multitasking tip: While the marshmallows melt, measure and prep your cereal and food coloring so you can move quickly once the mixture is ready. Timing matters a lot with marshmallows—they set fast!
Variations & Adaptations
- Dietary Swaps: Use gluten-free crispy rice cereal for those avoiding gluten. Swap butter for coconut oil and vegan marshmallows for a dairy-free, vegan-friendly treat.
- Seasonal Twists: Instead of red and blue, swap the colors for other themes—green and red for Christmas, pastel shades for Easter, or orange and black for Halloween.
- Flavor Variations: Add a pinch of cinnamon or almond extract to the marshmallow mixture for a subtle flavor boost. I once tried adding a splash of citrus zest to the white layer, which gave a surprising freshness that cut through the sweetness nicely.
- Cooking Method: If you prefer, melt the marshmallows in the microwave in 30-second increments, stirring each time, but watch closely to avoid burning.
- Texture Boost: Mix in sprinkles or chopped nuts in the blue layer for a fun crunch contrast, just be mindful of allergies if serving to a crowd.
Serving & Storage Suggestions
Serve these Festive Red White and Blue Rice Krispie Treats at room temperature for the best chewy texture and vibrant color. They make a fantastic addition to any patriotic spread and pair well with classic picnic foods or refreshing lemonade.
For a fun presentation, cut them into stars using cookie cutters or stack them on a platter with other colorful snacks like fresh berries or fruit bowls to keep the theme lively.
Store treats in an airtight container at room temperature for up to three days. If you want to save them longer, wrap individual portions tightly and freeze for up to two weeks. To reheat, let them thaw at room temperature or gently warm in the microwave for 10-15 seconds to soften.
Keep in mind, the flavors meld nicely as they sit, so leftovers taste even better the next day once the marshmallow goo firms up fully. Just don’t leave them in a humid spot or they may get sticky.
Nutritional Information & Benefits
Each serving (about 1 treat square) provides roughly 150-180 calories, mostly from carbohydrates and sugars due to the marshmallows and cereal. These treats are definitely an indulgence but also provide quick energy and a nostalgic boost for festive occasions.
Key ingredients like butter add some fat and richness, while Rice Krispies cereal offers a light crunch with minimal fiber or protein. This recipe is naturally gluten-free if you choose a certified gluten-free cereal, and can be adapted for dairy-free or vegan diets as mentioned earlier.
While not a health food, these treats bring joy and color to celebrations, which is worth something, right? For a lighter snack option, you might want to balance these with fresh fruit or a dip like the fresh Greek yogurt veggie dip to add some savory contrast.
Conclusion
Festive Red White and Blue Rice Krispie Treats are proof that simple ingredients and a little patience can result in a fun, memorable dessert that’s perfect for any patriotic celebration. Whether you’re feeding a crowd or just looking for a quick festive snack, this recipe is flexible, forgiving, and downright tasty.
Feel free to tweak the colors, add flavors, or switch up the textures to make it your own. I love coming back to this recipe because it captures that playful spirit of summer holidays without any fuss.
If you give these a try, I’d love to hear how you customize them or what part of the process you enjoyed most. Sharing your spin on this classic treat keeps the tradition fresh and full of surprises. Happy snacking!
FAQs About Festive Red White and Blue Rice Krispie Treats
Can I make these treats ahead of time?
Yes! You can prepare the layered treats a day or two in advance. Just store them in an airtight container at room temperature to keep them fresh and chewy.
What’s the best way to prevent colors from bleeding?
Let each colored layer set for about 5 minutes before adding the next. Also, use gel food coloring to avoid watery mixtures that cause bleeding.
Can I use liquid food coloring instead of gel?
You can, but it might make the marshmallow mixture too runny and affect the texture. Gel coloring is recommended for vibrant colors and consistency.
Is it possible to make these treats vegan or dairy-free?
Absolutely. Use vegan marshmallows and substitute butter with coconut oil or a plant-based butter alternative. Make sure your cereal is gluten-free if needed.
How do I cut the treats without them sticking to the knife?
Use a sharp knife wiped with a warm, damp cloth between cuts. You can also grease the knife blade lightly with butter or oil to get clean edges.
Pin This Recipe!
Festive Red White and Blue Rice Krispie Treats Easy Patriotic Recipe
A quick and easy patriotic snack featuring layered red, white, and blue Rice Krispie treats perfect for 4th of July and other celebrations. This recipe balances vibrant colors with classic marshmallow sweetness and a chewy texture.
- Prep Time: 10 minutes
- Cook Time: 10 minutes
- Total Time: 1 hour 20 minutes
- Yield: 12 servings 1x
- Category: Dessert
- Cuisine: American
Ingredients
- 6 cups Rice Krispies cereal (or any crispy rice cereal)
- 4 tablespoons unsalted butter
- 1 (10 oz) bag mini marshmallows (or about 4 cups large marshmallows, chopped)
- 1 teaspoon pure vanilla extract
- Red gel food coloring
- Blue gel food coloring
- Non-stick cooking spray or extra butter (optional, for greasing)
- Pinch of salt (optional)
Instructions
- Lightly grease a 9×13 inch baking pan with butter or non-stick spray and set aside.
- In a medium saucepan over low heat, melt 4 tablespoons of unsalted butter.
- Add the entire bag of mini marshmallows to the melted butter and stir constantly until fully melted and smooth, about 3-5 minutes.
- Remove from heat and stir in 1 teaspoon of vanilla extract.
- Quickly divide the melted marshmallow mixture into three equal portions (about 1 1/3 cups each).
- Add red gel food coloring gradually to the first portion until bright red; leave the second portion plain (white); add blue gel food coloring gradually to the third portion until vibrant blue.
- To each colored portion, add 2 cups of Rice Krispies cereal and fold gently until evenly coated.
- Press the red mixture evenly into the bottom of the prepared pan using a buttered spatula or greased hands. Let set for about 5 minutes until firm but not hard.
- Press the white mixture gently on top of the red layer, then press the blue mixture on top of the white layer, pressing all layers firmly but gently.
- Allow the layered treats to cool completely at room temperature for about 1 hour to set.
- Remove the block from the pan using parchment paper edges or loosen with a knife around the sides.
- Cut into squares or shapes using cookie cutters. Wipe the knife with a warm damp cloth between cuts to keep edges clean.
Notes
Use gel food coloring for vibrant colors and to avoid thinning the marshmallow mixture. Press layers firmly but gently to avoid crushing cereal. Let each layer set about 5 minutes before adding the next to prevent color bleeding. Grease spatula and hands with butter to reduce stickiness. If marshmallow mixture hardens while dividing, gently rewarm over low heat.
Nutrition
- Serving Size: 1 treat square
- Calories: 165
- Sugar: 18
- Sodium: 90
- Fat: 4
- Saturated Fat: 2.5
- Carbohydrates: 31
- Protein: 1
Keywords: Rice Krispie treats, patriotic dessert, 4th of July recipe, red white and blue treats, easy dessert, kid-friendly snack, marshmallow treats