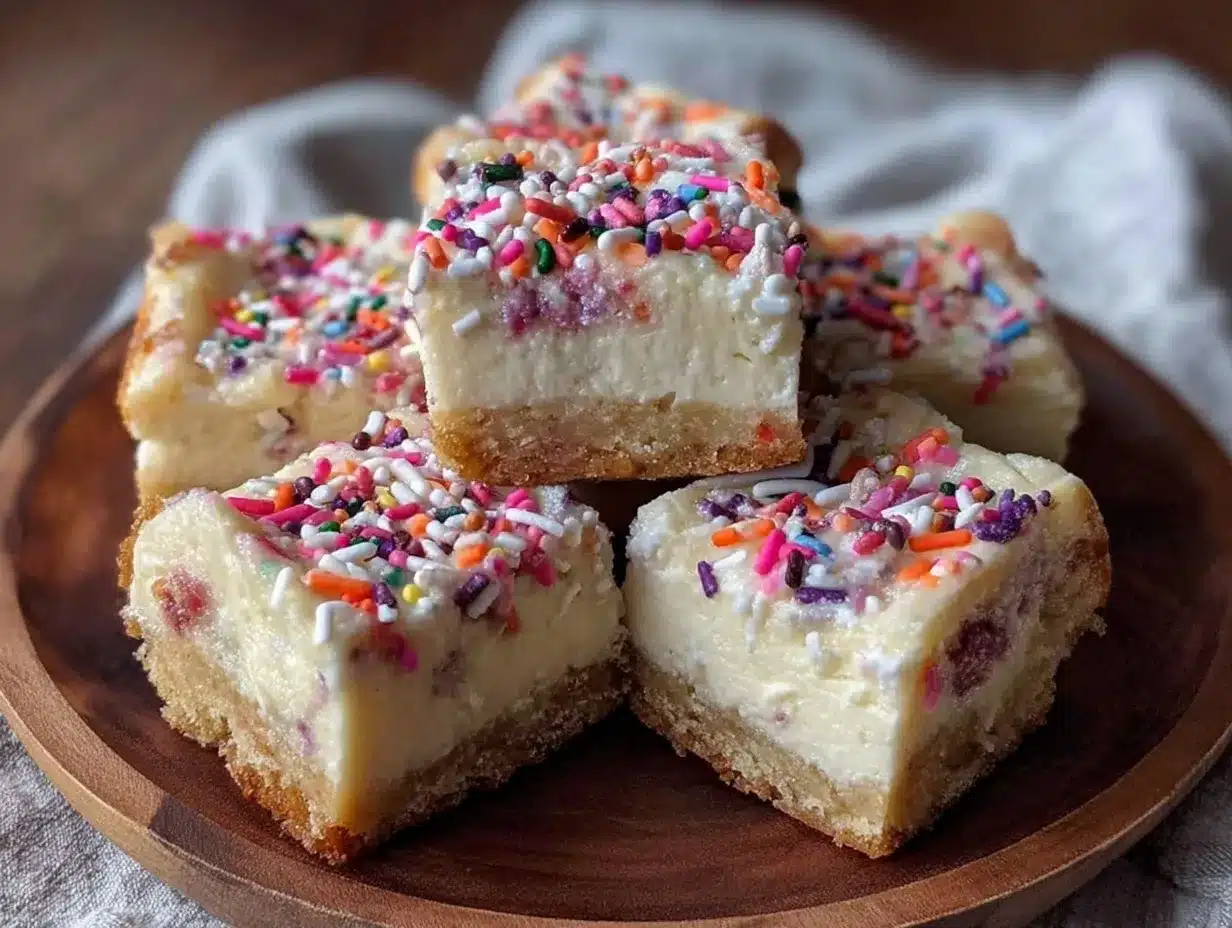
“Hey, did you bring the dessert?” That text popped up just as I was rushing out the door to a last-minute graduation party. Honestly, I hadn’t planned much—just some chips and a dip. But I wanted something that looked festive, tasted great, and wouldn’t have me juggling an oven or a million dishes. That’s when these Easy No-Bake Graduation Cheesecake Bars with Sprinkle Crust came into the picture.
I grabbed a few staples from the pantry, tossed together a quick crust with sprinkles (because, why not make it fun?), and blended the cheesecake filling while chatting with friends. The best part? No oven, no fuss, and less than an hour before these bars made their debut on the party table. People kept coming back for seconds, and I caught myself smiling, thinking, “Well, that was easier than I expected.”
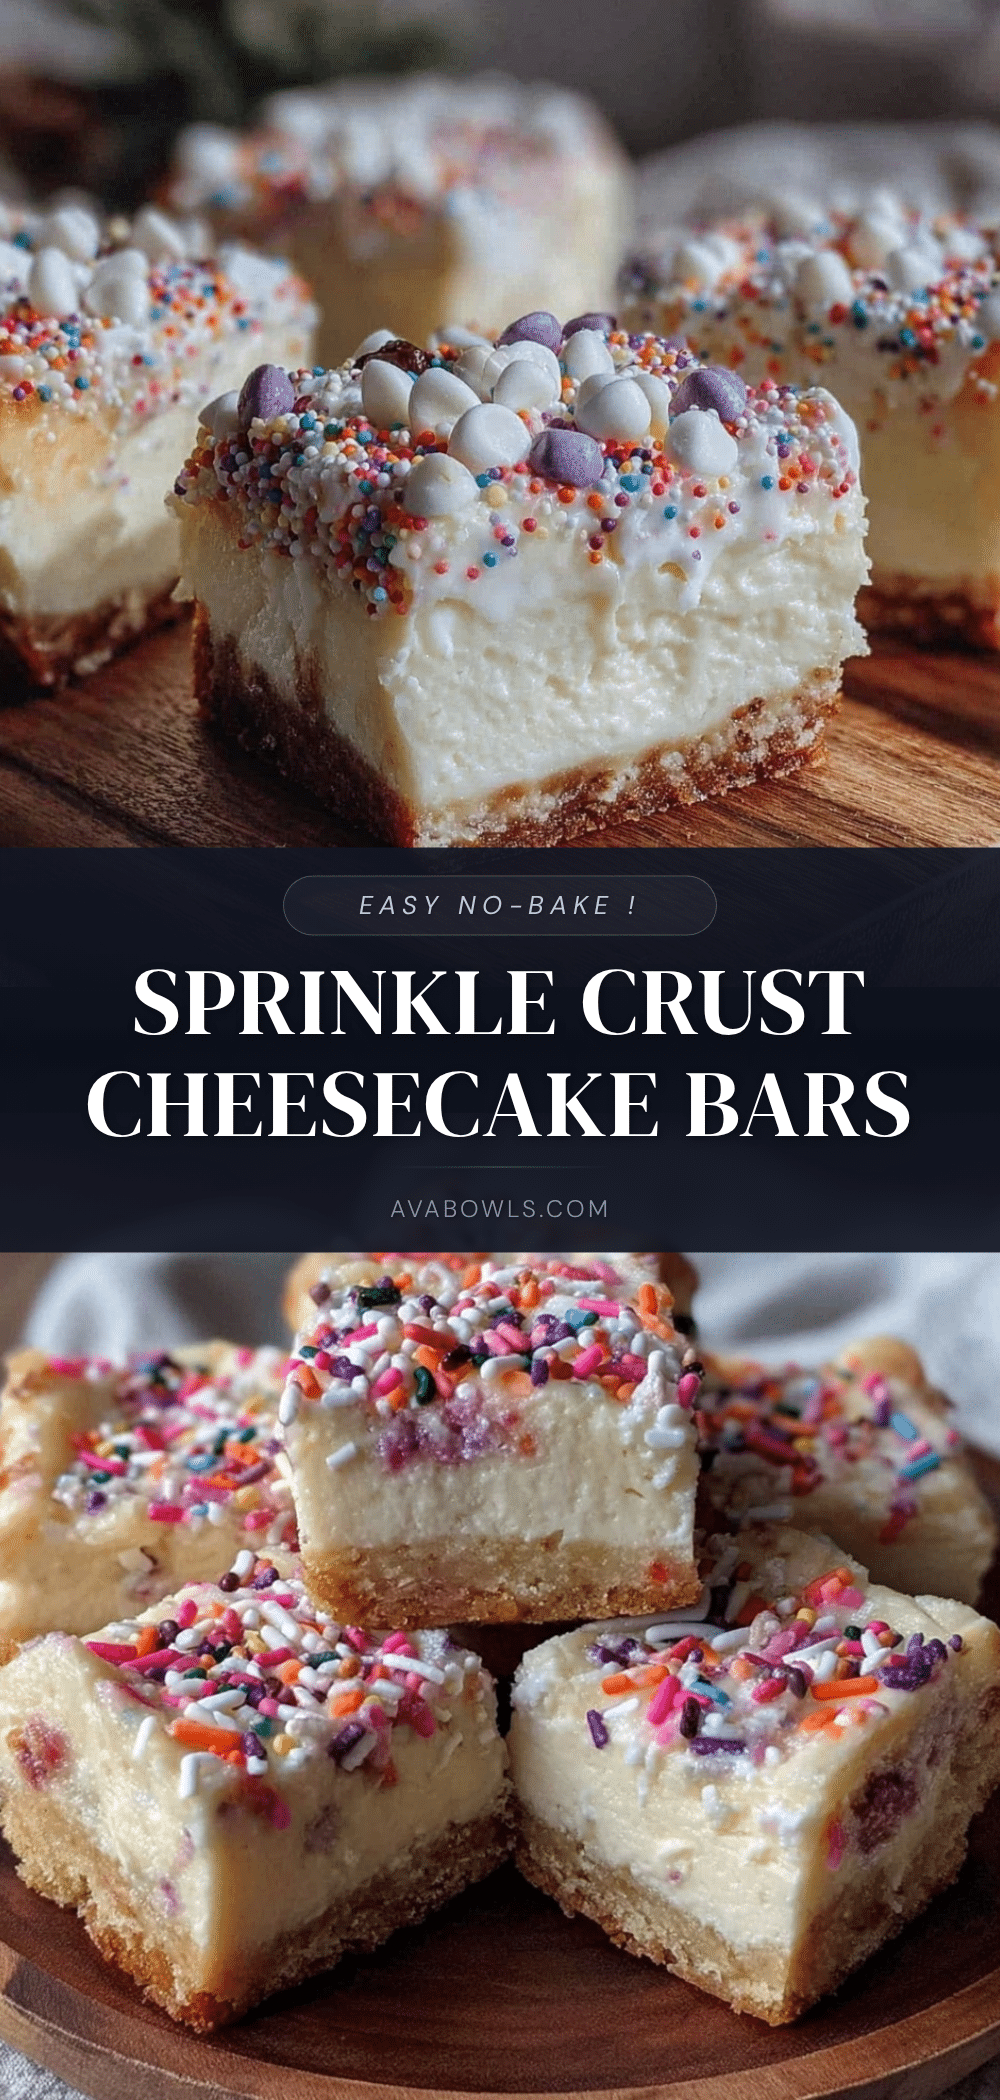
These bars aren’t just a dessert; they’re a little celebration on a plate, bright and cheerful with the sprinkle crust that brings that perfect pop of color—like confetti for your taste buds. Somehow, this simple recipe turned a spontaneous moment into a crowd-pleaser that I now rely on whenever a party sneaks up on me. It’s comforting but playful, just the right mix to make you feel like you nailed it without breaking a sweat.
That sprinkle crust? It’s my secret weapon for adding a touch of whimsy to the classic cheesecake bars. It’s one of those things that just sticks with you—like how the smooth, creamy filling contrasts with that crunchy, colorful base. If you’re ready for a treat that’s quick, cute, and delightfully easy, you’re about to find your new go-to dessert.
Why You’ll Love This Easy No-Bake Graduation Cheesecake Bars Recipe with Sprinkle Crust
After testing this recipe a handful of times—sometimes late at night, sometimes with friends hovering nearby—I can say it’s a keeper. Here’s why it’s earned a permanent spot in my recipe lineup:
- Quick & Easy: These cheesecake bars come together in under 30 minutes, no baking required. Perfect for those busy days when you want a homemade treat without the hassle.
- Simple Ingredients: Most of what you need is probably already in your kitchen. Cream cheese, whipped topping, sprinkles, and a few pantry staples make this recipe a no-brainer.
- Perfect for Celebrations: Whether it’s graduation parties, birthdays, or casual get-togethers, the colorful sprinkle crust adds a festive touch that feels special without being over the top.
- Crowd-Pleaser: Kids and adults alike love these bars. The creamy texture paired with the crunchy, sweet crust hits all the right notes.
- Unbelievably Delicious: The balance of tangy cheesecake and sweet sprinkles creates a dessert that’s comforting and fun—like a party in every bite.
What really sets this recipe apart is that sprinkle crust. It’s not just decoration; it adds texture and a nostalgic twist that makes these bars feel uniquely celebratory. Plus, the no-bake filling means the cheesecake stays light and fluffy—not dense or heavy like some baked versions.
Honestly, it’s the kind of dessert that makes you pause and savor the moment. Whether you’re throwing together a quick party spread or just needing a sweet pick-me-up, these bars bring a little joy without the fuss.
What Ingredients You Will Need for Easy No-Bake Graduation Cheesecake Bars with Sprinkle Crust
This recipe uses simple, wholesome ingredients to deliver bold flavor and satisfying texture without the fuss. Most are pantry staples, and substitutions are easy if you want to tweak things a bit.
- For the Sprinkle Crust:
- 1 ½ cups graham cracker crumbs (about 150g) – I like using honey-flavored for a subtle sweetness
- ½ cup unsalted butter, melted (115g) – adds richness and holds the crust together
- ½ cup rainbow sprinkles (about 75g) – classic jimmies or nonpareils both work; they bring the party vibe
- 2 tablespoons granulated sugar – balances the buttery crust
- For the Cheesecake Filling:
- 16 oz (450g) cream cheese, softened – room temperature is key for smooth mixing (I recommend Philadelphia brand for consistent results)
- 1 cup powdered sugar (120g) – adds sweetness without graininess
- 1 teaspoon vanilla extract – pure vanilla gives the best flavor depth
- 1 ½ cups heavy whipping cream (360ml) – whipped to soft peaks for that airy texture
Ingredient Tips & Substitutions:
- Use dairy-free cream cheese and coconut cream for a vegan-friendly version (just note texture differences).
- If you prefer a gluten-free crust, swap graham crackers with gluten-free biscuits or almond flour and add a pinch of cinnamon for warmth.
- For a little extra tang, stirring in a tablespoon of lemon juice into the filling can brighten flavors.
Equipment Needed
- 8×8-inch (20×20 cm) square baking pan – a classic size for bars; lined with parchment paper for easy removal.
- Mixing bowls – at least two; one for the crust and one for the filling.
- Electric mixer or stand mixer – whipping the cream by hand is possible but takes a workout.
- Spatula – for folding and spreading the filling gently.
- Measuring cups and spoons – accuracy helps keep the crust balanced and the filling silky.
- Food processor (optional) – handy if you want perfectly fine graham cracker crumbs, but you can crush them in a sealed bag with a rolling pin too.
Personally, I’ve made these bars with just a handheld mixer and some elbow grease—no fancy stand mixer required. For budget-friendly options, silicone spatulas and non-stick pans work just fine. Just remember to chill the pan a bit before pressing the crust for easier handling.
Preparation Method for Easy No-Bake Graduation Cheesecake Bars with Sprinkle Crust
- Prepare the crust: In a medium bowl, combine graham cracker crumbs, sugar, and rainbow sprinkles. Pour in the melted butter and stir until the mixture looks like wet sand and holds together when pressed. (About 3-5 minutes)
- Press the crust: Line your 8×8-inch pan with parchment paper, leaving some overhang for easy removal. Press the crust mixture firmly and evenly into the bottom of the pan using the back of a spoon or your fingers. Chill in the fridge for at least 15 minutes to set.
- Whip the cream: In a large bowl, whip the heavy cream with an electric mixer on medium-high speed until soft peaks form. This usually takes about 3-4 minutes. Be careful not to overwhip or it’ll turn grainy.
- Mix the filling: In a separate bowl, beat the softened cream cheese, powdered sugar, and vanilla extract until smooth and creamy (about 2-3 minutes). It helps to scrape down the sides once or twice to avoid lumps.
- Combine cream and cream cheese: Gently fold the whipped cream into the cream cheese mixture in batches, using a spatula. Fold slowly to keep the airy texture. The filling should be light and fluffy, with no streaks of cream cheese.
- Assemble the bars: Spread the cheesecake filling evenly over the chilled crust. Smooth the top with a spatula. Cover with plastic wrap and refrigerate for at least 4 hours, or overnight for best results.
- Cut and serve: Once set, use the parchment paper overhang to lift the bars out. Cut into 12 squares with a sharp knife (dip in warm water and wipe clean between cuts for neat edges). Serve chilled and enjoy!
Pro tip: If the filling feels too loose, chilling longer helps it firm up without changing flavor. Also, pressing the crust firmly ensures it won’t crumble when slicing.
Cooking Tips & Techniques for Perfect Cheesecake Bars
Getting the texture right in no-bake cheesecake bars can be a bit tricky, but a few tips can save you from common pitfalls:
- Softened cream cheese is a must. Cold cream cheese leads to lumps. Let it sit at room temperature for at least 30 minutes before mixing.
- Whip cream carefully. Stop whipping as soon as you see soft peaks. Overwhipped cream turns into butter, which ruins the texture.
- Folding is key. Don’t rush when combining the whipped cream and cream cheese. Use gentle folding motions to keep the air in, which makes the bars fluffy.
- Chill enough. Patience pays off. The filling firms up nicely after a few hours in the fridge, making cutting easier and the bars hold their shape.
- Sprinkle crust caution. Add sprinkles sparingly in the crust; too many can make it crumbly. The right balance gives color without sacrificing structure.
I learned these lessons the hard way, especially that time I skipped chilling and ended up with a filling that slid right off the crust (awkward party moment!). Now, I always plan ahead just a bit to avoid that.
Also, multitasking while prepping these bars is a lifesaver. Whip the cream while the crust chills, for example. It keeps things moving smoothly without the stress.
Variations & Adaptations for Easy No-Bake Graduation Cheesecake Bars
These cheesecake bars are wonderfully versatile—feel free to make them your own depending on the occasion or dietary needs.
- Flavor twists: Add zest of lemon or orange to the filling for a citrus kick. Or swirl in some strawberry or raspberry jam before chilling for a fruity surprise.
- Dietary adjustments: Use gluten-free graham crackers or substitute with crushed gluten-free cookies for a celiac-friendly crust. Swap heavy cream with coconut cream for a dairy-free version.
- Crunchy topping: Sprinkle chopped nuts like pistachios or toasted coconut flakes on top after spreading the filling to add texture and flavor contrast.
- Seasonal spin: Swap sprinkles with crushed peppermint candies for winter holidays, or use edible flower petals for spring celebrations.
- Personal favorite: I once added a thin layer of chocolate ganache over the chilled bars for a rich, decadent finish—perfect for chocolate lovers who still want that fun sprinkle crust base.
Serving & Storage Suggestions
These cheesecake bars are best served chilled, straight from the fridge. The cool temperature keeps the filling firm and refreshing, and that sprinkle crust crisp.
For parties, I like arranging them on a colorful platter to highlight the festive sprinkles, pairing the bars with fresh berries or a light fruit salad for balance. A cup of freshly brewed coffee or a sparkling lemonade complements the creamy sweetness nicely.
To store, cover the bars tightly with plastic wrap or keep in an airtight container. They stay fresh in the fridge for up to 4 days. If you want to keep them longer, freeze the bars for up to 2 months—just thaw overnight in the fridge before serving.
Reheating isn’t recommended, but letting them sit for 5 minutes at room temperature before serving softens the texture slightly and wakes up the flavors.
Over time, the flavors meld beautifully—the cheesecake filling becomes even creamier, and the sprinkle crust softens just a touch, making each bite a little different but always delicious.
Nutritional Information & Benefits
Each bar (assuming 12 servings) provides approximately:
| Nutrient | Amount per serving |
|---|---|
| Calories | 280 |
| Fat | 20g |
| Carbohydrates | 18g |
| Protein | 4g |
While these cheesecake bars aren’t exactly a health food, the cream cheese provides a decent amount of protein and calcium. Using real butter and heavy cream means the fats are satisfying and rich, which helps keep you full.
For those watching carbs or gluten, swapping ingredients as mentioned can make this treat fit specific diets. The recipe is free from nuts unless you add toppings, but always double-check sprinkles and packaged ingredients for allergens.
Honestly, I see these bars as a well-earned indulgence—perfect for celebrations or whenever you want a dessert that feels like a little reward without hours of work.
Conclusion
This Easy No-Bake Graduation Cheesecake Bars recipe with sprinkle crust has become a staple when I need a quick, crowd-pleasing dessert that looks festive and tastes fantastic. It’s a recipe that’s forgiving, flexible, and downright fun to make.
Feel free to play around with the sprinkles, add your favorite flavors, or even try it as a base for other no-bake desserts. It’s your canvas to make as bright and bold (or subtle and sweet) as you like.
Personally, I love how it turns a simple moment into a little celebration, and I hope it does the same for you. If you give it a try, I’d love to hear your tweaks and favorite ways to serve it. Sweet moments deserve to be shared, after all!
FAQs About Easy No-Bake Graduation Cheesecake Bars with Sprinkle Crust
Can I make these cheesecake bars ahead of time?
Absolutely! They taste even better after chilling overnight. Just keep them covered well in the fridge.
What can I use instead of graham crackers for the crust?
You can use digestive biscuits, gluten-free cookies, or even crushed pretzels for a salty twist.
How do I store leftover cheesecake bars?
Store them in an airtight container in the fridge for up to 4 days or freeze for longer storage.
Can I use flavored sprinkles for the crust?
Yes! Just be sure they’re sturdy sprinkles (like jimmies) rather than delicate ones that might melt or lose color.
Is it possible to make these bars vegan?
Yes, by using vegan cream cheese, coconut cream instead of heavy cream, and a vegan butter substitute for the crust.
If you want some inspiration for other creamy and easy crowd-pleasers, you might enjoy the creamy beer cheese pretzel dip for savory snacks or the creamy strawberry cream cheese stuffed French toast for a sweet morning treat.
Pin This Recipe!
Easy No-Bake Graduation Cheesecake Bars Recipe with Sprinkle Crust
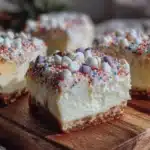
These no-bake cheesecake bars feature a colorful sprinkle crust and a light, fluffy filling, making them a quick and festive dessert perfect for celebrations.
- Prep Time: 15 minutes
- Cook Time: 0 minutes
- Total Time: 4 hours 15 minutes
- Yield: 12 servings 1x
- Category: Dessert
- Cuisine: American
Ingredients
- 1 ½ cups graham cracker crumbs (about 150g)
- ½ cup unsalted butter, melted (115g)
- ½ cup rainbow sprinkles (about 75g)
- 2 tablespoons granulated sugar
- 16 oz (450g) cream cheese, softened
- 1 cup powdered sugar (120g)
- 1 teaspoon vanilla extract
- 1 ½ cups heavy whipping cream (360ml)
Instructions
- In a medium bowl, combine graham cracker crumbs, sugar, and rainbow sprinkles. Pour in the melted butter and stir until the mixture looks like wet sand and holds together when pressed (about 3-5 minutes).
- Line an 8×8-inch pan with parchment paper, leaving some overhang for easy removal. Press the crust mixture firmly and evenly into the bottom of the pan. Chill in the fridge for at least 15 minutes to set.
- In a large bowl, whip the heavy cream with an electric mixer on medium-high speed until soft peaks form (about 3-4 minutes).
- In a separate bowl, beat the softened cream cheese, powdered sugar, and vanilla extract until smooth and creamy (about 2-3 minutes).
- Gently fold the whipped cream into the cream cheese mixture in batches using a spatula, folding slowly to keep the airy texture.
- Spread the cheesecake filling evenly over the chilled crust and smooth the top with a spatula. Cover with plastic wrap and refrigerate for at least 4 hours or overnight for best results.
- Once set, use the parchment paper overhang to lift the bars out. Cut into 12 squares with a sharp knife (dip in warm water and wipe clean between cuts for neat edges). Serve chilled.
Notes
Use softened cream cheese at room temperature to avoid lumps. Whip cream to soft peaks only to prevent graininess. Fold whipped cream gently into cream cheese mixture to keep filling airy. Chill bars for at least 4 hours or overnight for best texture. Press crust firmly to prevent crumbling. For vegan or gluten-free versions, substitute ingredients as suggested.
Nutrition
- Serving Size: 1 bar (1/12th of rec
- Calories: 280
- Fat: 20
- Carbohydrates: 18
- Protein: 4
Keywords: no-bake cheesecake bars, sprinkle crust, graduation dessert, easy cheesecake, party treats, no oven dessert