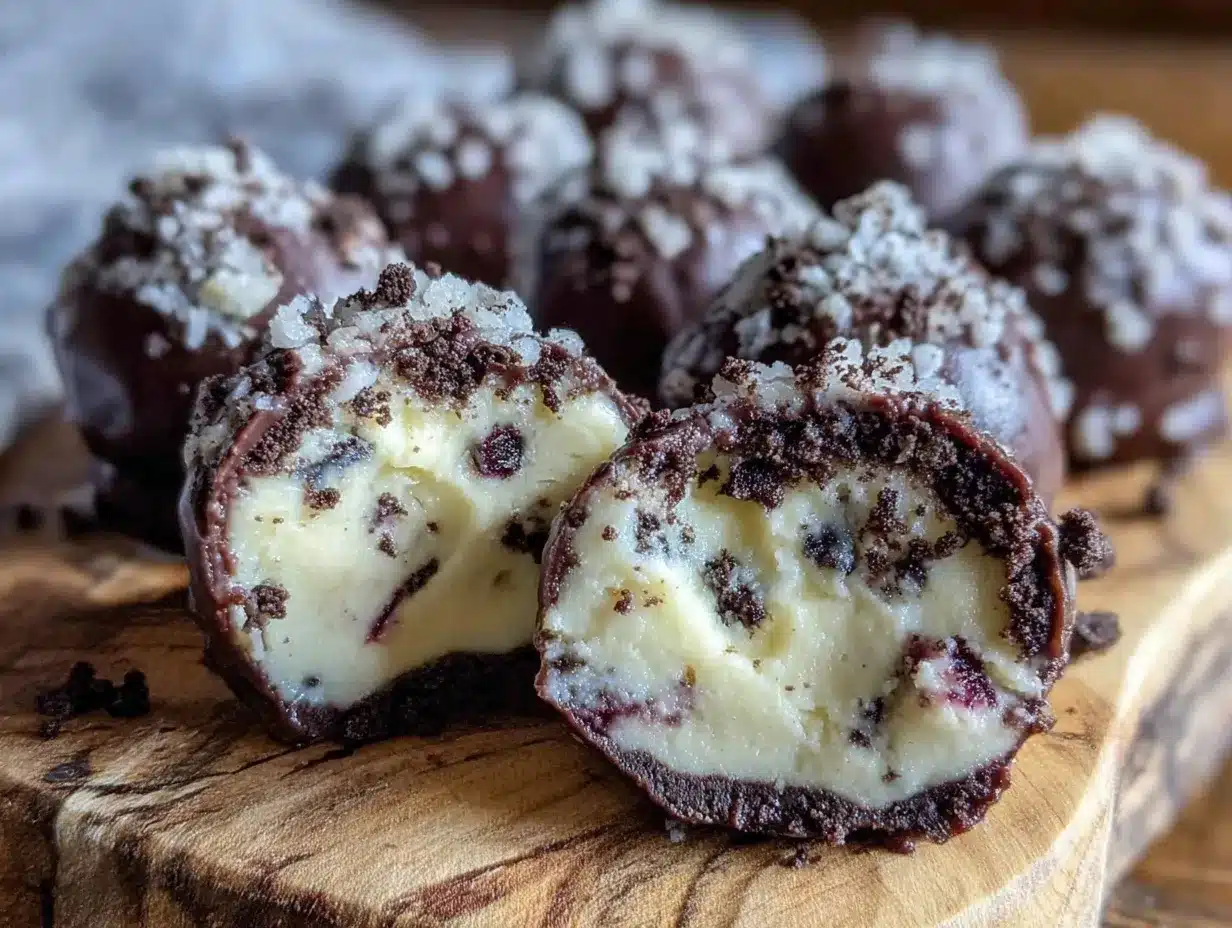
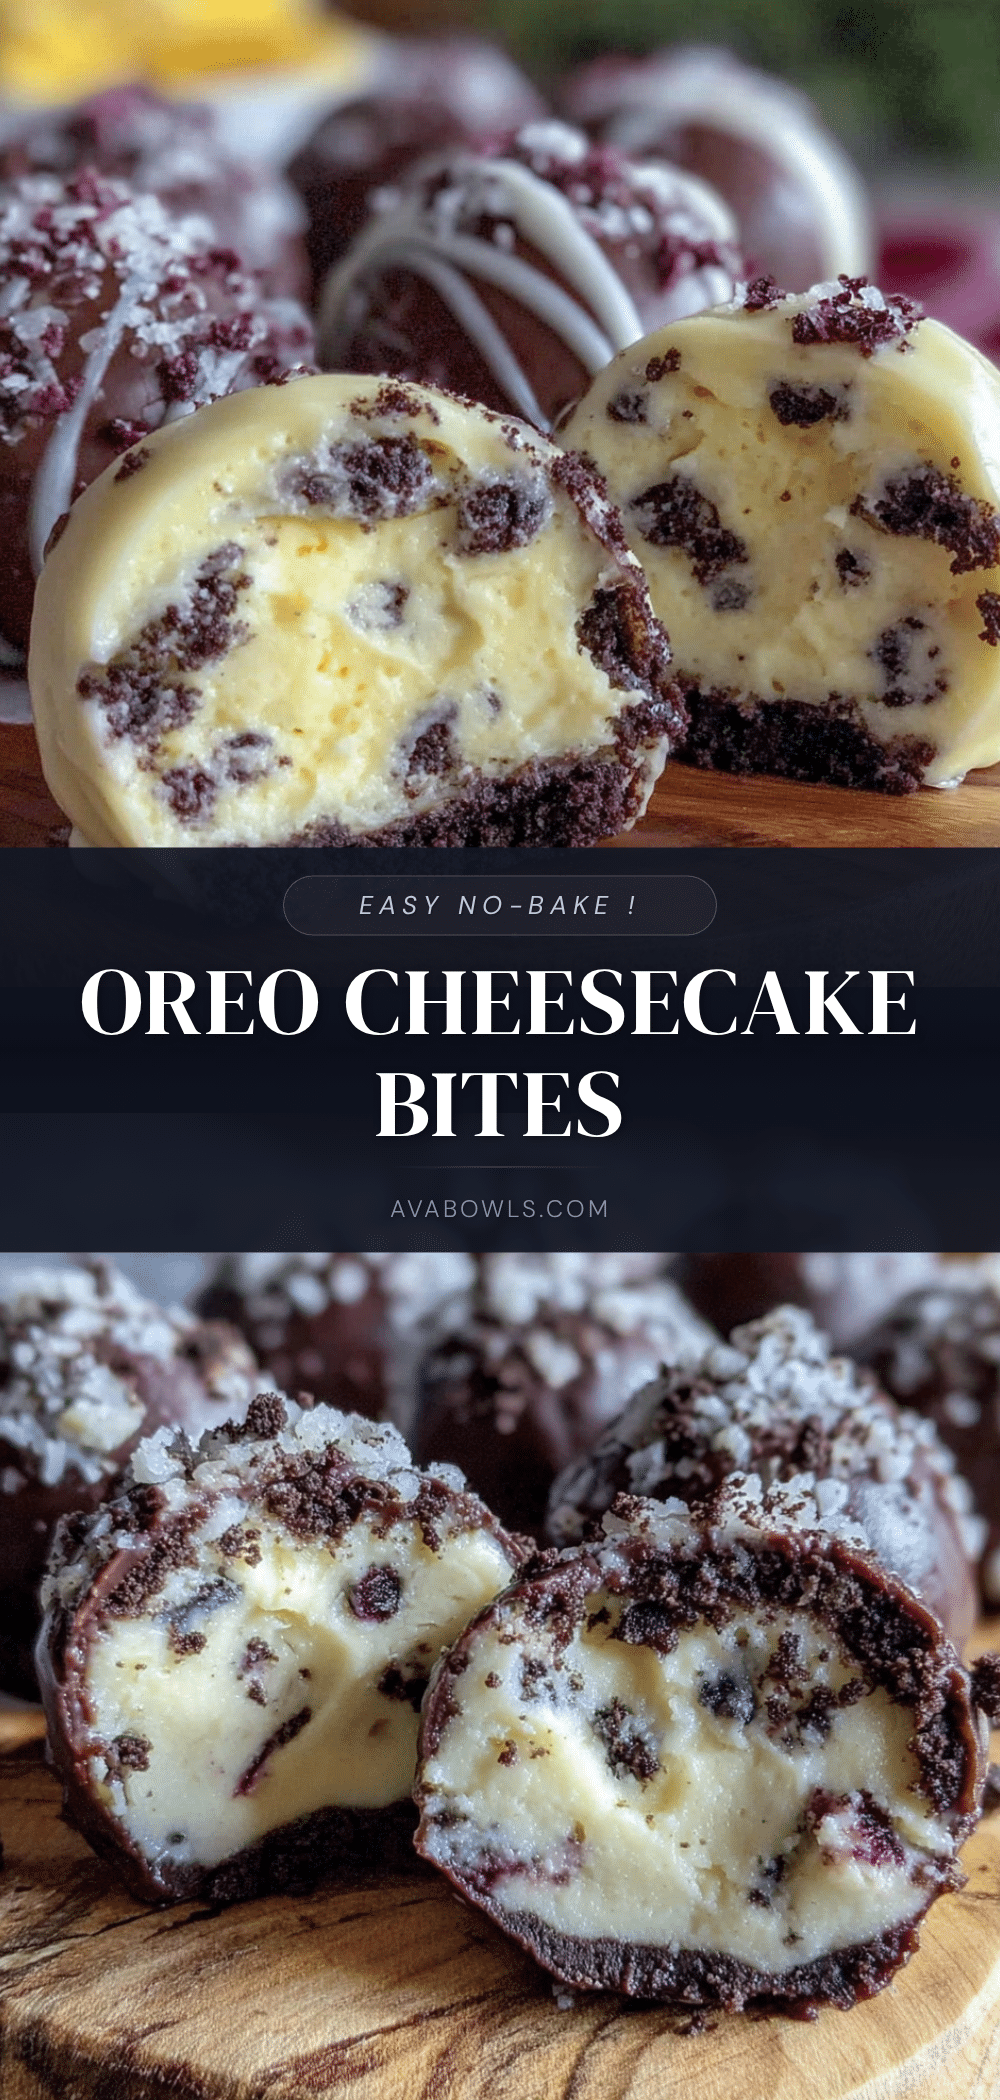
“You brought those Oreo cheesecake balls again? They’re addictive!” my coworker said, eyeing the container I’d set down at our office potluck. Honestly, I was a little surprised myself. This Easy 3-Ingredient No-Bake Oreo Cheesecake Balls recipe started as a lazy evening experiment after I realized I had no energy to bake but desperately wanted something sweet and crowd-pleasing. I just crushed some Oreos, mixed them with cream cheese and a bit of powdered sugar, rolled them up, and popped them in the fridge. That was it.
I wasn’t expecting much, honestly. But the next day, bites of these creamy, crunchy, and perfectly sweet little spheres disappeared faster than any dessert I’ve made before. People kept asking if I’d bring them again. I never thought something this simple could turn into a go-to party treat or an easy snack to whip up on a whim.
What sticks with me is how forgiving and quick this recipe is. No oven, no fuss, and just three ingredients—how often does that happen? Plus, the nostalgic Oreo flavor mixed with the tangy cream cheese is a combo that hits all the right notes without feeling heavy. It’s like the perfect little bite of comfort, especially when time or energy is low but you still want to impress or indulge.
So here I am, sharing this gem that came out of a sleepy night but somehow became a crowd favorite. If you’re anything like me—sometimes craving something sweet but not wanting to overcomplicate your life—these cheesecake balls will quietly become your secret weapon. And honestly, isn’t that the best kind of recipe?
Why You’ll Love This Recipe
From my many tests and tweaks, this Easy 3-Ingredient No-Bake Oreo Cheesecake Balls recipe earned its place in my dessert rotation for good reasons:
- Quick & Easy: Ready in under 30 minutes, perfect for busy nights or last-minute gatherings.
- Simple Ingredients: No special trips to the store; Oreos and cream cheese are pantry staples for most.
- Perfect for Parties: Great for potlucks, birthday celebrations, or casual get-togethers.
- Crowd-Pleaser: Kids, adults, skeptics alike keep coming back for more.
- Unbelievably Delicious: The creamy texture with crunchy Oreo bits makes every bite feel like a little celebration.
What sets this version apart? Instead of just blending Oreos and cream cheese, I’ve found that adding a touch of powdered sugar balances the flavors and firms up the balls without extra steps. Rolling them by hand gives a rustic, homemade look that’s way more charming than anything perfect and polished.
And honestly, this recipe hits that sweet spot where comfort food meets ease. It’s like having the best parts of a cheesecake without sweating over baking times or crusts. For a fuss-free dessert that still feels special, you can’t beat this.
What Ingredients You Will Need
This recipe uses simple, wholesome ingredients to deliver bold flavor and satisfying texture without the fuss. The ingredient list is straightforward, and you likely have most of these on hand already.
- Oreos: About 20 whole cookies (roughly 14 oz / 400 g). Classic Oreos work best; you can experiment with golden or flavored varieties for a twist.
- Cream Cheese: 8 oz (225 g), softened to room temperature. I recommend Philadelphia cream cheese for its smoothness and tang.
- Powdered Sugar: 1/4 cup (30 g), sifted to avoid lumps. This adds just enough sweetness and helps bind the mixture.
Optional additions, if you want to experiment later:
- 1 teaspoon vanilla extract (adds warmth and depth)
- Sprinkles or melted chocolate for coating (for presentation and extra flair)
For substitutions, you can try dairy-free cream cheese alternatives if needed, but the texture might vary slightly. If you want a gluten-free option, look for gluten-free Oreo-style cookies. Just be sure to crush them finely for better binding.
Equipment Needed
- Mixing Bowl: A medium to large bowl to combine ingredients comfortably.
- Food Processor or Blender: To crush Oreos finely. If you don’t have one, placing cookies in a sealed plastic bag and smashing with a rolling pin works fine.
- Spatula or Spoon: For mixing the cream cheese and crushed Oreos evenly.
- Baking Sheet or Plate: For placing the formed balls. Lined with parchment paper helps to prevent sticking.
- Refrigerator: Essential for chilling and setting the cheesecake balls.
In my experience, a food processor saves a lot of time and gives a finer crumb, but you can definitely get by without one. If you’re using a blender, just pulse carefully so you don’t turn the Oreos into a powder. And a silicone spatula makes mixing a breeze without scraping your knuckles.
Preparation Method
- Crush the Oreos: Place 20 Oreos (14 oz / 400 g) in a food processor and pulse until fine crumbs form. If you don’t have a processor, put the cookies in a sealed plastic bag and crush them with a rolling pin until you get fine crumbs but still some small chunks for texture. (About 5 minutes)
- Soften the Cream Cheese: Leave 8 oz (225 g) of cream cheese out at room temperature for about 30 minutes before mixing, or microwave for 10 seconds. This helps the cream cheese blend smoothly without lumps.
- Mix Ingredients: In a medium bowl, combine the softened cream cheese and 1/4 cup (30 g) powdered sugar. Beat or stir until creamy and smooth. Add the crushed Oreos and fold gently until evenly incorporated. The mixture should be thick but pliable. (5 minutes)
- Form the Balls: Using a tablespoon or small cookie scoop, portion the mixture and roll between your palms into 1-inch (2.5 cm) balls. Place on a parchment-lined baking sheet or plate. (10 minutes)
- Chill: Refrigerate the balls for at least 1 hour to firm up. This step is key for the texture to set right. (1 hour)
- Optional Decoration: Before serving, dip the balls in melted chocolate, roll in sprinkles, or dust with extra crushed Oreos for a fancy touch.
Pro tip: If the mixture feels too soft to roll, pop it back in the fridge for 10-15 minutes. If too crumbly, a tiny splash of milk or cream cheese can help.
Cooking Tips & Techniques
Even though this recipe is no-bake and straightforward, a few tricks make all the difference:
- Don’t skip softening the cream cheese. Cold cream cheese leads to lumps and uneven mixing. Room temperature cream cheese blends beautifully and creates a silky base.
- Crush Oreos to the right texture. You want fine crumbs but still some small chunks for texture. Too powdery and your balls can get dry; too chunky and they won’t hold together well.
- Use powdered sugar, not granulated. Powdered sugar dissolves quickly and adds smooth sweetness; granulated sugar could leave a gritty feel.
- Chill long enough. The chilling time allows the cream cheese to firm up and bind with the crumbs. Rushing this step means soft, sticky balls that won’t hold shape.
- Rolling tips: Keep your hands slightly damp or powdered sugar dusted to avoid too much sticking. You can also roll balls in crushed Oreos or cocoa powder for a pretty finish.
I remember the first time I skipped chilling — disaster. The balls fell apart, and I had to start over. Lesson learned: patience pays off with this one.
Variations & Adaptations
You can easily customize these cheesecake balls to suit different tastes or dietary needs:
- Flavor twists: Add a teaspoon of instant coffee granules for mocha-flavored balls or mix in a handful of mini chocolate chips for added texture.
- Seasonal versions: Swap Oreos with crushed peppermint cookies for a festive holiday treat or use golden Oreos for a milder flavor.
- Dietary swaps: Use dairy-free cream cheese and gluten-free sandwich cookies to make a vegan and gluten-free version that still tastes amazing.
- Coatings: Roll balls in toasted coconut flakes, chopped nuts, or dip in white or dark chocolate for an extra-special presentation.
- Personal favorite: I once mixed in a spoonful of peanut butter with the cream cheese for a nutty twist that disappeared almost as fast as the original.
For a fun change, try freezing these balls after chilling. They make a fantastic, cold bite perfect for warmer months.
Serving & Storage Suggestions
Serve these cheesecake balls chilled for the best texture and flavor. They’re perfect bite-sized treats at room temperature but tend to soften when left out too long.
Presentation-wise, place them on a pretty platter or in mini cupcake liners to keep things neat and inviting. Pair them with a cup of coffee or a creamy iced latte for a dreamy combo — something like the creamy matcha latte I love making alongside.
Store leftover balls in an airtight container in the refrigerator for up to 5 days. For longer storage, these freeze well for up to 2 months. To enjoy, thaw in the fridge overnight or for a few hours, then bring to room temperature before serving.
Interestingly, the flavors mellow and blend even more after a day or two, making them taste even richer if you plan ahead.
Nutritional Information & Benefits
Each ball (about 1-inch diameter) contains roughly:
| Nutrient | Amount |
|---|---|
| Calories | 90-110 kcal |
| Fat | 6-7 g |
| Carbohydrates | 9-11 g |
| Protein | 1-2 g |
The recipe is indulgent but portion-controlled by its bite-sized nature. Cream cheese provides calcium and some protein, while Oreos add sugar and carbs for that sweet kick. If you want a lower-sugar version, try using light cream cheese and reducing powdered sugar or using a sugar substitute.
Note: Contains dairy and gluten (unless gluten-free cookies are used). Always check ingredient labels if allergies are a concern.
Conclusion
This Easy 3-Ingredient No-Bake Oreo Cheesecake Balls recipe is proof that sometimes the simplest ideas turn into the best desserts. It’s quick, requires no baking skills, and delivers that rich, creamy, crunchy Oreo goodness every time. I love how adaptable it is, too—whether you want to keep it classic or add your own spin.
Give it a try, and don’t hesitate to make it your own. I’ve found that sharing these balls sparks smiles and requests to bring them again, so they’re a perfect little treat to brighten your day or impress your friends.
And hey, if you’re in the mood for a savory snack alongside, you might enjoy whipping up this creamy beer cheese pretzel dip—it’s another easy recipe that always steals the show.
Happy no-baking! Let those Oreo cheesecake balls be your next sweet success.
FAQs
Can I make these Oreo cheesecake balls ahead of time?
Yes! They’re great made a day in advance and stored in the fridge. The flavors even improve after sitting for a bit.
What if I don’t have a food processor to crush the Oreos?
No worries. Place the Oreos in a sealed plastic bag and crush them with a rolling pin or the bottom of a heavy pan until finely broken but with some texture.
Can I freeze the cheesecake balls?
Absolutely. Freeze them in an airtight container for up to 2 months. Thaw in the fridge overnight before serving.
Are there any good alternatives to cream cheese?
You can try mascarpone for a richer taste or dairy-free cream cheese for a vegan version, but the texture and flavor might vary slightly.
How do I make these Oreo cheesecake balls less sweet?
Reduce the powdered sugar amount or use light cream cheese to cut down on sweetness without sacrificing balance.
Pin This Recipe!
Easy 3-Ingredient No-Bake Oreo Cheesecake Balls

A quick and easy no-bake dessert made with just Oreos, cream cheese, and powdered sugar. Perfect for parties and last-minute treats with a creamy, crunchy texture.
- Prep Time: 15 minutes
- Cook Time: 0 minutes
- Total Time: 1 hour 15 minutes
- Yield: 20 servings 1x
- Category: Dessert
- Cuisine: American
Ingredients
- 20 whole Oreos (about 14 oz / 400 g)
- 8 oz (225 g) cream cheese, softened to room temperature
- 1/4 cup (30 g) powdered sugar, sifted
Instructions
- Crush the Oreos: Place 20 Oreos (14 oz / 400 g) in a food processor and pulse until fine crumbs form. If you don’t have a processor, put the cookies in a sealed plastic bag and crush them with a rolling pin until you get fine crumbs but still some small chunks for texture. (About 5 minutes)
- Soften the Cream Cheese: Leave 8 oz (225 g) of cream cheese out at room temperature for about 30 minutes before mixing, or microwave for 10 seconds to soften.
- Mix Ingredients: In a medium bowl, combine the softened cream cheese and 1/4 cup (30 g) powdered sugar. Beat or stir until creamy and smooth. Add the crushed Oreos and fold gently until evenly incorporated. The mixture should be thick but pliable. (5 minutes)
- Form the Balls: Using a tablespoon or small cookie scoop, portion the mixture and roll between your palms into 1-inch (2.5 cm) balls. Place on a parchment-lined baking sheet or plate. (10 minutes)
- Chill: Refrigerate the balls for at least 1 hour to firm up. This step is key for the texture to set right. (1 hour)
- Optional Decoration: Before serving, dip the balls in melted chocolate, roll in sprinkles, or dust with extra crushed Oreos for a fancy touch.
Notes
If the mixture feels too soft to roll, chill it for 10-15 minutes. If too crumbly, add a tiny splash of milk or cream cheese. Use powdered sugar instead of granulated for smooth sweetness. Chill long enough to allow the balls to firm up and hold shape. Rolling hands slightly damp or dusted with powdered sugar helps prevent sticking.
Nutrition
- Serving Size: 1 ball (about 1 inch
- Calories: 90110
- Fat: 67
- Carbohydrates: 911
- Protein: 12
Keywords: Oreo cheesecake balls, no-bake dessert, easy party treats, 3-ingredient dessert, Oreo snacks, no-bake cheesecake, quick desserts