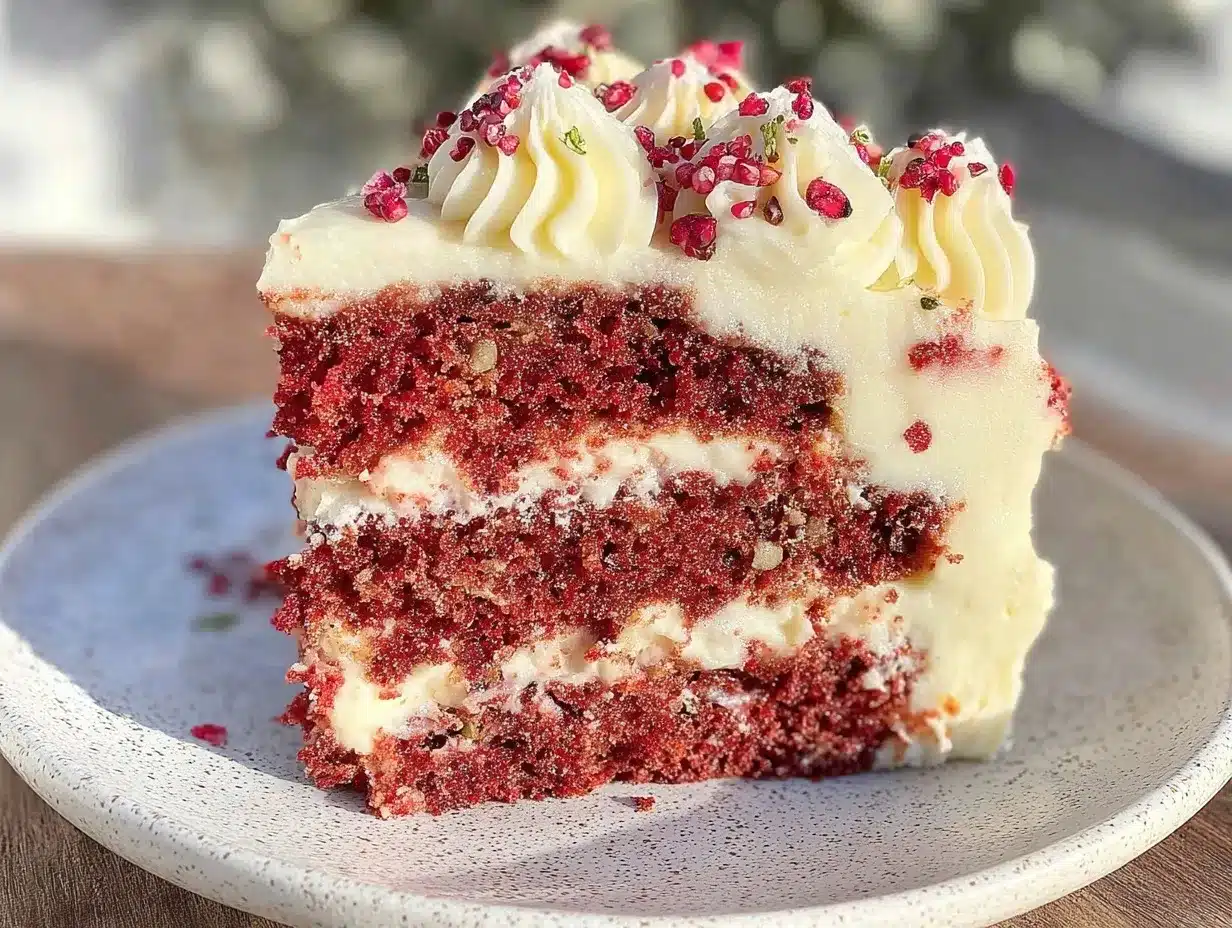
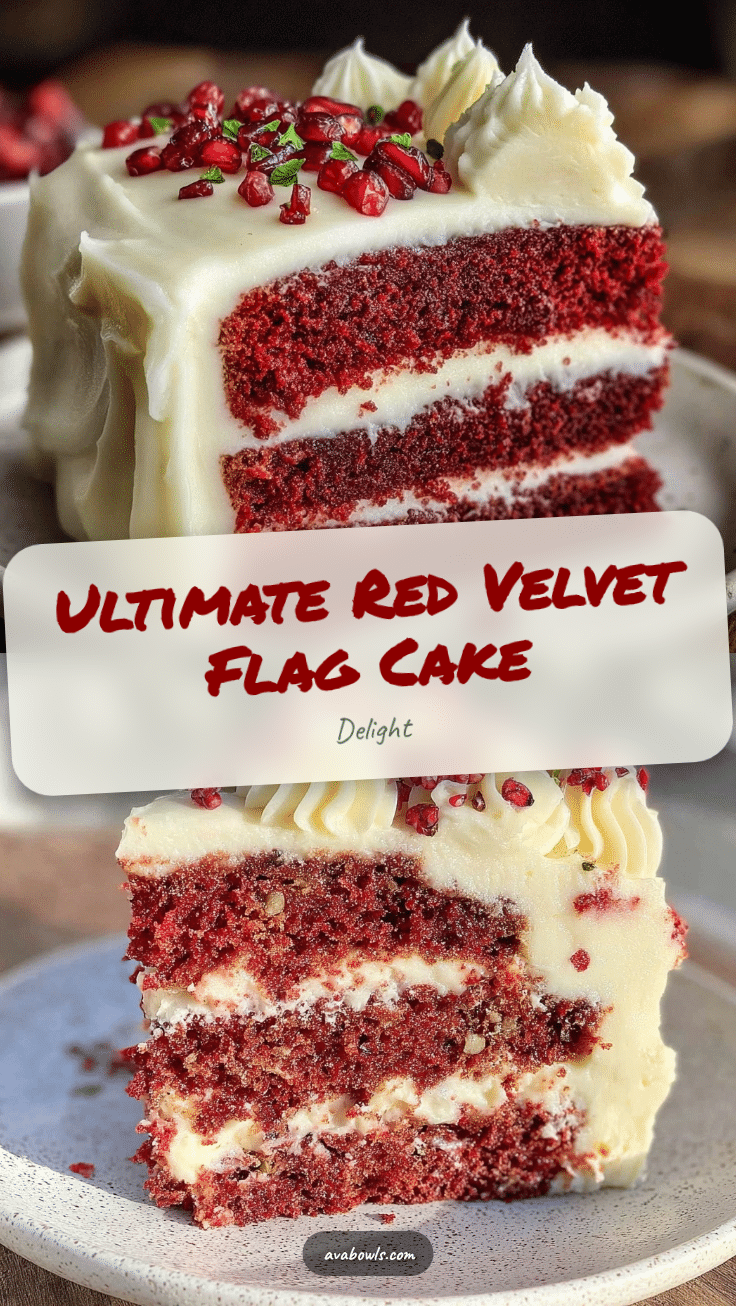
That sharp tang of cream cheese frosting, just as it brushes past your nose, still takes me back to a chilly autumn afternoon in my grandmother’s kitchen. The light was soft and golden, slipping through lace curtains while the hum of a mixer blended with the subtle crackle of a vinyl record spinning somewhere in the background. I remember how the deep red velvet cake layers were stacked carefully, each one wrapped in a thick, luscious coat of cream cheese frosting that smelled faintly of vanilla and a hint of lemon zest. There was always a quiet sense of anticipation at those moments—no rush, just the gentle, intimate ritual of baking something special.
Making the perfect Red Velvet Flag Cake with Cream Cheese Frosting became a kind of culinary meditation for me, a way to slow down and honor that memory. This cake isn’t just about its striking red layers or the creamy frosting that melts in your mouth; it’s about the feel of the batter slipping through your fingers, the subtle cocoa notes mingling with the tangy sweetness, and the way the frosting brings everything together in a cozy, comforting hug. Honestly, it’s the kind of recipe that sticks with you, not because it’s fancy or complicated, but because it feels like home, like a quiet promise of joy baked into every bite.
And so, this Red Velvet Flag Cake recipe isn’t just another celebration dessert—it’s a nod to those moments that linger, the ones where food connects us to memory and comfort without fuss or flash. I learned early that the secret lies in the balance: rich but not heavy, sweet but not cloying, and that unmistakable cream cheese frosting that ties it all together. If you’re looking for a cake that feels like a warm, familiar story told through flavors, this is it.
Why You’ll Love This Recipe
Honestly, this Perfect Red Velvet Flag Cake with Cream Cheese Frosting has been my go-to for birthdays, holidays, or when I just want a little slice of joy. Here’s why it’s a keeper:
- Quick & Easy: You can whip up the batter and frosting in under an hour, making it perfect for last-minute celebrations or sweet cravings.
- Simple Ingredients: No need for specialty shopping trips—mostly pantry staples and a few fresh ingredients you likely have on hand.
- Perfect for Parties: The visually stunning flag design makes it a showstopper for patriotic holidays, birthdays, or even casual get-togethers.
- Crowd-Pleaser: Kids and adults alike rave about the moist, tender crumb paired with the tangy, smooth cream cheese frosting.
- Unbelievably Delicious: The subtle cocoa undertones combined with the silky frosting deliver a deeply satisfying flavor combo that feels like comfort food reinvented.
This isn’t just any red velvet cake. The trick is in the way the batter is gently folded to keep it light and airy, plus the frosting recipe that blends cream cheese with just a touch of butter and a splash of vanilla to keep it creamy without being overpowering. Plus, the flag pattern isn’t just pretty—it’s a fun, festive touch that makes the cake feel special without extra fuss.
For me, this recipe stuck because it’s the kind of cake you can make on a whim and still impress everyone around the table. It’s comforting without being heavy, familiar but with a little twist, and honestly, it’s the kind of dessert that makes you pause and savor the moment.
What Ingredients You Will Need
This recipe calls for simple, wholesome ingredients that come together to create bold flavor and a moist, tender texture without complicated steps. Most are pantry staples, with a few fresh basics to round it out.
- For the Cake Batter:
- All-purpose flour – 2 ½ cups (315g), sifted (I prefer King Arthur Flour for consistent texture)
- Granulated sugar – 1 ½ cups (300g)
- Unsweetened cocoa powder – 2 tablespoons (use Dutch-processed if possible for a smoother chocolate note)
- Baking soda – 1 teaspoon
- Salt – ½ teaspoon
- Buttermilk – 1 cup (240ml), room temperature (adds tang and moisture)
- Vegetable oil – 1 cup (240ml) (neutral flavor, keeps cake moist)
- Large eggs – 2, room temperature (helps with structure and richness)
- Red food coloring – 2 tablespoons (gel color works best for vibrant hue without thinning batter)
- White vinegar – 1 teaspoon (reacts with baking soda for lift)
- Pure vanilla extract – 2 teaspoons
- For the Cream Cheese Frosting:
- Cream cheese – 8 oz (225g), softened (Philadelphia brand gives the best tang)
- Unsalted butter – ½ cup (115g), softened (adds richness and smooth texture)
- Powdered sugar – 4 cups (480g), sifted (for smooth, lump-free frosting)
- Pure vanilla extract – 1 teaspoon
- Fresh lemon juice – 1 teaspoon (brightens the frosting flavor)
Substitution tips: If you don’t have buttermilk, mix 1 tablespoon lemon juice or white vinegar with 1 cup milk and let it sit for 5 minutes. For a dairy-free option, try coconut cream cheese and vegan butter substitutes, but the flavor will shift slightly. If you want a gluten-free version, almond or oat flour can work, but the texture will be different.
Equipment Needed
- Two 9-inch (23 cm) round cake pans – non-stick or well-greased, or use springform pans for easy removal
- Mixing bowls – one large for dry ingredients, one for wet
- Electric mixer or stand mixer – for smooth, consistent batter and frosting
- Sifter or fine mesh sieve – to sift flour, cocoa, and powdered sugar (important for light texture)
- Rubber spatula – for folding ingredients gently without deflating the batter
- Offset spatula or butter knife – for spreading frosting evenly
- Cake turntable (optional) – helpful for decorating, but not necessary
- Measuring cups and spoons – for precise ingredient amounts
Personal note: I’ve found that a stand mixer makes the frosting incredibly smooth, but a handheld mixer works just as well. If you don’t have a cake turntable, placing your cake on a large plate and rotating the plate with your hand works fine when frosting. For budget-friendly pans, simple non-stick aluminum pans work great when greased and lined with parchment.
Preparation Method
- Preheat your oven to 350°F (175°C). Grease and flour two 9-inch cake pans, or line them with parchment paper for easy removal. Set aside. (10 minutes)
- Mix the dry ingredients: In a large bowl, sift together the flour, cocoa powder, baking soda, and salt. Whisk gently to combine and set aside. (5 minutes)
- Combine the wet ingredients: In another bowl, whisk the sugar and vegetable oil until well mixed. Add the eggs one at a time, beating well after each addition. Stir in the buttermilk, red food coloring, vinegar, and vanilla extract until fully combined. (7 minutes)
- Combine wet and dry: Slowly add the dry ingredients to the wet, folding gently with a rubber spatula. Be careful not to overmix—the batter should be smooth but light and airy. Overmixing can make the cake dense. (5 minutes)
- Divide and bake: Pour the batter evenly into the prepared pans. Tap the pans lightly on the counter to release air bubbles. Bake for 30-35 minutes, or until a toothpick inserted in the center comes out clean. (30-35 minutes)
- Cool the cakes: Let the cakes cool in the pans for about 10 minutes before transferring to wire racks to cool completely. This prevents the frosting from melting. (At least 1 hour)
- Prepare the frosting: Beat the softened cream cheese and butter together until smooth and fluffy (about 3-5 minutes). Gradually add the sifted powdered sugar, one cup at a time, mixing on low speed until combined. Add vanilla extract and lemon juice, then increase speed to medium-high and beat until light and creamy. (10 minutes)
- Assemble the flag cake: Slice each cake layer horizontally into three even layers (you’ll have six layers total). Arrange three layers side-by-side horizontally on your serving platter, then spread a thin layer of frosting on each. Stack the remaining three layers vertically on top, again frosting between each layer. The visual flag effect comes from this crosswise layering. (15-20 minutes)
- Frost the entire cake: Spread a thin crumb coat over the whole cake and chill for 20 minutes. Then apply a thicker, smooth layer of frosting all around. Use an offset spatula to create clean edges or a rustic look, whichever you prefer. (30 minutes)
- Final touches: Chill the cake for at least an hour before serving to let the layers settle and flavors meld. (1 hour or more)
Tip: If the batter looks a little thick, don’t worry—it’s supposed to be dense enough to hold the layers but still moist. When slicing the cake layers, use a serrated knife and a slow sawing motion to keep the layers even. If your frosting feels too soft, pop it in the fridge for 15 minutes, then whip again before spreading.
Cooking Tips & Techniques
Getting this Red Velvet Flag Cake just right takes a few tricks I’ve picked up over time. First, always use room temperature eggs and buttermilk—they blend more easily and help the batter come together smoothly. I’ve noticed that gel food coloring makes the red hue deep and vibrant without watering down the batter, unlike liquid food coloring.
When mixing the batter, folding gently is key. Overmixing can toughen the crumb, and honestly, it’s easy to get carried away when you’re excited. I remind myself to stop as soon as the dry ingredients disappear. For the cream cheese frosting, patience is your friend—beat the cream cheese and butter really well to avoid lumps and a grainy texture.
One mistake I made early on was skipping the crumb coat before the final frosting. That thin layer traps loose crumbs so you get a smooth finish without flecks of cake in your frosting. Also, chilling the cake between steps helps the layers set so your flag design stays neat.
Timing-wise, I usually prepare the frosting while the cake cools to make efficient use of time. If you’re prepping ahead, the cake layers can be wrapped tightly in plastic wrap and frozen for a few days—just thaw before frosting.
Variations & Adaptations
This recipe is surprisingly flexible, which makes it fun to tweak depending on your mood or dietary needs.
- Flavor twist: Add a teaspoon of espresso powder to the dry ingredients to intensify the cocoa flavor without making it taste like coffee.
- Seasonal adaptation: Swap the classic cream cheese frosting for a whipped mascarpone frosting with a hint of orange zest for a lighter, citrusy finish in spring or summer.
- Dietary swaps: For gluten-free, use a 1:1 gluten-free baking flour blend (Bob’s Red Mill works well) and ensure your cocoa powder is gluten-free certified. For dairy-free, try vegan cream cheese and coconut oil-based frosting.
- Decorative options: Instead of the flag pattern, try layering the cake as a traditional stacked round and topping with fresh berries or edible flowers for a fresh look.
- Personal favorite: I once added a thin layer of homemade cherry jam between layers for a surprise burst of tartness that balanced the rich cream cheese frosting beautifully.
Serving & Storage Suggestions
This cake shines best served slightly chilled or at cool room temperature—the frosting should be firm but still creamy. I love slicing it with a sharp serrated knife, wiping the blade clean between cuts for tidy slices. It pairs beautifully with a cup of strong coffee, a glass of cold milk, or even a light sparkling rosé for celebrations.
Store leftover cake covered tightly with plastic wrap or in an airtight container in the refrigerator for up to 4 days. The cream cheese frosting means it’s safer to keep chilled. You can freeze slices wrapped individually in plastic wrap and placed in a freezer bag for up to 2 months. Thaw overnight in the fridge before enjoying.
Fun fact: The flavors actually deepen after a day or two, so if you can wait, the cake tastes even better the next day. Just bring it out of the fridge 20 minutes before serving to soften the frosting slightly.
Nutritional Information & Benefits
Per serving (assuming 12 servings): approximately 350 calories, 18g fat, 45g carbohydrates, 3g protein.
This cake delivers a satisfying treat with the richness of cream cheese and moderate sugar levels. Using buttermilk adds calcium and probiotics, while the cocoa powder contributes antioxidants. The recipe is adaptable for gluten-free and dairy-free diets, making it approachable for many.
From a wellness perspective, enjoying a slice of this red velvet cake is about balance—savoring the moment, and the flavors, without guilt. It’s a reminder that homemade treats, made with care, can be part of a joyful eating experience.
Conclusion
The Perfect Red Velvet Flag Cake with Cream Cheese Frosting is more than just a dessert—it’s a little ceremony of flavor and memory, one that I return to whenever I want something comforting but special. The cake’s moist crumb, the tangy frosting, and that festive flag pattern come together in a way that feels both timeless and fun.
Feel free to play around with the recipe to match your own tastes or occasion. Maybe you’ll add a twist or two, or keep it classic like I do most times. Either way, it’s a recipe that’s worth keeping in your baking repertoire.
And hey, if you’re into creamy homemade sauces, you might find inspiration in my Creamy Spring Vegetable Fettuccine Alfredo or the rich, smoky flavors of my Creamy Beer Cheese Pretzel Dip recipes—both perfect companions for your next cozy gathering.
Thanks for baking along with me. I’d love to hear how your cake turns out or any personal twists you try!
Frequently Asked Questions
- Can I make this Red Velvet Flag Cake ahead of time?
Yes! You can bake the cake layers and make the frosting up to two days ahead. Store layers wrapped tightly in plastic wrap and keep the frosting refrigerated. Assemble and frost the cake the day you plan to serve it. - What if I don’t have buttermilk?
No worries. Mix 1 tablespoon of white vinegar or lemon juice with 1 cup of milk and let it sit for 5 minutes. This homemade buttermilk substitute works well in the recipe. - How do I get the vibrant red color without artificial food coloring?
Natural color alternatives like beet juice or powder can be used, but the color may be less intense and the flavor slightly earthy. Gel food coloring typically gives the most vibrant, true red velvet color. - Can I make this cake gluten-free?
Absolutely. Use a 1:1 gluten-free baking flour blend, and double-check your cocoa powder is gluten-free. The texture might be a little different but still delicious. - Why does my cream cheese frosting sometimes turn out runny?
This usually happens if the cream cheese or butter is too warm or if the powdered sugar is added too quickly. Chill the frosting briefly and beat again to restore firmness before spreading.
Pin This Recipe!
Perfect Red Velvet Flag Cake with Easy Homemade Cream Cheese Frosting
A moist and tender red velvet cake with subtle cocoa undertones, layered in a festive flag pattern and topped with a tangy, smooth cream cheese frosting. Perfect for celebrations and comforting moments alike.
- Prep Time: 25 minutes
- Cook Time: 30-35 minutes
- Total Time: 2 hours 30 minutes
- Yield: 12 servings 1x
- Category: Dessert
- Cuisine: American
Ingredients
- 2 ½ cups (315g) all-purpose flour, sifted
- 1 ½ cups (300g) granulated sugar
- 2 tablespoons unsweetened cocoa powder (preferably Dutch-processed)
- 1 teaspoon baking soda
- ½ teaspoon salt
- 1 cup (240ml) buttermilk, room temperature
- 1 cup (240ml) vegetable oil
- 2 large eggs, room temperature
- 2 tablespoons red food coloring (gel preferred)
- 1 teaspoon white vinegar
- 2 teaspoons pure vanilla extract
- 8 oz (225g) cream cheese, softened
- ½ cup (115g) unsalted butter, softened
- 4 cups (480g) powdered sugar, sifted
- 1 teaspoon pure vanilla extract
- 1 teaspoon fresh lemon juice
Instructions
- Preheat oven to 350°F (175°C). Grease and flour two 9-inch cake pans or line with parchment paper. Set aside.
- In a large bowl, sift together flour, cocoa powder, baking soda, and salt. Whisk gently to combine and set aside.
- In another bowl, whisk sugar and vegetable oil until well mixed. Add eggs one at a time, beating well after each addition. Stir in buttermilk, red food coloring, vinegar, and vanilla extract until fully combined.
- Slowly add dry ingredients to wet ingredients, folding gently with a rubber spatula. Avoid overmixing; batter should be smooth, light, and airy.
- Divide batter evenly between prepared pans. Tap pans lightly to release air bubbles. Bake for 30-35 minutes or until a toothpick inserted in the center comes out clean.
- Cool cakes in pans for 10 minutes, then transfer to wire racks to cool completely (at least 1 hour).
- For frosting, beat cream cheese and butter until smooth and fluffy (3-5 minutes). Gradually add powdered sugar one cup at a time on low speed until combined. Add vanilla extract and lemon juice, then beat on medium-high until light and creamy (about 10 minutes).
- Slice each cake layer horizontally into three even layers (six layers total). Arrange three layers side-by-side horizontally on serving platter, spreading a thin layer of frosting between each. Stack remaining three layers vertically on top, frosting between each layer to create the flag pattern.
- Spread a thin crumb coat over entire cake and chill for 20 minutes. Apply a thicker, smooth layer of frosting all around using an offset spatula.
- Chill cake for at least 1 hour before serving to let layers settle and flavors meld.
Notes
Use room temperature eggs and buttermilk for best batter consistency. Gel food coloring provides the most vibrant red color. Fold batter gently to keep it light and airy. Chill frosting if too soft before spreading. Use a serrated knife with a slow sawing motion to slice cake layers evenly. Crumb coat before final frosting for smooth finish. Cake layers can be frozen wrapped tightly and thawed before frosting.
Nutrition
- Serving Size: 1 slice (1/12 of cak
- Calories: 350
- Fat: 18
- Carbohydrates: 45
- Protein: 3
Keywords: red velvet cake, cream cheese frosting, flag cake, easy cake recipe, celebration cake, homemade frosting, moist cake, festive dessert