Introduction
“You sure those cookies are done?” my roommate asked, peering suspiciously into the oven. Honestly, I wasn’t convinced either. I’d just finished experimenting with a batch of extra thick brown butter chocolate chip cookies, and the dough looked like something that might never bake through. But as soon as they came out, the intoxicating aroma of browned butter mixed with melting chocolate filled the kitchen, making us both pause and forget our doubts.
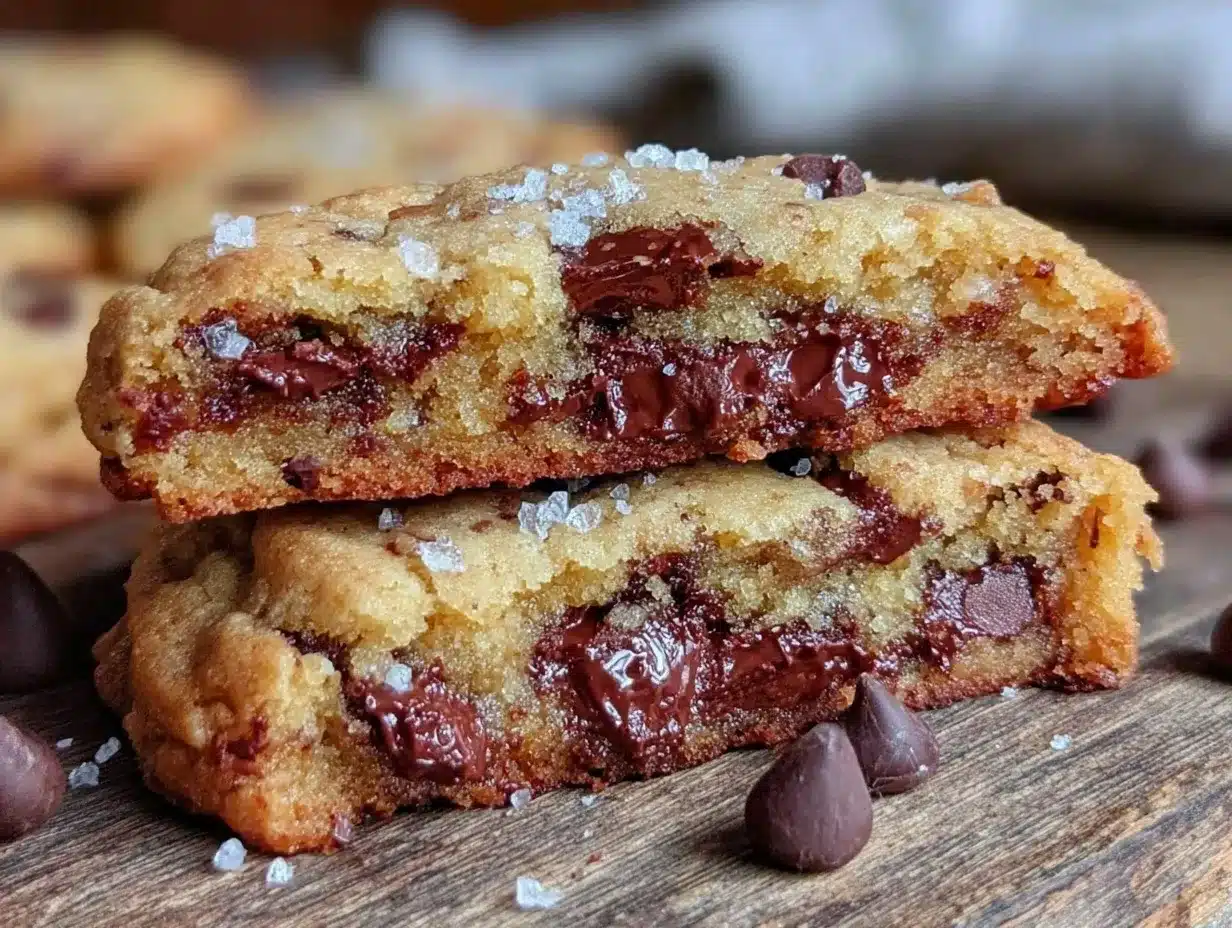
There was this moment — the first bite — where the edges gave a perfect crisp snap, while the center stayed tender and impossibly thick. It’s funny how a simple tweak, like browning the butter just right and doubling down on thickness, can flip your cookie game upside down. I ended up making these cookies three times that week alone, much to my own surprise and the delight of anyone who walked by.
What stuck with me was the way these cookies felt like a cozy hug — crisp yet soft, rich but not overwhelming, balancing nostalgia with a little grown-up twist. They’re not just another chocolate chip cookie; they’re the kind that makes you close your eyes and savor the moment, whether you’re sneaking one late at night or sharing with friends after a long day. That’s why this recipe never left my repertoire.
Why You’ll Love This Recipe
This crispy-tender extra thick brown butter chocolate chip cookies recipe isn’t just a random cookie—it’s a carefully built comfort treat that’s stood up to multiple rounds of testing and hungry taste testers. Here’s why I keep coming back to it:
- Quick & Easy: Although the cookies look fancy, they come together in about 25 minutes prep time. Perfect for busy evenings or spontaneous cravings.
- Simple Ingredients: You probably have everything in your pantry already—brown butter, chocolate chips, flour, and a few staples. No need for special trips.
- Perfect for Sharing: Whether it’s a casual get-together or a last-minute dessert, these cookies impress without stress.
- Crowd-Pleaser: From kids to adults, the texture and flavor get rave reviews every time.
- Unbelievably Delicious: The brown butter adds a nutty depth, and the extra thickness means you get that chewy center with crispy edges every single time.
What really sets this cookie apart is the brown butter step — not just melting it, but cooking until it’s golden and fragrant, a touch more caramelized than usual. This adds a complexity that no plain butter cookie has. Plus, making the dough extra thick means you get these giant, satisfyingly hefty cookies that stand out on a plate. It’s honestly the best version I’ve found after trying countless recipes and tweaking ratios.
These cookies fit nicely alongside savory snacks like my creamy butternut squash soup recipe, where the warm, rich flavors balance each other beautifully. So whether you’re craving a sweet finish or a cozy pick-me-up, this recipe delivers that quiet satisfaction that keeps you coming back.
What Ingredients You Will Need
This recipe uses straightforward, wholesome ingredients to create a cookie that’s both rich in flavor and perfect in texture. Most of these should be pantry staples, with a few notes on quality and substitutions.
- Unsalted Butter, 1 cup (227g), browned until nutty and fragrant (this is the star ingredient for flavor)
- Granulated Sugar, ¾ cup (150g), for sweetness and crispy edges
- Light Brown Sugar, 1 cup (220g), packed, adds moisture and chewiness
- Large Eggs, 2, room temperature to help bind and build structure
- Pure Vanilla Extract, 2 teaspoons, for that warm, classic cookie aroma
- All-Purpose Flour, 3 cups (375g), sifted for lightness and structure (King Arthur Flour works great for consistent results)
- Baking Soda, 1 teaspoon, helps with spread and rise
- Salt, 1½ teaspoons, balances sweetness and boosts flavor
- Semi-Sweet Chocolate Chips, 2 cups (340g), generous amount for melty pockets of chocolate (I prefer Ghirardelli or Guittard chips for their rich taste)
Substitution Tips: For a gluten-free option, swap all-purpose flour with a 1-to-1 gluten-free baking flour blend. Use coconut oil instead of butter if dairy-free, but the flavor will be slightly different (brown butter notes are unique). If you want a twist, try dark chocolate chunks or a mix of milk and dark chips.
Equipment Needed
- Large mixing bowl and medium bowl for dry ingredients
- Heavy-bottomed saucepan or skillet for browning butter (a stainless steel pan works well to monitor color)
- Electric mixer or sturdy wooden spoon for mixing dough
- Baking sheet lined with parchment paper or silicone baking mat
- Cookie scoop (about 3 tablespoons size) to portion out thick dough evenly
- Cooling rack to let cookies rest without sogginess
If you don’t have a cookie scoop, use two spoons to shape the dough balls. For browning butter, keep a close eye — it can go from golden to burnt quickly. I like using a glass or light-colored pan so I can see the color changes better.
Budget tip: If you don’t own a silicone baking mat, parchment paper works just fine and makes cleanup a breeze — which you’ll appreciate after making multiple batches because, trust me, you will.
Preparation Method
- Brown the Butter (about 6-8 minutes): In a medium saucepan over medium heat, melt 1 cup (227g) of unsalted butter. Stir frequently as the butter foams, then begins to brown and smell nutty. Watch carefully — once it reaches a golden amber color with toasted bits, remove from heat immediately to prevent burning. Transfer browned butter to a heatproof bowl to cool slightly.
- Mix Sugars and Butter (5 minutes): In a large mixing bowl, combine the browned butter (still warm but not hot), ¾ cup (150g) granulated sugar, and 1 cup (220g) light brown sugar. Beat until smooth and creamy using an electric mixer or wooden spoon.
- Add Eggs and Vanilla (2 minutes): Beat in 2 large eggs, one at a time, followed by 2 teaspoons pure vanilla extract. The mixture will look glossy and thick.
- Combine Dry Ingredients (3 minutes): In a separate bowl, whisk 3 cups (375g) sifted all-purpose flour, 1 teaspoon baking soda, and 1½ teaspoons salt.
- Incorporate Dry Ingredients (3-4 minutes): Gradually add the dry ingredients to the wet mixture, stirring until just combined. Avoid overmixing to keep cookies tender.
- Fold in Chocolate Chips (2 minutes): Gently fold 2 cups (340g) semi-sweet chocolate chips into the dough, making sure they’re evenly distributed without breaking them up.
- Chill Dough (at least 30 minutes): Cover the bowl with plastic wrap and refrigerate. This step helps the dough firm up for extra thick cookies and prevents too much spread during baking.
- Preheat Oven and Prepare Baking Sheet (10 minutes): Preheat oven to 350°F (175°C). Line baking sheets with parchment or silicone mats.
- Scoop Dough and Bake (12-15 minutes): Using a cookie scoop or two spoons, portion 3-tablespoon-sized dough balls spaced about 3 inches apart. Bake for 12 to 15 minutes until edges are golden and centers look set but still soft. The cookies will firm up as they cool.
- Cool on Rack (15 minutes): Let cookies cool on the baking sheet for 5 minutes, then transfer to a wire rack to cool completely. This avoids soggy bottoms and preserves crisp edges.
Tip: If your kitchen is warm, chilling the dough longer helps keep the cookies chunky and thick. Also, resist the urge to bake multiple trays at once on different oven racks — it can cause uneven baking. One tray at a time is your best bet for consistent results.
Cooking Tips & Techniques
Brown butter can be intimidating, but the trick is patience and attention. Stir constantly, and once you smell that nutty aroma, don’t step away. Pull it off the heat just before it looks too dark — the residual heat will carry it a bit further.
For extra thick cookies, don’t skimp on chilling the dough. I once tried baking right after mixing, and the cookies spread out thin and flat, missing that chewy heart I was after.
Using a cookie scoop ensures uniform size and bake time. If you don’t have one, shape dough balls tightly so they don’t spread too much.
Common mistake: overmixing the dough after adding flour. This can create tougher cookies. Stir just enough to bring the dough together.
Multi-tasking tip: While the dough chills, prep your kitchen tools or clean up. It’s a nice breather and keeps the process smooth.
For consistent chewiness, watch the baking time closely—pull them out when edges are golden but centers still look slightly underdone. They’ll set up as they cool.
Variations & Adaptations
- Nutty Twist: Add ½ cup chopped walnuts or pecans for crunch that complements the brown butter’s nuttiness.
- Salted Caramel: Sprinkle flaky sea salt on top right after baking for that perfect sweet-salty contrast.
- Gluten-Free: Use a 1-to-1 gluten-free flour blend and reduce baking soda to ¾ teaspoon to avoid over-rising.
- Chocolate Chunk Upgrade: Swap chocolate chips for chopped bittersweet chocolate bars for bigger melty pockets.
- Dairy-Free: Replace butter with coconut oil browned gently (watch closely) and use dairy-free chocolate chips.
I personally tried the nutty twist with toasted pecans once, and it gave a lovely texture contrast that made the cookies feel even more indulgent without changing the core flavors.
Serving & Storage Suggestions
These cookies are best served warm or at room temperature, allowing the chocolate to be gooey and the edges crisp. If you want to impress at a casual brunch or potluck, pair them with a glass of cold milk or a cup of rich coffee.
To store, keep leftovers in an airtight container at room temperature for up to 3 days. For longer storage, freeze the cookies in a sealed bag for up to 3 months. Warm frozen cookies in a 300°F (150°C) oven for 5-7 minutes before serving to refresh their crisp-tender texture.
Flavors deepen a bit after a day, making them even more satisfying. If you enjoy desserts like my creamy beer cheese pretzel dip, these cookies provide a sweet counterpoint you’ll appreciate.
Nutritional Information & Benefits
Each cookie (based on 24 cookies per batch) contains approximately 210 calories, 10g fat, 28g carbohydrates, 2g fiber, and 3g protein. The brown butter adds healthy fats and a rich flavor without extra sugar.
Using real butter and quality chocolate chips provides antioxidants and essential fatty acids, making these a better choice than many store-bought alternatives.
Note: Contains gluten, dairy, and eggs. For allergy-friendly options, see the variations above.
From a wellness perspective, indulging in homemade treats like these offers a mindful pleasure — the kind where you control ingredients and savor every bite, rather than mindlessly snacking.
Conclusion
These crispy-tender extra thick brown butter chocolate chip cookies have earned their place in my kitchen because they strike that rare balance of crispy edges and soft, chewy centers with a flavor that’s just a notch beyond your typical chocolate chip cookie.
Feel free to tweak the mix-ins or try chilling times to suit your preferences—the recipe is forgiving but rewarding once you get the hang of it. I love sharing these with friends and seeing their eyes light up at how something so simple can taste so good.
Give this recipe a try, and if you end up tweaking it or adding your own spin, I’d love to hear about it! Baking’s always better when there’s a little sharing involved.
Next time you’re craving a hearty snack, you might even pair these with a savory dish like the crispy Nashville hot chicken tenders, for a sweet and spicy combo that’s hard to beat.
Frequently Asked Questions
How do I know when the brown butter is ready?
Look for a golden amber color with small toasted bits settling at the bottom of the pan. It should smell nutty and fragrant, not burnt. Remove from heat immediately once you see this.
Can I use salted butter instead of unsalted?
Yes, but reduce added salt in the recipe to ¾ teaspoon to avoid an overly salty cookie.
Why are my cookies not thick and chewy?
Most likely the dough wasn’t chilled long enough, or the dough balls were too small. Use a larger cookie scoop and chill the dough for at least 30 minutes before baking.
Can I freeze the cookie dough?
Absolutely! Scoop dough balls onto a tray, freeze until solid, then transfer to a freezer bag. Bake from frozen, adding a couple extra minutes to the bake time.
What’s the best way to store leftover cookies?
Keep them in an airtight container at room temperature for up to 3 days, or freeze for up to 3 months. Reheat gently to refresh the crisp-tender texture.
Pin This Recipe!
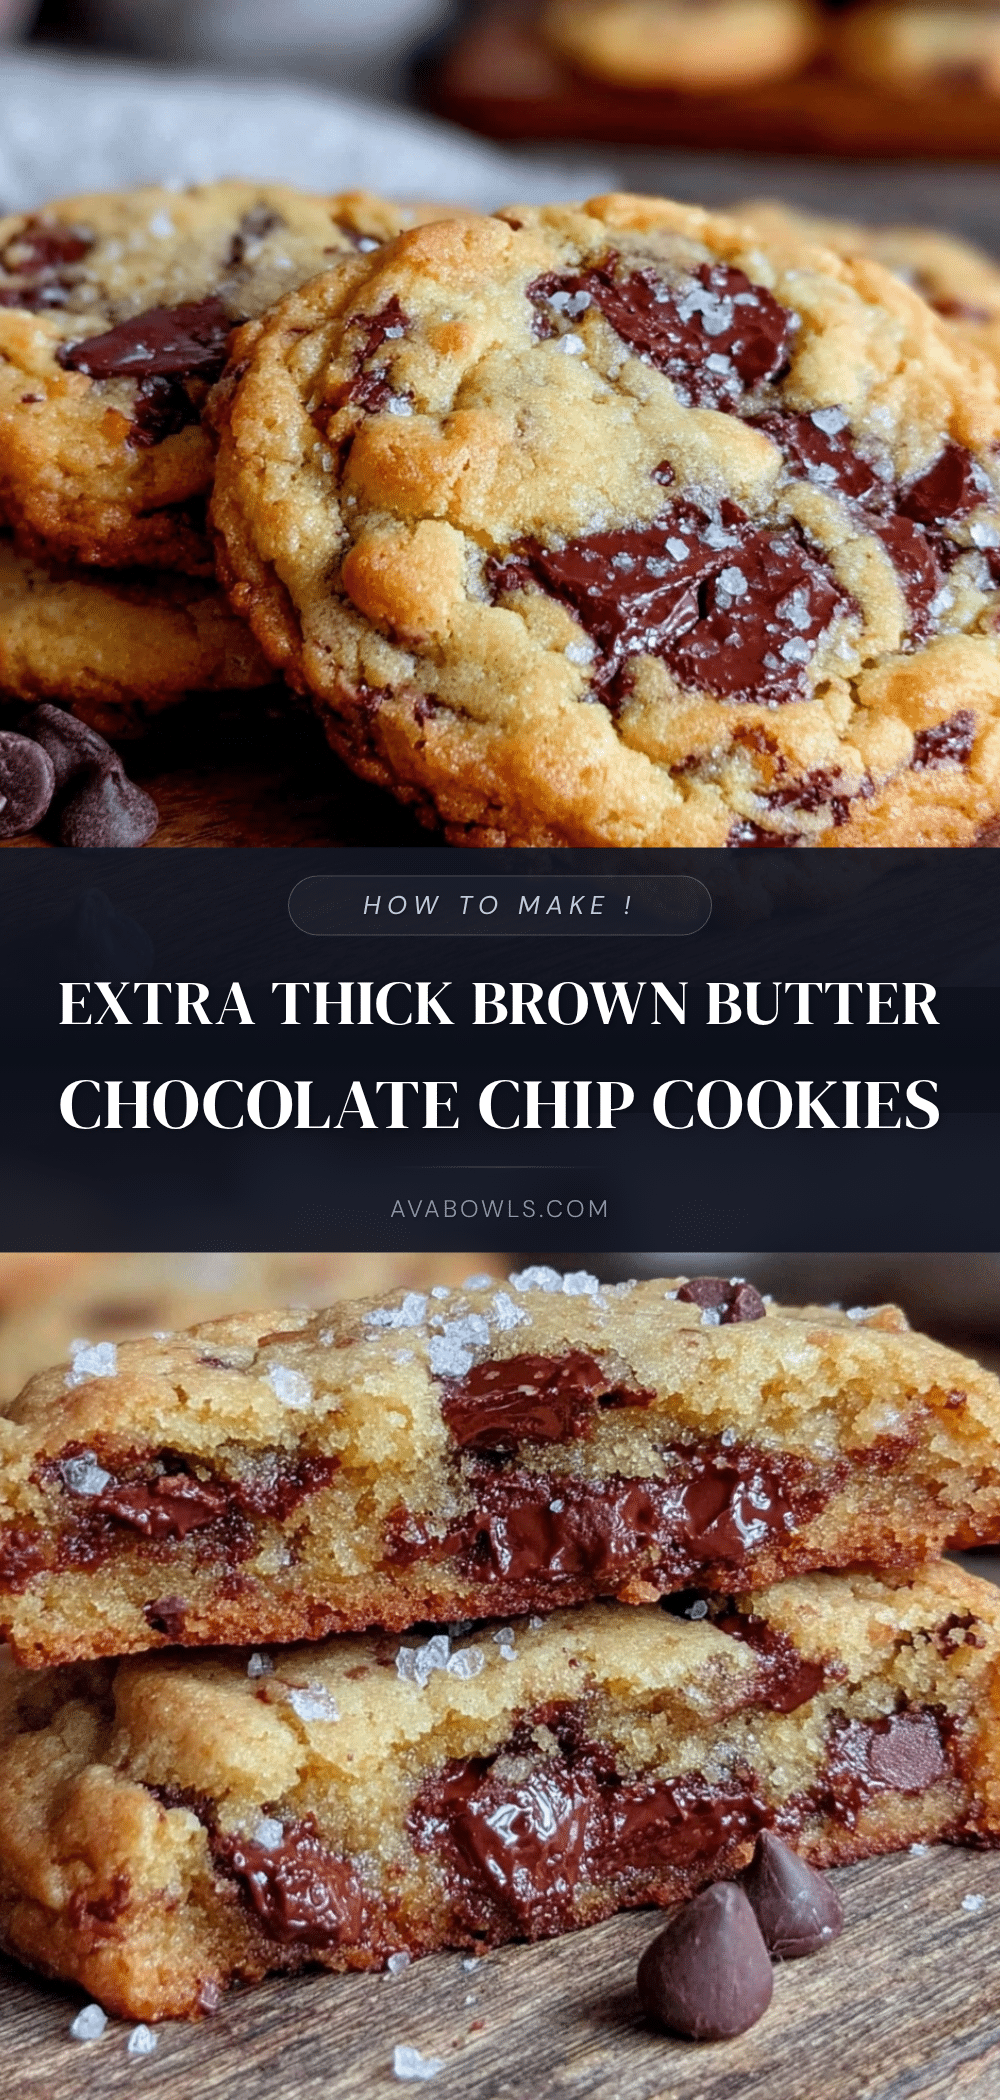
Crispy-Tender Brown Butter Chocolate Chip Cookies
These extra thick brown butter chocolate chip cookies offer a perfect balance of crispy edges and tender, chewy centers with a rich, nutty flavor from browned butter.
- Prep Time: 25 minutes
- Cook Time: 15 minutes
- Total Time: 1 hour 10 minutes
- Yield: 24 cookies 1x
- Category: Dessert
- Cuisine: American
Ingredients
- 1 cup (227g) unsalted butter, browned until nutty and fragrant
- ¾ cup (150g) granulated sugar
- 1 cup (220g) light brown sugar, packed
- 2 large eggs, room temperature
- 2 teaspoons pure vanilla extract
- 3 cups (375g) all-purpose flour, sifted
- 1 teaspoon baking soda
- 1½ teaspoons salt
- 2 cups (340g) semi-sweet chocolate chips
Instructions
- Brown the butter (about 6-8 minutes): In a medium saucepan over medium heat, melt 1 cup (227g) of unsalted butter. Stir frequently as the butter foams, then begins to brown and smell nutty. Once it reaches a golden amber color with toasted bits, remove from heat immediately to prevent burning. Transfer browned butter to a heatproof bowl to cool slightly.
- Mix sugars and butter (5 minutes): In a large mixing bowl, combine the browned butter (still warm but not hot), ¾ cup (150g) granulated sugar, and 1 cup (220g) light brown sugar. Beat until smooth and creamy using an electric mixer or wooden spoon.
- Add eggs and vanilla (2 minutes): Beat in 2 large eggs, one at a time, followed by 2 teaspoons pure vanilla extract. The mixture will look glossy and thick.
- Combine dry ingredients (3 minutes): In a separate bowl, whisk 3 cups (375g) sifted all-purpose flour, 1 teaspoon baking soda, and 1½ teaspoons salt.
- Incorporate dry ingredients (3-4 minutes): Gradually add the dry ingredients to the wet mixture, stirring until just combined. Avoid overmixing to keep cookies tender.
- Fold in chocolate chips (2 minutes): Gently fold 2 cups (340g) semi-sweet chocolate chips into the dough, making sure they’re evenly distributed without breaking them up.
- Chill dough (at least 30 minutes): Cover the bowl with plastic wrap and refrigerate. This step helps the dough firm up for extra thick cookies and prevents too much spread during baking.
- Preheat oven and prepare baking sheet (10 minutes): Preheat oven to 350°F (175°C). Line baking sheets with parchment or silicone mats.
- Scoop dough and bake (12-15 minutes): Using a cookie scoop or two spoons, portion 3-tablespoon-sized dough balls spaced about 3 inches apart. Bake for 12 to 15 minutes until edges are golden and centers look set but still soft. The cookies will firm up as they cool.
- Cool on rack (15 minutes): Let cookies cool on the baking sheet for 5 minutes, then transfer to a wire rack to cool completely to avoid soggy bottoms and preserve crisp edges.
Notes
Watch the brown butter carefully to avoid burning; remove from heat once golden amber with toasted bits. Chill dough at least 30 minutes for thick, chewy cookies. Bake one tray at a time for even baking. Use a cookie scoop for uniform size. Cookies firm up as they cool; remove from oven when edges are golden and centers look set but still soft.
Nutrition
- Serving Size: 1 cookie
- Calories: 210
- Fat: 10
- Carbohydrates: 28
- Fiber: 2
- Protein: 3
Keywords: brown butter cookies, chocolate chip cookies, thick cookies, chewy cookies, crispy edges, homemade cookies, dessert, baking