Introduction
“You really think this will work?” my friend asked, eyeing the bowl of bright red and blue swirled cream cheese mixture suspiciously. Honestly, I wasn’t sure either. It was one of those last-minute dessert ideas that started as a bit of a scramble — the Fourth of July cookout was just hours away, and I’d forgotten to bake anything. No oven, no problem, right? The idea of a no-bake cheesecake bar with patriotic colors popped into my head while rummaging through the fridge. I had cream cheese, some berries, and a packet of graham crackers on hand. It was a quick gamble, but as the bars chilled in the fridge, I started to feel hopeful.
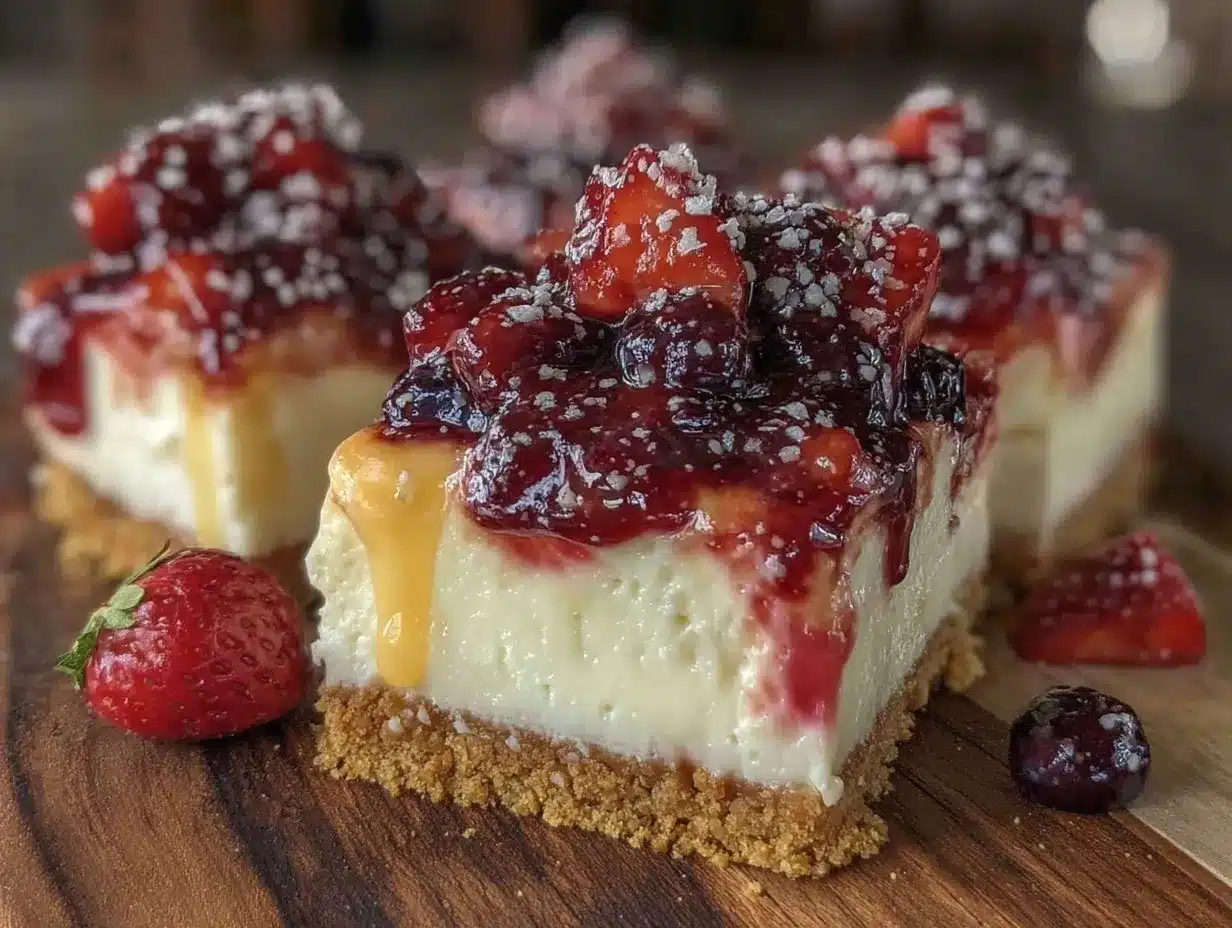
When I finally cut into those red, white, and blue cheesecake bars, the texture was creamy and just firm enough, with a crumbly, buttery crust that held it all together. The berries added a fresh tang that balanced the richness perfectly — no heavy baking or fuss involved. My skeptical friend ended up asking for seconds, which, honestly, was the moment I realized this recipe wasn’t just a convenient save; it was destined to become my go-to summer dessert. The colors alone bring a festive pop, but the ease and flavors keep everyone coming back.
These cheesecake bars have since made appearances at multiple family barbecues, casual get-togethers, and, yes, even some solo late-night snack sessions. They’re proof that sometimes the simplest ideas — whipped up in a flash — can turn out to be the most memorable. It’s like fireworks on a plate, but way easier to handle. And that’s why this recipe stuck with me: it’s quick, it’s colorful, and it tastes like summer in every bite.
Why You’ll Love This Recipe
This easy no-bake red white and blue cheesecake bars recipe has been tested and approved by friends, family, and that one skeptical friend who’s hard to impress. Here’s why it’s a total winner:
- Quick & Easy: Comes together in under 30 minutes, perfect for busy summer days when you want dessert without the wait.
- Simple Ingredients: No fancy or hard-to-find items here — just classic pantry staples and fresh berries you can grab anywhere.
- Perfect for Summer Celebrations: Whether it’s the Fourth of July, Memorial Day, or just a sunny weekend, these bars bring that festive vibe effortlessly.
- Crowd-Pleaser: Kids love the fun colors, adults appreciate the balance of creamy and fruity flavors, and everyone gets a slice of nostalgia.
- Unbelievably Delicious: Creamy, smooth texture with a crumbly graham crust — it’s the kind of dessert that makes you close your eyes after the first bite.
What makes this recipe stand out is the gentle folding technique I’ve perfected to keep the cheesecake base airy yet smooth, along with the fresh berry swirls that avoid overpowering sweetness. It’s not just another red, white, and blue dessert; it’s the one that feels homemade but looks like you spent hours on it. Plus, it’s a hands-off chill job — no oven heat to dread in the summer!
Honestly, this recipe is like that friend who shows up with the perfect dish that impresses without stress. It’s the kind of dessert you can whip up while prepping something savory, like the creamy spring vegetable fettuccine alfredo or the creamy lemon ricotta pasta with fresh peas and mint, and still have time to savor the sunshine.
What Ingredients You Will Need
This recipe uses simple, wholesome ingredients to deliver bold flavor and a satisfying texture without fuss. Most of these are pantry staples, and the fresh berries make all the difference in taste and presentation.
- For the Crust:
- 1 ½ cups graham cracker crumbs (about 10 full sheets, finely crushed)
- 6 tablespoons unsalted butter, melted (adds richness and helps bind the crust)
- 2 tablespoons granulated sugar (balances the buttery crust)
- For the Cheesecake Filling:
- 16 oz (450 g) cream cheese, softened (I prefer Philadelphia for smooth texture)
- ¾ cup powdered sugar (for gentle sweetness)
- 1 teaspoon pure vanilla extract (quality matters here for deep flavor)
- 1 cup heavy whipping cream, cold (whipped to soft peaks for fluffiness)
- For the Red & Blue Swirls:
- ½ cup fresh strawberries, pureed (strained for smoothness)
- ½ cup fresh blueberries, pureed (strained as well to avoid seeds)
- 1 tablespoon granulated sugar for each berry puree (adjust to taste)
Quick tip: If fresh berries aren’t in season, frozen ones work just fine — just thaw and strain thoroughly before using. For a dairy-free spin, you could swap the cream cheese with a plant-based alternative and use coconut cream instead of heavy cream, but note that the texture may differ slightly. Also, almond flour or gluten-free graham cracker crumbs can replace the crust ingredients if needed.
Equipment Needed
- 9×9-inch (23×23 cm) square baking pan – for easy slicing and serving
- Mixing bowls – at least two, one for crust and one for filling
- Electric mixer or stand mixer – to whip cream and blend cream cheese smoothly (hand whisking is doable but takes longer)
- Spatula – for folding and spreading the batter evenly
- Food processor or plastic bag & rolling pin – to crush graham crackers finely
- Fine mesh sieve – to strain berry purees and avoid seeds
If you don’t have a food processor, placing graham crackers in a sealed plastic bag and rolling over them with a rolling pin works just as well. For whipping cream, chill your mixing bowl in the freezer for 10 minutes beforehand — it really helps get those soft peaks without too much effort. I’ve tried this recipe with both stand mixers and handheld beaters; both work, but a stand mixer speeds things up and leaves your hands free.
Preparation Method
- Prepare the Crust (10 minutes): In a medium bowl, combine graham cracker crumbs, melted butter, and sugar. Stir until all crumbs are evenly coated and the mixture holds together when pressed. Press the crust mixture firmly into the bottom of the 9×9-inch pan, spreading evenly. Use the bottom of a glass or measuring cup to compact it well. Chill in the refrigerator for at least 15 minutes to set.
- Make Berry Purees (10 minutes): While the crust chills, puree strawberries and blueberries separately in a blender or food processor. Add 1 tablespoon sugar to each and blend again. Strain each puree through a fine mesh sieve to remove seeds and set aside.
- Whip the Cream (5-7 minutes): In a chilled bowl, beat cold heavy whipping cream with an electric mixer until soft peaks form. Be careful not to overbeat — the cream should be fluffy but still smooth.
- Mix the Cheesecake Base (8 minutes): In another large bowl, beat softened cream cheese, powdered sugar, and vanilla extract until smooth and creamy. Gently fold the whipped cream into the cream cheese mixture in batches, preserving as much air as possible for a light texture.
- Assemble the Bars (10 minutes): Spread half of the cheesecake mixture evenly over the chilled crust. Dollop spoonfuls of strawberry and blueberry purees on top in alternating spots. Use a skewer or butter knife to swirl the purees gently into the cheesecake layer — don’t overmix, or the colors will muddy. Carefully spread the remaining cheesecake mixture on top, smoothing it out with a spatula.
- Chill and Set (at least 4 hours or overnight): Cover the pan with plastic wrap and refrigerate until the bars are firm enough to cut cleanly. Overnight chilling is best if you can wait — it helps the flavors meld and the texture firm up perfectly.
- Serve: Run a sharp knife under hot water and wipe dry before slicing the bars into squares for clean edges. Keep leftover bars refrigerated.
Quick troubleshooting tip: If your cheesecake mixture feels too loose, make sure the cream cheese is fully softened and avoid overfolding the whipped cream. The swirl effect looks best when you just gently drag the purees through without mixing too much. If the crust feels crumbly, adding a bit more melted butter next time usually does the trick.
Cooking Tips & Techniques
Getting the perfect texture for no-bake cheesecake bars can be tricky, but a few tricks make all the difference:
- Softening the Cream Cheese: Take it out of the fridge at least 30 minutes before starting. Cold cream cheese doesn’t mix well and leads to lumps, which you definitely want to avoid.
- Whipping the Cream: Chill your bowl and beaters for a bit before whipping. This helps the cream reach soft peaks faster and prevents it from turning grainy.
- Folding Technique: Use a spatula to fold the whipped cream into the cream cheese mixture gently. Think of folding like a slow, sweeping motion instead of stirring — it keeps the mixture airy and light.
- Swirling the Berry Purees: Don’t go crazy mixing the purees into the cheesecake — just a few gentle swirls preserve the vibrant red and blue colors. This keeps the bars visually stunning and gives little bursts of berry flavor in every bite.
- Pressing the Crust: Use the bottom of a flat glass or measuring cup to really pack the crust down tightly. A loose crust can fall apart when you slice the bars.
One thing I learned the hard way is not to rush the chilling time. Those bars need at least four hours to set, but overnight is ideal. I once tried to cut them after just two hours, and the slices were a messy disaster. Patience really pays off here.
Also, if you’re prepping this for a party, making the bars the day before can free up your time on the big day — and the flavors get better with a little rest.
Variations & Adaptations
If you want to mix things up or accommodate dietary needs, this recipe is flexible enough to handle a few tweaks:
- Flavor Swaps: Instead of strawberries and blueberries, try raspberries and blackberries for a different berry combo that still looks stunning.
- Dietary Adaptations: Use almond flour or gluten-free graham crackers for a gluten-free crust. For a lower sugar option, swap powdered sugar with a natural sweetener like erythritol or monk fruit sweetener.
- Flavor Boosters: Add a teaspoon of lemon zest to the cheesecake mixture for a fresh citrus kick that pairs beautifully with the berries.
- Cooking Method Variation: If you want a slightly firmer texture, you can add 1 tablespoon of unflavored gelatin dissolved in a little warm water to the cheesecake base before folding in the whipped cream.
- Personal Twist: I once sprinkled some finely chopped toasted pecans on top for a little crunch — it was a hit and added a nice contrast to the creamy bars.
Serving & Storage Suggestions
These cheesecake bars are best served chilled, straight from the fridge. The cool, creamy texture is a refreshing treat on a warm day. For a festive presentation, add a few fresh berries on top of each slice or a small dollop of whipped cream.
They pair wonderfully with a light iced tea or a sparkling lemonade — the tartness of the drinks balances the rich cheesecake perfectly. If you’re planning a larger spread, these bars fit right in alongside savory dishes like creamy beer cheese pretzel dip or loaded nachos for a well-rounded summer party menu.
Store the bars covered in the refrigerator for up to 4 days. If you want to keep them longer, they freeze well for up to 2 months — just thaw overnight in the fridge before slicing. When reheating, it’s best to enjoy them chilled, but letting them sit at room temperature for 10 minutes can soften the texture slightly for a creamier bite.
Over time, the berry swirls may blend a bit more, but the bars will still taste delicious, and the flavors often deepen after a day or two.
Nutritional Information & Benefits
Each serving of these no-bake cheesecake bars offers a satisfying balance of creamy fats, natural sugars from berries, and a bit of wholesome carbs from the graham cracker crust. Estimated nutritional values per bar (assuming 12 servings):
| Calories | 280 kcal |
|---|---|
| Fat | 18 g |
| Carbohydrates | 22 g |
| Protein | 4 g |
The cream cheese and heavy cream provide calcium and protein, while the fresh berries contribute antioxidants and vitamins like vitamin C. This recipe is naturally gluten-containing unless you swap the crust ingredients, and it contains dairy products, so it’s not suitable for those with allergies to these.
From a wellness perspective, I appreciate that this dessert feels indulgent but can be enjoyed in moderation as part of a balanced diet. Because it uses real fruit and no artificial colors or flavors, it’s a bit lighter than many traditional cheesecakes or boxed desserts.
Conclusion
Easy no-bake red white and blue cheesecake bars are the kind of recipe you want in your back pocket — festive, fast, and fantastically flavorful. Whether you’re feeding a crowd or craving a solo sweet treat, these bars deliver creamy richness with a vibrant, fresh twist. The best part? You can make them ahead and relax while they chill.
Feel free to tweak the berries or try the variations to suit your taste or dietary needs. I keep coming back to this recipe because it’s just so reliable and crowd-friendly — plus, it always brings a little joy to any occasion.
If you give these bars a try, I’d love to hear how you customize them or what pairing you enjoy most. Sharing little twists and tricks is what makes home cooking fun, after all! So go ahead, slice up some summer happiness, and savor every bite.
FAQs
Can I make these cheesecake bars ahead of time?
Absolutely! They actually taste better after chilling overnight, which helps the flavors meld and the texture firm up.
What can I substitute for graham crackers in the crust?
Almond flour, crushed digestive biscuits, or gluten-free graham crackers all make great alternatives if you need a gluten-free option.
Can I use frozen berries for the red and blue swirls?
Yes, just thaw them completely and strain out excess liquid and seeds to keep the swirl smooth and vibrant.
Is it possible to make these bars without heavy cream?
You can try using full-fat coconut cream for a dairy-free version, but the texture might be slightly different. Whipping it properly is key!
How should I store leftover cheesecake bars?
Keep them covered in the refrigerator for up to 4 days or freeze for longer storage. Thaw in the fridge before serving.
Pin This Recipe!
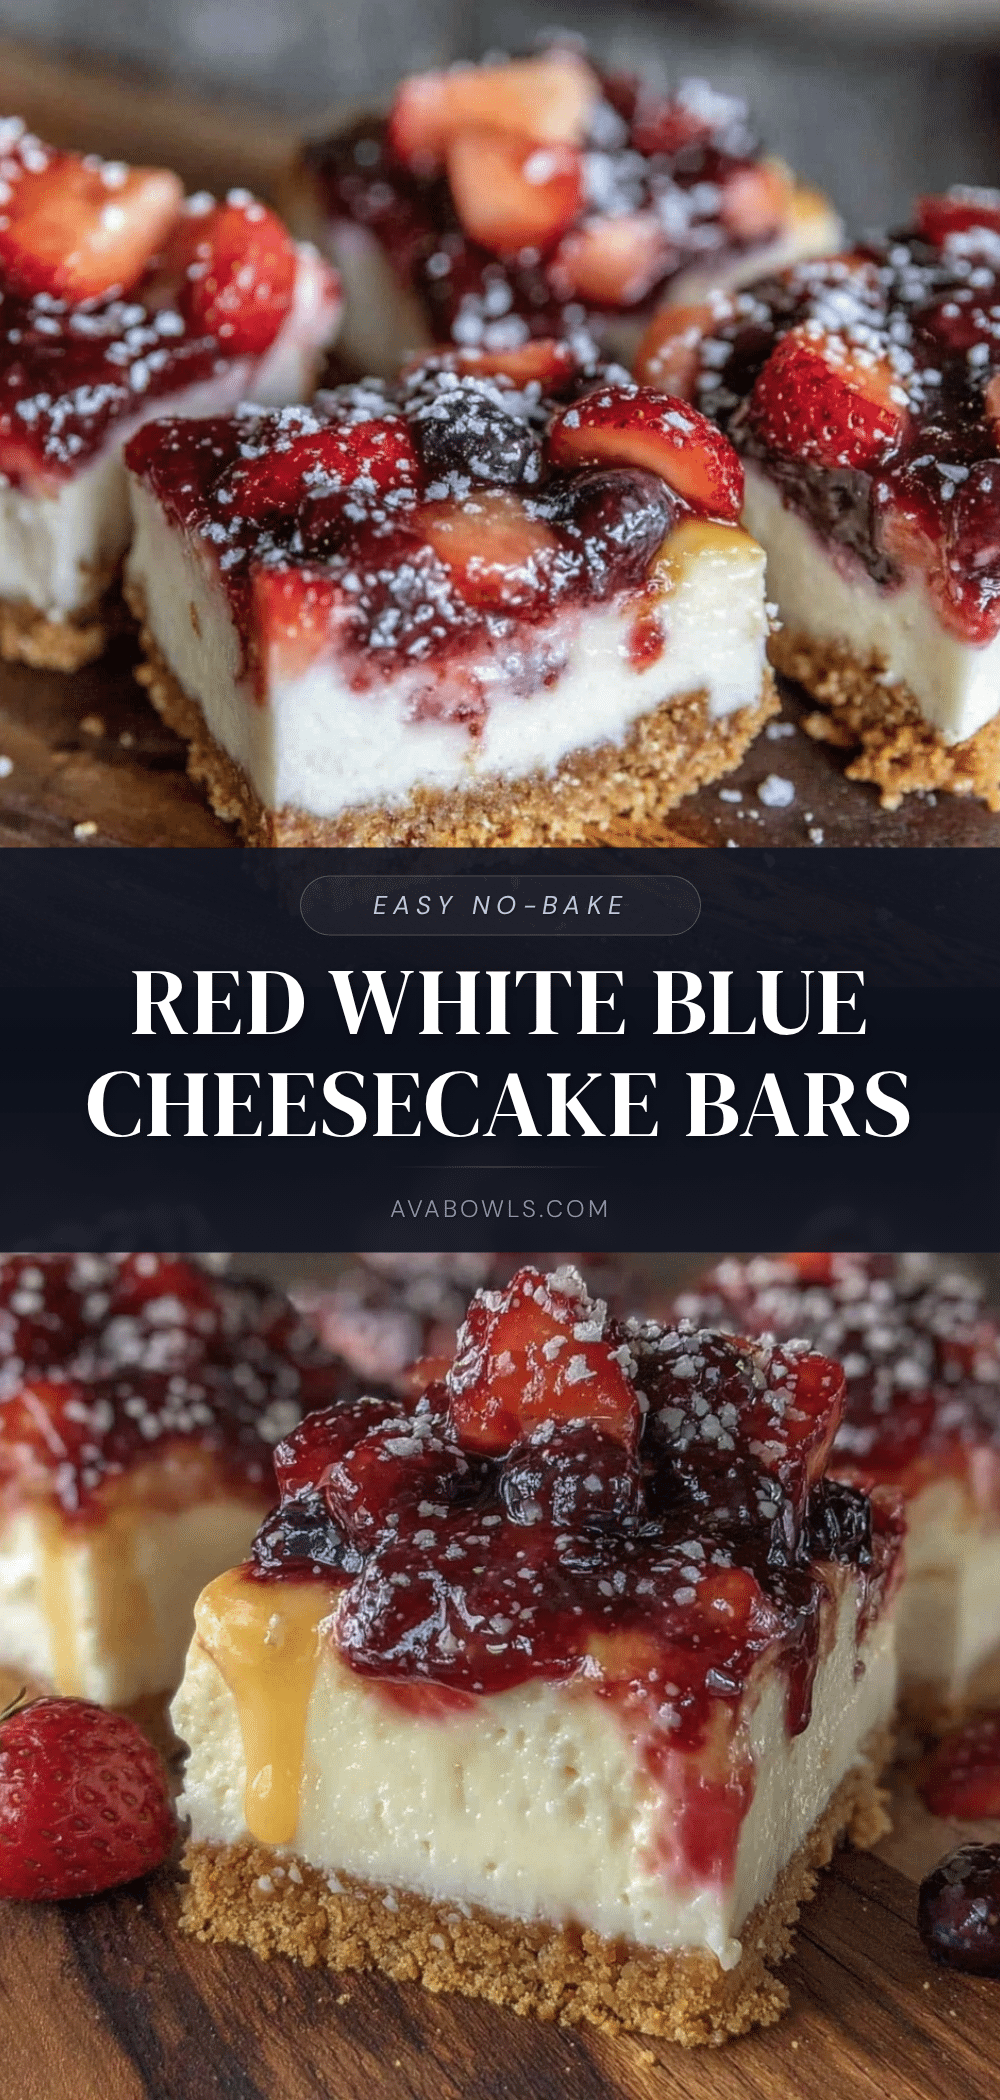
Easy No-Bake Red White and Blue Cheesecake Bars
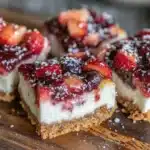
A quick and festive no-bake cheesecake bar recipe featuring a creamy texture, buttery graham cracker crust, and vibrant red and blue berry swirls, perfect for summer celebrations.
- Prep Time: 25 minutes
- Cook Time: 0 minutes
- Total Time: 4 hours 25 minutes
- Yield: 12 servings 1x
- Category: Dessert
- Cuisine: American
Ingredients
- 1 ½ cups graham cracker crumbs (about 10 full sheets, finely crushed)
- 6 tablespoons unsalted butter, melted
- 2 tablespoons granulated sugar
- 16 oz (450 g) cream cheese, softened
- ¾ cup powdered sugar
- 1 teaspoon pure vanilla extract
- 1 cup heavy whipping cream, cold
- ½ cup fresh strawberries, pureed and strained
- ½ cup fresh blueberries, pureed and strained
- 1 tablespoon granulated sugar for each berry puree
Instructions
- Prepare the Crust (10 minutes): In a medium bowl, combine graham cracker crumbs, melted butter, and sugar. Stir until all crumbs are evenly coated and the mixture holds together when pressed. Press the crust mixture firmly into the bottom of the 9×9-inch pan, spreading evenly. Use the bottom of a glass or measuring cup to compact it well. Chill in the refrigerator for at least 15 minutes to set.
- Make Berry Purees (10 minutes): While the crust chills, puree strawberries and blueberries separately in a blender or food processor. Add 1 tablespoon sugar to each and blend again. Strain each puree through a fine mesh sieve to remove seeds and set aside.
- Whip the Cream (5-7 minutes): In a chilled bowl, beat cold heavy whipping cream with an electric mixer until soft peaks form. Be careful not to overbeat — the cream should be fluffy but still smooth.
- Mix the Cheesecake Base (8 minutes): In another large bowl, beat softened cream cheese, powdered sugar, and vanilla extract until smooth and creamy. Gently fold the whipped cream into the cream cheese mixture in batches, preserving as much air as possible for a light texture.
- Assemble the Bars (10 minutes): Spread half of the cheesecake mixture evenly over the chilled crust. Dollop spoonfuls of strawberry and blueberry purees on top in alternating spots. Use a skewer or butter knife to swirl the purees gently into the cheesecake layer — don’t overmix, or the colors will muddy. Carefully spread the remaining cheesecake mixture on top, smoothing it out with a spatula.
- Chill and Set (at least 4 hours or overnight): Cover the pan with plastic wrap and refrigerate until the bars are firm enough to cut cleanly. Overnight chilling is best if you can wait — it helps the flavors meld and the texture firm up perfectly.
- Serve: Run a sharp knife under hot water and wipe dry before slicing the bars into squares for clean edges. Keep leftover bars refrigerated.
Notes
If fresh berries aren’t in season, frozen ones work just fine — just thaw and strain thoroughly before using. For a dairy-free version, substitute cream cheese with a plant-based alternative and use coconut cream instead of heavy cream, but texture may differ. Almond flour or gluten-free graham cracker crumbs can replace crust ingredients for gluten-free. Chill mixing bowl before whipping cream for best results. Avoid overmixing berry purees to keep vibrant colors. Chill bars at least 4 hours or overnight for best texture.
Nutrition
- Serving Size: 1 bar (1/12th of rec
- Calories: 280
- Fat: 18
- Carbohydrates: 22
- Protein: 4
Keywords: no-bake cheesecake, red white and blue dessert, summer dessert, patriotic dessert, cheesecake bars, easy dessert, berry cheesecake