Introduction
“Are you sure this will set without baking?” my friend asked, eyebrows raised as I whisked together cream cheese and crushed Oreos on a lazy Sunday afternoon. Honestly, I wasn’t entirely convinced either at first. I’d stumbled upon the idea during a hectic week when the oven was just not an option, and the thought of a dessert that required zero baking sounded like a dream. The texture was silky, the flavor was rich, and those little Oreo bits gave it a playful crunch that felt like a secret treat in every bite.
That first attempt was almost accidental—I was trying to make a quick cheesecake after a long day, and the oven was already occupied with dinner. The result? A fridge-chilled creamy no-bake Oreo cheesecake delight that quickly became my go-to dessert for all kinds of last-minute celebrations. What really sold me was how it felt like indulgence without the stress. Plus, it’s surprisingly easy to throw together with just a handful of ingredients.
Now, whenever someone drops by unexpectedly or when I want a cozy night in with something sweet but fuss-free, this cheesecake is the answer. It’s that kind of dessert that makes you pause, savor, and quietly appreciate how simple ingredients can come together into something irresistibly creamy and satisfying. And truth be told, it’s one of those recipes I keep coming back to because it just works—no drama, no oven, just pure, comforting joy.
Why You’ll Love This Recipe
Having tested this creamy no-bake Oreo cheesecake delight more times than I can count, I’m confident it ticks all the boxes for a perfect dessert. Here’s why it stands out:
- Quick & Easy: Ready in under 20 minutes, it’s perfect for those evenings when you want dessert without the wait.
- Simple Ingredients: No complicated shopping trips—just cream cheese, Oreos, and a few pantry staples.
- Perfect for Any Occasion: Whether it’s a casual family dinner, a potluck, or an unexpected guest, this cheesecake always impresses.
- Crowd-Pleaser: Kids, adults, picky eaters—everyone asks for seconds.
- Unbelievably Delicious: The marriage of creamy cheesecake filling with crunchy Oreo bits is pure magic.
What sets this recipe apart? It’s the perfectly balanced texture—smooth and creamy, but with just enough cookie crunch to keep things interesting. I like to use a high-quality cream cheese brand (Philadelphia is my favorite for that silky texture) and full-sized Oreos for maximum flavor impact. Plus, the no-bake method means the flavors stay fresh and vibrant, unlike some baked cheesecakes that can dry out.
It’s not just a dessert; it’s a little moment of happiness that fits into busy days and unexpected celebrations. If you enjoy creamy indulgences like the creamy strawberry cream cheese stuffed French toast I recently made, you’ll find this cheesecake to be just as comforting and satisfying, minus the morning rush.
What Ingredients You Will Need
This creamy no-bake Oreo cheesecake delight uses straightforward ingredients that come together for a rich flavor and satisfying texture. Most of these are pantry staples, and you can easily substitute a few depending on your preferences.
- For the Crust:
- 24 Oreo cookies (crushed finely; you can use classic or double-stuffed for extra creaminess)
- 4 tablespoons unsalted butter, melted (adds richness and helps bind the crust)
- For the Cheesecake Filling:
- 16 oz (450g) cream cheese, softened (Philadelphia or similar brand recommended for smooth texture)
- 1 cup (240 ml) heavy whipping cream, cold (for that luscious creaminess)
- ¾ cup (90g) powdered sugar (adjust to taste for sweetness)
- 1 teaspoon vanilla extract (pure vanilla extract adds depth)
- 8 Oreo cookies, roughly chopped (for mixing into the filling)
Ingredient Tips: If you prefer a lighter version, you can swap heavy cream with coconut cream or a dairy-free whipped topping. For a gluten-free option, try using gluten-free chocolate sandwich cookies instead of Oreos. In the summer, fresh berries on top make an excellent seasonal twist.
Equipment Needed
- Mixing bowls (a large and a medium size)
- Electric hand mixer or stand mixer (for whipping cream and beating cream cheese to a smooth consistency)
- Food processor or zip-top bag with rolling pin (to crush the Oreo cookies finely)
- 9-inch (23cm) springform pan or pie dish (springform works best for easy removal)
- Rubber spatula (to fold ingredients gently)
- Measuring cups and spoons
If you don’t have a food processor, no worries—crushing Oreos in a sealed bag with a rolling pin works just fine. I’ve also used a regular round cake pan without a removable bottom in a pinch, but a springform pan definitely makes serving easier. When picking your electric mixer, I find a handheld one with multiple speed settings makes the whipping process smooth and quick.
Preparation Method
- Prepare the crust: Place 24 Oreo cookies in a food processor and pulse until finely crushed. If you don’t have one, put the cookies in a zip-top bag and crush them with a rolling pin until they resemble coarse crumbs. Combine the crushed Oreos with 4 tablespoons of melted unsalted butter in a bowl and mix until the texture feels like wet sand. This usually takes about 3 minutes.
- Press the crust: Transfer the Oreo crust mixture into your 9-inch springform pan. Using the bottom of a glass or your fingers, firmly press the crumbs evenly across the bottom to create a compact base. Pop it in the fridge to chill while you make the filling (about 10 minutes).
- Make the filling: In a large mixing bowl, beat the softened cream cheese with an electric mixer at medium speed until smooth and creamy (about 2-3 minutes). Gradually add the powdered sugar and vanilla extract, continuing to beat until fully combined and fluffy.
- Whip the cream: In a separate bowl, whip the cold heavy cream on high speed until stiff peaks form. This step takes roughly 3-5 minutes but keep an eye on it—over-whipping can turn it grainy.
- Combine filling and whipped cream: Gently fold about half of the whipped cream into the cream cheese mixture to lighten it. Then fold in the rest of the whipped cream along with the 8 roughly chopped Oreo cookies. Be careful not to overmix; you want a fluffy, airy texture with cookie bits evenly distributed.
- Assemble the cheesecake: Pour the filling over the chilled crust and smooth the top with a spatula. Cover the pan with plastic wrap or foil, then refrigerate for at least 4 hours, preferably overnight. This resting time lets the cheesecake set perfectly.
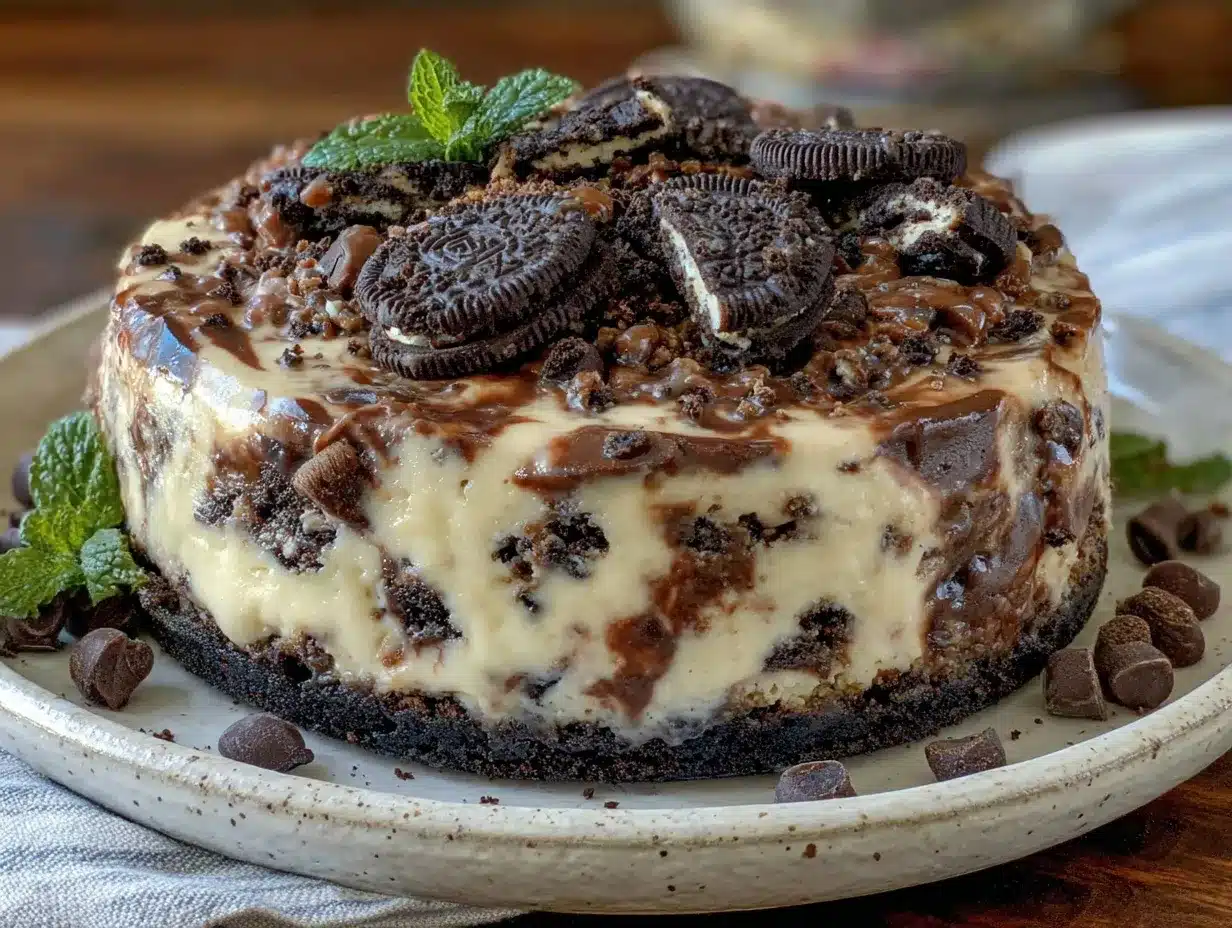
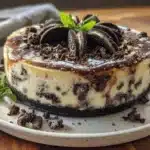
- Serve: Once set, carefully remove the sides of the springform pan. Garnish with extra crushed Oreos or whipped cream if desired. Slice and enjoy!
Tip: If the crust feels too loose, adding a bit more melted butter can help firm it up. Also, using room temperature cream cheese is key for a smooth filling—cold cream cheese lumps up and can be frustrating to mix.
Cooking Tips & Techniques
Getting the perfect creamy no-bake Oreo cheesecake texture takes some finesse, but after a few tries, it becomes second nature. One trick I swear by is beating the cream cheese on its own first until silky smooth before adding anything else. Skipping this can leave you with a grainy filling.
Whipping the heavy cream to stiff peaks is another crucial step. I learned the hard way that under-whipped cream results in a runny cheesecake, and over-whipped cream can separate and lose that luscious mouthfeel. For best results, chill your mixing bowl and beaters beforehand.
Folding is where the magic happens—gently combining the whipped cream with the cream cheese preserves the airiness. I use a silicone spatula and fold with a light hand, turning the bowl slowly instead of stirring vigorously.
Refrigeration time should not be rushed. The cheesecake firms up nicely after several hours, and the flavors meld beautifully. I often make it a day ahead, which also frees up time during the actual event.
If you want to speed things up, a quick chill in the freezer for 1-2 hours works, but keep an eye on it so it doesn’t freeze solid. This recipe is perfect for multitasking—you can whip up the crust while dinner simmers or while prepping other dishes like a creamy spring vegetable fettuccine Alfredo for a full meal experience.
Variations & Adaptations
This creamy no-bake Oreo cheesecake delight is a versatile base that welcomes plenty of tweaks and twists based on your taste or dietary needs.
- Chocolate Lover’s Version: Add ¼ cup (25g) cocoa powder to the filling for a chocolatey twist, or drizzle melted chocolate over the top before serving.
- Fruit-Filled: Fold in fresh raspberries or strawberries to the filling for a fruity surprise. This pairs wonderfully with a crumbly crust.
- Dairy-Free Adaptation: Use dairy-free cream cheese and coconut whipped cream to make this vegan-friendly. Gluten-free cookies substitute well for the crust.
- Mini Cheesecakes: Prepare individual portions in small jars or muffin tins lined with cupcake liners for party-friendly servings.
I once tried adding a splash of coffee extract to the filling for a mocha Oreo cheesecake twist—unexpected but surprisingly good! Don’t hesitate to experiment with flavored extracts or toppings like caramel sauce or crushed nuts.
Serving & Storage Suggestions
This cheesecake is best served chilled straight from the fridge, which keeps its creamy texture intact. For a little extra flair, a dollop of whipped cream or a sprinkle of crushed Oreos on top never fails.
Pair it with a cup of rich coffee or a glass of cold milk for a classic combo. If you’re planning a dessert spread, this pairs nicely alongside lighter treats or even savory snacks like the creamy beer cheese pretzel dip for a fun contrast of flavors.
Store leftovers tightly covered in the refrigerator for up to 4 days. The flavors tend to develop even more after a day, making it taste richer and smoother. If you want to freeze it, remove from the pan, wrap tightly in plastic wrap and foil, and freeze for up to 2 months. Thaw overnight in the fridge before serving.
When reheating (if you prefer it slightly softer), let it sit at room temperature for 15-20 minutes—avoid microwaving, which can cause separation.
Nutritional Information & Benefits
Each slice of this creamy no-bake Oreo cheesecake delight offers a comforting balance of fats and sugars with a satisfying dose of protein from the cream cheese. Estimated nutrition per 1/10 slice provides approximately 320 calories, 25g fat, 20g carbohydrates, and 5g protein.
Cream cheese supplies calcium and vitamin A, while Oreos, though indulgent, add that nostalgic flavor punch that makes this dessert special. For those mindful of gluten or dairy, simple swaps can make this recipe accessible.
While it’s a treat, the recipe’s quick preparation and portion control help keep indulgence in check. It’s a dessert you can feel good about sharing, especially when balanced with healthy meals or snacks throughout the day.
Conclusion
This creamy no-bake Oreo cheesecake delight has become a little slice of effortless joy in my kitchen. It’s the kind of recipe that feels fancy without the fuss and never fails to bring smiles around the table. Whether you stick to the classic or try one of the variations, it’s a dessert that invites creativity and comfort all at once.
Don’t hesitate to tweak it to suit your taste—maybe a bit more Oreo here, a dash of vanilla there. I love how this recipe fits into busy lives yet still feels like a special occasion. If you’ve enjoyed treats like the creamy lemon ricotta pasta for a refreshing meal, this cheesecake makes the perfect sweet ending.
Give it a try, and if you have your own twists or tips, please share in the comments—I always love hearing how you make this recipe your own. Here’s to sweet moments made simple!
FAQs
Can I make this cheesecake ahead of time?
Absolutely! It tastes even better after chilling overnight, which helps it set firmly and lets the flavors meld.
What if I don’t have a springform pan?
You can use a regular pie dish or cake pan, but removing the cheesecake might be trickier. Consider lining the pan with parchment paper for easier removal.
Can I use a different cookie instead of Oreos?
Yes! Chocolate wafer cookies or gluten-free sandwich cookies work well. Just adjust the crust and mix-ins accordingly.
How long does it take for the cheesecake to set?
Ideally, refrigerate for at least 4 hours, but overnight chilling is best for firm slices.
Is there a way to make it lighter or less sweet?
Try reducing the powdered sugar slightly or swap heavy cream for a lighter whipped topping. Adding fresh fruit toppings can also balance the sweetness.
Pin This Recipe!
Creamy No-Bake Oreo Cheesecake Delight
A rich and creamy no-bake Oreo cheesecake with a crunchy cookie crust, perfect for quick and fuss-free dessert occasions.
- Prep Time: 15 minutes
- Cook Time: 0 minutes
- Total Time: 4 hours 15 minutes
- Yield: 10 servings 1x
- Category: Dessert
- Cuisine: American
Ingredients
- 24 Oreo cookies (crushed finely; classic or double-stuffed)
- 4 tablespoons unsalted butter, melted
- 16 oz (450g) cream cheese, softened
- 1 cup (240 ml) heavy whipping cream, cold
- 3/4 cup (90g) powdered sugar
- 1 teaspoon vanilla extract
- 8 Oreo cookies, roughly chopped
Instructions
- Prepare the crust: Crush 24 Oreo cookies finely using a food processor or a zip-top bag and rolling pin. Combine crushed Oreos with 4 tablespoons melted unsalted butter until texture resembles wet sand.
- Press the crust: Transfer mixture into a 9-inch springform pan and press firmly and evenly across the bottom. Chill in the fridge for about 10 minutes.
- Make the filling: Beat softened cream cheese with an electric mixer at medium speed until smooth (2-3 minutes). Gradually add powdered sugar and vanilla extract, beating until fluffy.
- Whip the cream: In a separate bowl, whip cold heavy cream on high speed until stiff peaks form (3-5 minutes).
- Combine filling and whipped cream: Gently fold half of the whipped cream into the cream cheese mixture, then fold in the remaining whipped cream and 8 chopped Oreos. Avoid overmixing.
- Assemble the cheesecake: Pour filling over chilled crust and smooth the top. Cover and refrigerate for at least 4 hours or overnight to set.
- Serve: Remove sides of springform pan carefully. Garnish with extra crushed Oreos or whipped cream if desired. Slice and enjoy.
Notes
Use room temperature cream cheese for smooth filling. Chill mixing bowl and beaters before whipping cream for best results. Refrigerate at least 4 hours or overnight for firm set. Can freeze up to 2 months wrapped tightly.
Nutrition
- Serving Size: 1 slice (1/10 of che
- Calories: 320
- Fat: 25
- Carbohydrates: 20
- Protein: 5
Keywords: no-bake cheesecake, Oreo cheesecake, easy dessert, creamy cheesecake, no oven dessert, Oreo dessert