“Hey, can you bring something sweet to the potluck?” That text popped up right when I had zero dessert plans and honestly, no energy to bake. I rummaged through the kitchen, spotted a forgotten lemon in the fridge, and figured, why not whip up some lemon bars? But not just any lemon bars—ones with a crispy, salted butter shortbread crust that I’d been tweaking on and off for a couple of weeks. The idea was simple: a sheet pan recipe that’s easy, fast, and totally crowd-pleasing.
The first time I made these, I wasn’t even sure if the salted butter shortbread would hold up under the tangy lemon topping. Turns out, the crust crisps up perfectly, offering that buttery snap you want without getting soggy. Honestly, it surprised me how quickly it disappeared at the party—people kept asking if I’d baked it from scratch or bought it from a fancy bakery. There’s something about the balance of sharp lemon and rich, salted butter that hits the spot every time.
And here’s a little secret: this recipe has become my go-to reset after hectic days. Something about slicing into those golden bars, the zing of lemon cutting through the richness, it just feels like a small victory. Plus, you can make it in a sheet pan, so cleanup is a breeze—perfect when you’re juggling work, life, and somehow still want a little homemade sweetness in your life.
It’s funny how a random text message led to a recipe that’s now a staple whenever I need a reliable dessert or just a little pick-me-up. If you’re anything like me, juggling a dozen things at once, you’ll appreciate how these lemon bars come together with minimal fuss but maximum flavor. They’re proof that quick, simple recipes can still surprise you with how good they taste.
Why You’ll Love This Recipe
After making these crispy sheet pan lemon bars with salted butter shortbread crust multiple times, I’ve realized why they stand out from the sea of lemon bar recipes out there. Here’s the scoop:
- Quick & Easy: Ready in under 45 minutes, these bars are perfect for last-minute plans or busy weeknights when you want something homemade but fast.
- Simple Ingredients: No fancy or hard-to-find items here. You probably have salted butter, lemons, sugar, and flour in your pantry already.
- Perfect for Gatherings: Whether it’s a potluck, brunch, or casual dinner, these bars disappear fast and always get compliments.
- Crowd-Pleaser: The crisp crust pairs beautifully with the tangy lemon topping, pleasing both kids and adults alike.
- Unbelievably Delicious: The secret is in the salted butter shortbread crust, baked just right for that satisfying crunch and buttery flavor that balances the tart lemon.
This isn’t your run-of-the-mill lemon bar recipe. The shortbread crust is made with salted butter, giving a subtle savory note that makes the lemon flavor pop even more. Also, baking it on a sheet pan means you get evenly crisp edges and a thin, delicate lemon layer that’s not too sweet or too dense.
It’s the kind of recipe you’ll find yourself making repeatedly, whether you want a quick dessert or something to impress without much fuss. Plus, if you enjoy lemon flavors in other dishes, like the creamy lemon ricotta pasta with fresh peas and mint, this recipe echoes that bright, fresh citrus vibe in dessert form.
What Ingredients You Will Need
This recipe uses simple, wholesome ingredients to deliver bold flavor and a satisfying texture without any fuss. Each element plays its part — the crust is buttery and crisp, the lemon filling tangy and smooth. Most are pantry staples, making this easy to pull together anytime.
- For the Salted Butter Shortbread Crust:
- 1 cup (226g) salted butter, softened (I love using Land O’Lakes for consistent quality)
- 1/2 cup (100g) granulated sugar
- 2 cups (240g) all-purpose flour
- 1/4 tsp fine sea salt (optional, for extra balance if your butter isn’t very salty)
- For the Lemon Filling:
- 4 large eggs, room temperature
- 1 1/2 cups (300g) granulated sugar
- 1/4 cup (32g) all-purpose flour
- 1/2 cup (120ml) freshly squeezed lemon juice (about 3-4 lemons)
- Zest of 2 lemons (for that fresh, punchy aroma)
Ingredient notes: Use fresh lemons for the best flavor—the bottled stuff just won’t cut it here. If you want a gluten-free version, swapping the all-purpose flour for almond flour works surprisingly well in the crust, though the texture is a bit different. For those avoiding dairy, try substituting salted vegan butter, but expect a slightly softer crust.
Equipment Needed
- Half sheet pan (about 13×18 inches) — this size ensures the lemon bars bake evenly and fit perfectly.
- Parchment paper — lining the sheet pan helps with easy removal and cleanup.
- Mixing bowls — at least two: one for the crust and one for the filling.
- Electric mixer or stand mixer — helps cream the butter and sugar for the crust smoothly, but you can also use a sturdy wooden spoon if needed.
- Whisk — for beating the eggs and mixing the lemon filling.
- Zester or microplane — to get fresh lemon zest, which really amps up the flavor.
- Rubber spatula — for scraping down the bowl and folding ingredients gently.
If you don’t have a half sheet pan, a 9×13 inch pan works, but the bars will be thicker and need a slightly longer baking time. I’ve tried baking in glass pans too, but metal tends to give a better crust crispness. Also, keeping your butter softened but not melted makes a huge difference in the crust texture — I learned that the hard way once!
Preparation Method

- Preheat your oven to 350°F (175°C). Line your half sheet pan with parchment paper, leaving an overhang on two sides for easy removal later. This step saves so much hassle when slicing.
- Make the crust: In a large bowl, beat 1 cup softened salted butter with 1/2 cup granulated sugar until light and fluffy — about 3-4 minutes. Use an electric mixer or stand mixer on medium speed.
- Add 2 cups all-purpose flour and 1/4 tsp salt to the butter mixture. Mix on low speed until just combined. The dough will be crumbly but should hold together when pressed.
- Press the crust evenly into the prepared sheet pan, covering the entire bottom with a firm, even layer. Use the bottom of a measuring cup or your fingers to compact it well.
- Bake the crust for 18-20 minutes or until it just starts to turn golden around the edges. Keep an eye on it — you want a crisp base but not a burnt one.
- While the crust bakes, prepare the lemon filling: In a medium bowl, whisk together 4 large eggs and 1 1/2 cups sugar until fully combined and slightly frothy.
- Whisk in 1/4 cup flour, lemon juice, and lemon zest until smooth. The flour helps thicken the filling so it sets well without cracking.
- Once the crust is out of the oven, pour the lemon filling evenly over the warm crust. Return the pan to the oven and bake for 20-25 minutes, or until the filling is just set — it should still have a slight jiggle in the center.
- Cool completely on a wire rack—this can take at least 1 hour. Then refrigerate for a couple of hours or overnight to let the bars fully set and firm up.
- Use the parchment overhang to lift the bars out of the pan. Slice into squares or rectangles with a sharp knife, wiping it clean between cuts for neat edges.
If you notice the filling cracking a little, don’t stress — it’s normal and doesn’t affect taste. Also, letting the crust come fully to room temperature before adding the filling prevents sogginess. Learned that tip after a few batches!
Cooking Tips & Techniques
To get that perfect crispy shortbread crust with a silky lemon topping, here are some tips I’ve picked up over time:
- Use salted butter: It adds a subtle savory balance that makes the lemon flavor pop and gives the crust a richer taste.
- Don’t overmix the crust dough: Mix just until combined to keep the shortbread tender yet crisp. Overworking flour can make it tough.
- Press the crust firmly: Use a flat-bottomed glass or measuring cup to ensure an even layer that bakes uniformly and holds the filling well.
- Fresh lemon juice and zest: Always fresh — bottled lemon juice lacks brightness, and zest brings a fragrant punch.
- Watch the baking times: The crust should be golden but not brown; the filling should be set but slightly jiggly when you take it out. Residual heat finishes the cooking.
- Chill before slicing: This step is crucial for clean slices and neat presentation.
Once, I got impatient and cut the bars warm. The filling oozed everywhere. Lesson learned! Also, if you like a bit more tang, add an extra tablespoon of lemon juice but reduce sugar by a tablespoon to balance sweetness.
Variations & Adaptations
This recipe is pretty versatile and easy to tweak depending on your preferences or dietary needs:
- Gluten-Free: Substitute the all-purpose flour in the crust with almond flour or a gluten-free baking blend. The texture will be a bit different but still delicious.
- Less Sweet & More Tart: Use less sugar in the filling (try 1 cup instead of 1 1/2 cups) and add a splash of lime juice for an extra citrus kick.
- Herbal Twist: Add a teaspoon of finely chopped fresh thyme or rosemary to the crust for a subtle herbal note that complements lemon beautifully.
- Berry Addition: Scatter fresh raspberries or blueberries over the crust before pouring the lemon filling for a pretty, fruity surprise.
- Dairy-Free: Swap salted butter for coconut oil or a vegan butter substitute; just expect a slightly softer crust.
One variation I adore is adding a thin layer of cream cheese spread under the lemon filling. It adds a luscious texture contrast and makes the bars feel extra special.
Serving & Storage Suggestions
These lemon bars are best served chilled or at room temperature. I usually cut them into small squares and dust lightly with powdered sugar for a pretty finish right before serving.
They pair wonderfully with a cup of tea or a light, citrusy cocktail if you’re entertaining. For a brunch spread, they fit right alongside dishes like the creamy spring vegetable fettuccine alfredo or a fresh salad.
To store, keep the bars in an airtight container in the refrigerator for up to 4 days. You can also freeze them for up to 2 months — just thaw overnight in the fridge. Reheat briefly at room temperature or enjoy straight from the fridge; the flavors actually deepen and meld after a day or two.
Nutritional Information & Benefits
Each serving (about 2×2 inch square) roughly contains:
| Calories | 220 kcal |
|---|---|
| Fat | 12g (mostly from butter) |
| Carbohydrates | 28g (sugar and flour) |
| Protein | 3g (from eggs) |
The use of fresh lemon juice adds vitamin C and antioxidants, while the eggs provide protein. The salted butter crust adds richness and fat, which helps keep you satisfied. For a lighter dessert, consider cutting smaller pieces or pairing with fresh fruit.
For those with gluten sensitivities, the almond flour substitution offers a grain-free option. Just be mindful of the sugar content if you’re watching carbohydrate intake.
Conclusion
If you’re looking for a dessert that’s simple but packs a punch, these crispy sheet pan lemon bars with salted butter shortbread crust fit the bill. They’re the kind of recipe that’s easy enough to throw together on a whim yet impressive enough to bring to any gathering. Plus, the balance of buttery crust and tangy lemon filling is just the kind of sweet-sour harmony that keeps people coming back for more.
What I love most is how adaptable this recipe is — whether you want to add berries, go gluten-free, or add a little herbal twist. It’s become a staple in my home, especially after busy days when I need a little homemade comfort without spending hours in the kitchen.
Give it a try, and I’d love to hear how you make it your own. Drop a comment below if you have variations or tricks you’ve found, or share your favorite occasions for these lemon bars. There’s something so satisfying about a recipe that feels both classic and personal.
FAQs About Crispy Sheet Pan Lemon Bars
Can I use unsalted butter instead of salted butter for the crust?
Yes, but add a pinch of salt (about 1/4 tsp) to the crust dough to balance the flavors.
How do I prevent the lemon filling from cracking?
Don’t overbake the filling; it should still jiggle slightly when you take it out. Also, let the bars cool gradually and chill before slicing.
Can I make these lemon bars ahead of time?
Absolutely! They taste even better the next day once chilled and set. Store covered in the fridge for up to 4 days.
What’s the best way to cut clean squares?
Use a sharp knife wiped clean between cuts. Chilling the bars thoroughly before slicing helps get neat edges.
Can I freeze these lemon bars?
Yes, freeze them in an airtight container for up to 2 months. Thaw overnight in the fridge before serving.
Pin This Recipe!
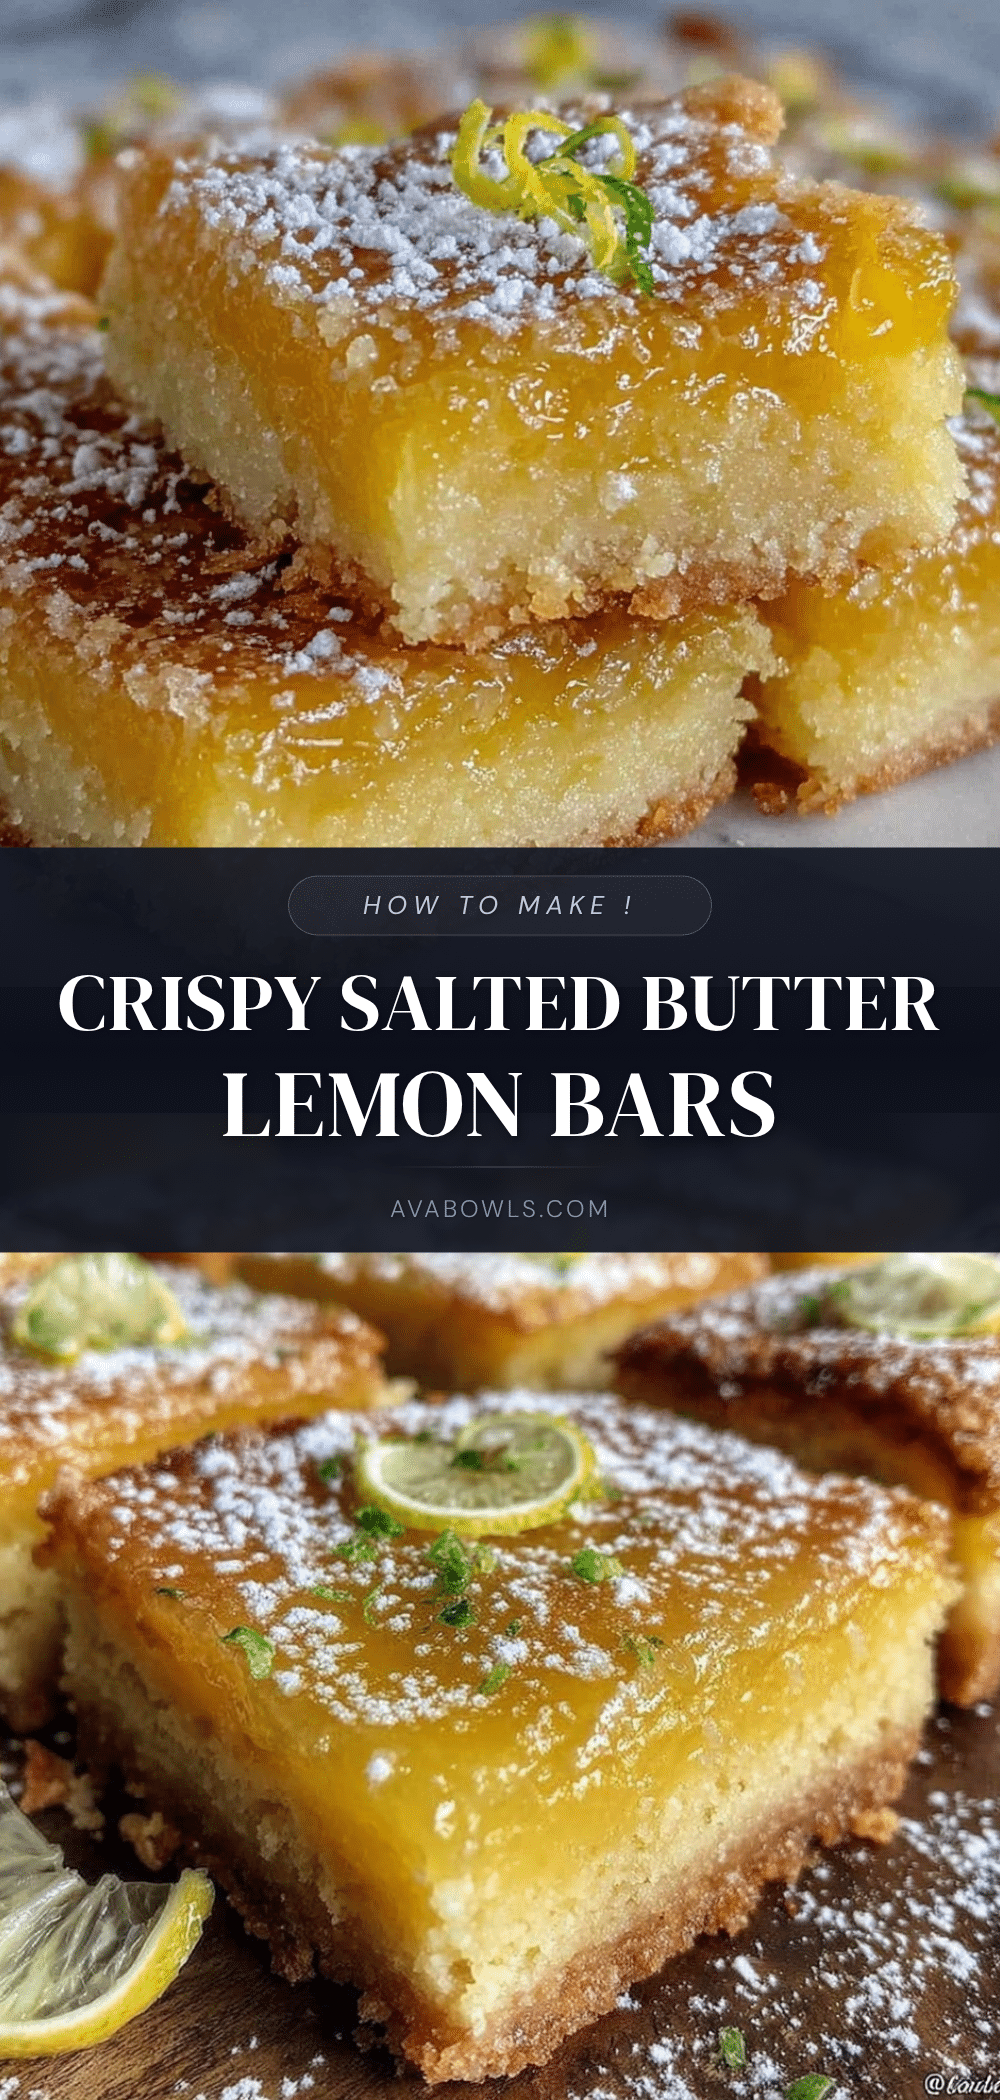
Crispy Sheet Pan Lemon Bars Recipe with Salted Butter Shortbread Crust

These lemon bars feature a crispy salted butter shortbread crust topped with a tangy lemon filling. Easy to make in a sheet pan, they are perfect for gatherings and quick desserts.
- Prep Time: 15 minutes
- Cook Time: 40 minutes
- Total Time: 1 hour 15 minutes plus chilling time
- Yield: 24 servings 1x
- Category: Dessert
- Cuisine: American
Ingredients
- 1 cup (226g) salted butter, softened
- 1/2 cup (100g) granulated sugar
- 2 cups (240g) all-purpose flour
- 1/4 tsp fine sea salt (optional)
- 4 large eggs, room temperature
- 1 1/2 cups (300g) granulated sugar
- 1/4 cup (32g) all-purpose flour
- 1/2 cup (120ml) freshly squeezed lemon juice (about 3–4 lemons)
- Zest of 2 lemons
Instructions
- Preheat your oven to 350°F (175°C). Line your half sheet pan with parchment paper, leaving an overhang on two sides for easy removal later.
- In a large bowl, beat 1 cup softened salted butter with 1/2 cup granulated sugar until light and fluffy, about 3-4 minutes, using an electric mixer or stand mixer on medium speed.
- Add 2 cups all-purpose flour and 1/4 tsp salt to the butter mixture. Mix on low speed until just combined. The dough will be crumbly but should hold together when pressed.
- Press the crust evenly into the prepared sheet pan, covering the entire bottom with a firm, even layer. Use the bottom of a measuring cup or your fingers to compact it well.
- Bake the crust for 18-20 minutes or until it just starts to turn golden around the edges.
- While the crust bakes, whisk together 4 large eggs and 1 1/2 cups sugar in a medium bowl until fully combined and slightly frothy.
- Whisk in 1/4 cup flour, lemon juice, and lemon zest until smooth.
- Once the crust is out of the oven, pour the lemon filling evenly over the warm crust.
- Return the pan to the oven and bake for 20-25 minutes, or until the filling is just set but still slightly jiggly in the center.
- Cool completely on a wire rack, then refrigerate for a couple of hours or overnight to let the bars fully set and firm up.
- Use the parchment overhang to lift the bars out of the pan. Slice into squares or rectangles with a sharp knife, wiping it clean between cuts for neat edges.
Notes
Use fresh lemons for best flavor. For gluten-free, substitute all-purpose flour with almond flour in the crust. For dairy-free, use salted vegan butter or coconut oil but expect a softer crust. Do not overbake the filling to avoid cracking; it should still jiggle slightly when done. Chill bars thoroughly before slicing for clean cuts.
Nutrition
- Serving Size: 1 piece (about 2x2 i
- Calories: 220
- Sugar: 20
- Sodium: 150
- Fat: 12
- Saturated Fat: 7
- Carbohydrates: 28
- Fiber: 0.5
- Protein: 3
Keywords: lemon bars, sheet pan dessert, salted butter shortbread, lemon dessert, easy lemon bars, crowd-pleaser, quick dessert