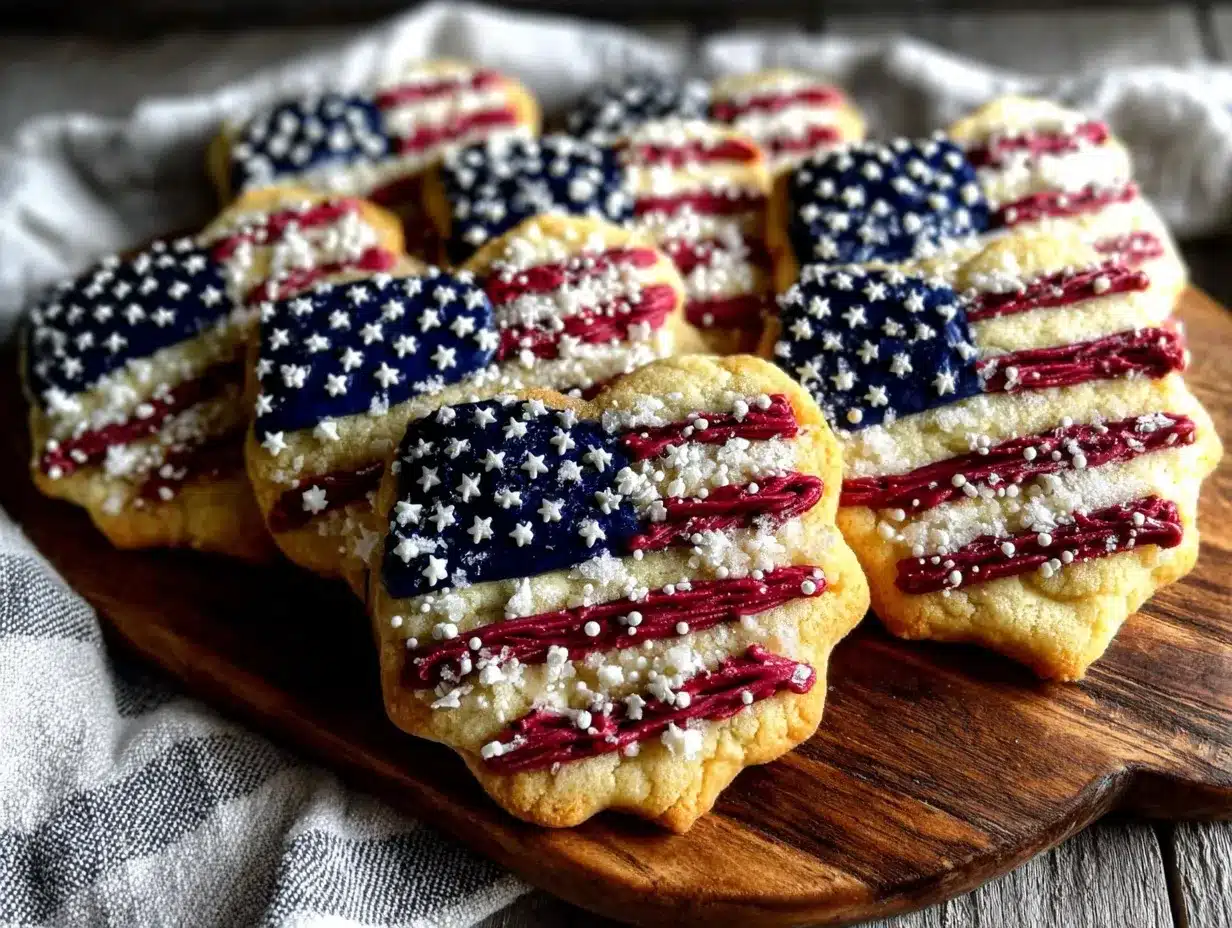
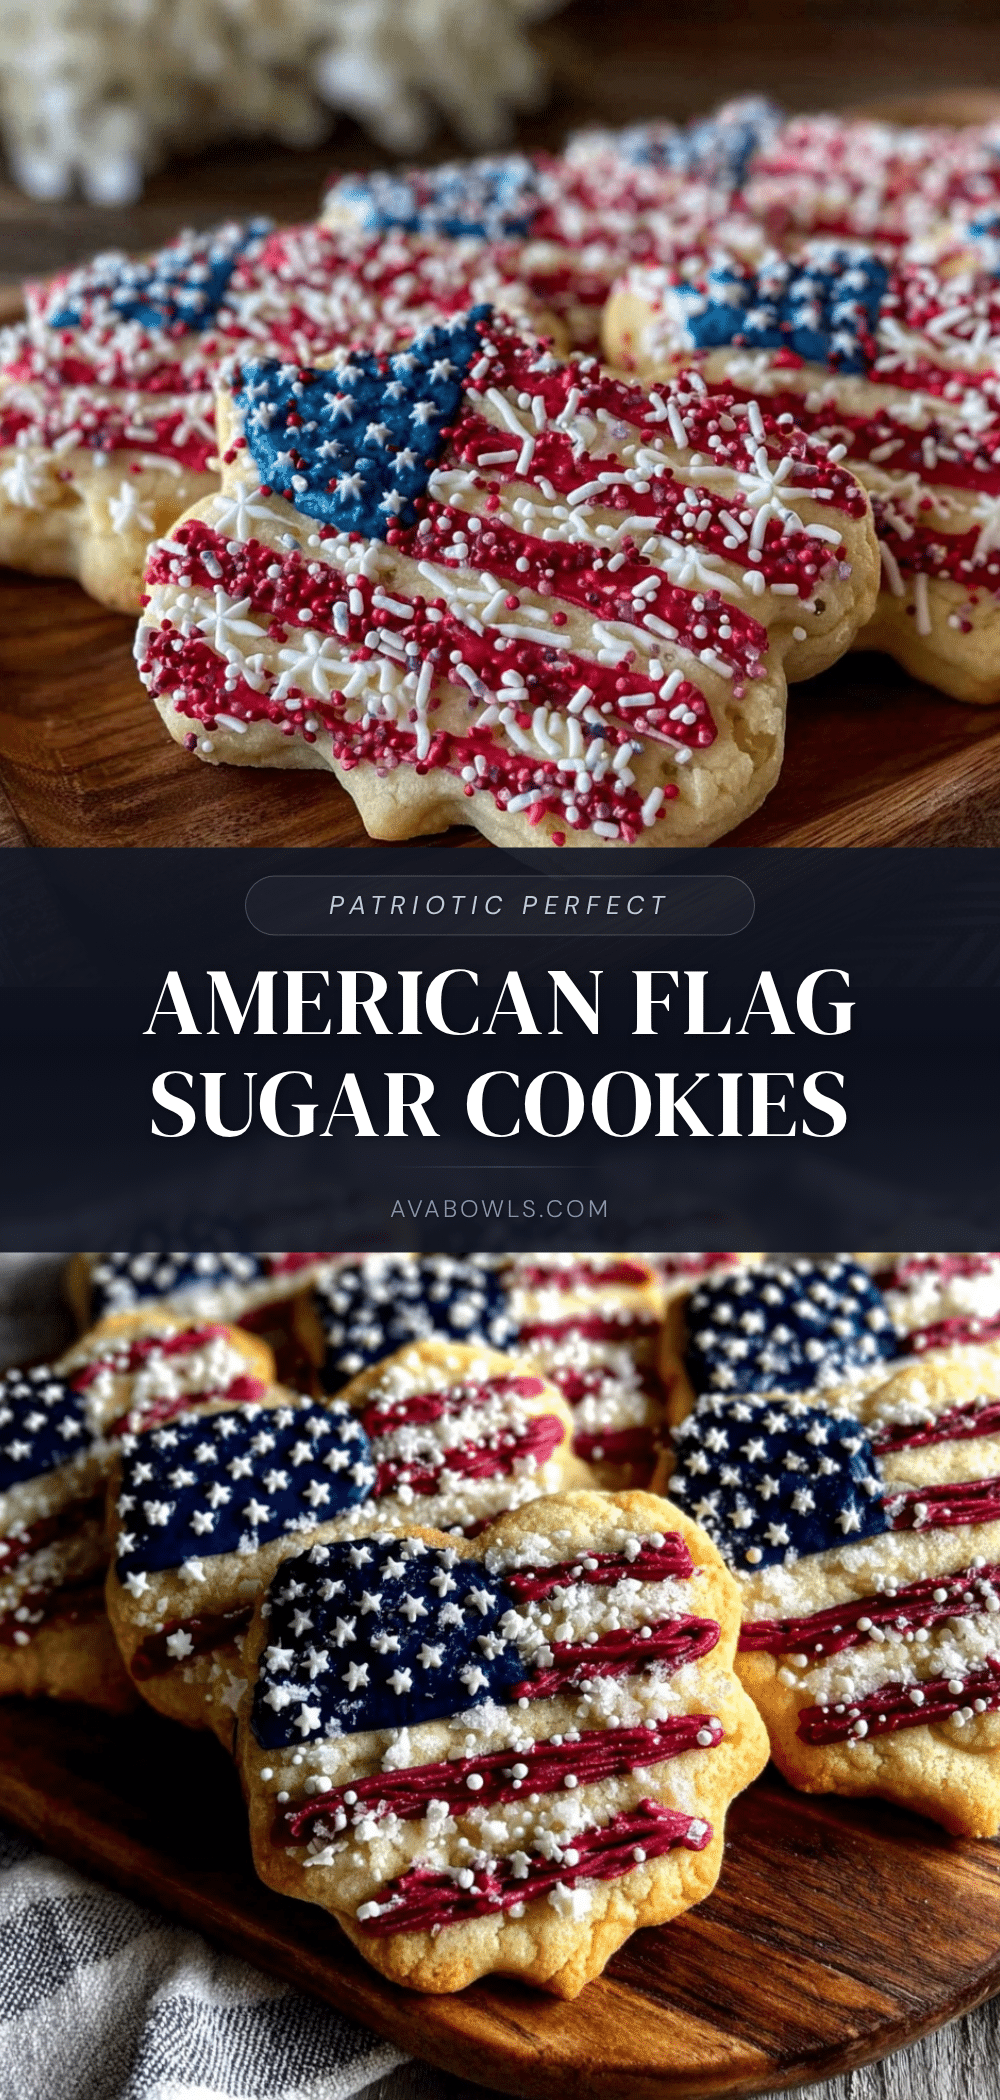
“You’re not seriously decorating those cookies with all those tiny stars, are you?” my friend laughed as I carefully piped blue dots onto each cookie. It was the Fourth of July weekend, the kitchen smelled of vanilla and sugar, and honestly, I was a little overambitious. But there’s something about crafting these Perfect American Flag Sugar Cookies with Royal Icing that turns me into a kid again—patient, focused, and quietly proud. It wasn’t some grand plan; more like a last-minute idea sparked by the sight of red, white, and blue ribbons leftover from last year’s picnic. I figured, why not make something that tastes as good as it looks?
At first, I wasn’t sure if my royal icing skills would hold up—let’s face it, I’m not really a baker—but the recipe kept surprising me. Each batch came out crisp around the edges, tender in the center, and the icing? Smooth and glossy, drying just right for stacking without smudges. By the second batch, neighbors were knocking, asking for the recipe, and I realized these cookies had quietly become the star of the block party. It’s that kind of recipe that sticks with you, not because it’s flawless, but because it’s approachable and genuinely fun.
So, if you want a cookie that brings a little sparkle to your celebrations—whether for Independence Day, Memorial Day, or just when you’re craving a sweet nod to Americana—this recipe’s got you. It’s a sweet tradition in the making, with just the right balance of nostalgia and skill-building, and a little messy kitchen chaos. Trust me, you’ll want to keep these Perfect American Flag Sugar Cookies with Royal Icing in your recipe box for years.
Why You’ll Love This Recipe
Honestly, these Perfect American Flag Sugar Cookies with Royal Icing became a staple for me because they check all the boxes for a festive treat that’s actually doable. Here’s why this recipe stands out:
- Quick & Easy: The dough comes together in about 15 minutes, and the cookies bake in just 10–12 minutes—ideal for those last-minute holiday plans.
- Simple Ingredients: You probably have everything in your pantry already: flour, sugar, butter, eggs, and basic spices. No fancy imports or specialty shops required.
- Perfect for Celebrations: Whether it’s a backyard barbecue, a school party, or a quiet picnic, these cookies bring a festive vibe that’s hard to beat.
- Crowd-Pleaser: Kids love the bright colors, and adults appreciate the buttery, tender crumb with just the right hint of vanilla.
- Unbelievably Delicious: The royal icing sets with a smooth, glossy finish that’s not too sweet, giving a perfect balance to the cookie’s buttery flavor.
What makes these cookies different? It’s the royal icing technique I tweaked—whipping it to just the right consistency so it’s pipeable but dries without cracking or going too hard. Also, the cookie base is foolproof, holding its shape well for detailed decorating but never feeling dry or tough. And honestly, it’s a recipe that invites you to get creative without stress—so whether you’re decorating for a patriotic theme or want to try your hand at piping, you’ll find this recipe both forgiving and rewarding.
These cookies aren’t just pretty; they’re a little celebration on a plate, the kind of treat that makes you smile, maybe close your eyes after the first bite, and think, “Yeah, this was worth the effort.”
What Ingredients You Will Need
This recipe uses simple, wholesome ingredients to create a buttery, tender cookie base and a smooth, vibrant royal icing that dries perfectly for decorating. Most are pantry staples, and substitutions are easy if needed.
- For the Sugar Cookies Dough:
- 2 ¾ cups (345 g) all-purpose flour, sifted (I prefer King Arthur for consistent texture)
- 1 teaspoon baking powder
- ½ teaspoon salt
- 1 cup (227 g) unsalted butter, softened (room temperature for best creaming)
- 1 ½ cups (300 g) granulated sugar
- 1 large egg, room temperature
- 2 teaspoons pure vanilla extract (a good quality extract really makes a difference here)
- For the Royal Icing:
- 4 cups (480 g) powdered sugar, sifted
- 3 tablespoons meringue powder or 2 large egg whites (use pasteurized egg whites for safety)
- 6 tablespoons (90 ml) water, plus more to adjust consistency
- Gel food coloring in red, blue, and white (white is natural with the icing, but a touch of titanium dioxide powder can brighten it if desired)
- Optional: A drop of lemon juice to add a little brightness and help with drying
You can swap all-purpose flour with gluten-free blend for a gluten-free version, though texture might shift slightly. For dairy-free, replace butter with vegan margarine or coconut oil, but expect a subtle flavor difference. When choosing food coloring, gel types are best—they won’t thin your icing like liquid colors might.
Equipment Needed
- Mixing bowls (medium and large sizes)
- Electric mixer or stand mixer with paddle attachment for the cookie dough
- Hand mixer or stand mixer with whisk attachment for the royal icing
- Rolling pin (a non-stick or lightly floured surface is essential)
- Cookie cutters shaped as rectangles or squares to mimic flags (about 3 inches wide recommended)
- Baking sheets lined with parchment paper or silicone baking mats
- Piping bags (disposable or reusable) and small round piping tips (#1 or #2) for detailed icing work
- Spoons and toothpicks for mixing and adjusting icing colors
If you don’t have piping bags, zip-top bags with a small snip in the corner work fine for the icing. I’ve found that silicone mats make cleanup easier, especially when working with royal icing, which can be tricky to remove once dried. For those on a budget, a simple wooden rolling pin and basic cookie cutters work perfectly well—no need for expensive gadgets here.
Preparation Method
- Mix Dry Ingredients: In a medium bowl, whisk together the flour, baking powder, and salt. Set aside. This combination ensures your cookies hold their shape but stay tender. (5 minutes)
- Cream Butter and Sugar: Using an electric mixer on medium speed, beat the softened butter and granulated sugar until pale and fluffy—about 3-4 minutes. This step traps air for a lighter cookie. (5 minutes)
- Add Egg and Vanilla: Beat in the egg and vanilla extract until fully combined. The dough might look a little curdled here, but that’s normal. (2 minutes)
- Combine Wet and Dry: Gradually add the dry ingredients to the butter mixture on low speed. Mix until just combined—don’t overwork or the cookies might get tough. The dough should be soft but not sticky; if it’s too sticky, chill for 15 minutes. (3-5 minutes)
- Chill the Dough: Shape the dough into two discs, wrap in plastic wrap, and refrigerate for at least 1 hour. This step helps the cookies hold their shape and makes rolling easier. (1 hour)
- Preheat Oven and Prepare Baking Sheets: Preheat to 350°F (175°C). Line baking sheets with parchment or silicone mats for easy cleanup. (10 minutes)
- Roll and Cut: On a lightly floured surface, roll out dough to about ¼ inch (6 mm) thickness. Use rectangular cookie cutters to cut shapes resembling flags. Transfer cookies to baking sheets about 1 inch (2.5 cm) apart. (10-15 minutes)
- Bake: Bake for 10-12 minutes or until edges are just golden (watch closely). The centers should remain pale. Let cookies cool on the sheet for 5 minutes before transferring to wire racks to cool completely. (15 minutes)
- Prepare Royal Icing: In a clean bowl, beat powdered sugar, meringue powder, and water on medium-high speed until stiff peaks form, about 7-10 minutes. Adjust water if needed for piping consistency—thicker for outlines, thinner for flooding. Divide icing into three bowls and tint red and blue accordingly, leaving one white. (15 minutes)
- Decorate: Outline each cookie in white icing and flood the inside. Once set (about 20 minutes), pipe blue sections for the stars and red stripes carefully. Use a toothpick to fix any bubbles or spread colors slightly. Let dry completely (4-6 hours or overnight). (1 hour active, plus drying time)
Pro tip: If your icing dries too fast while working, cover bowls with damp towels to keep it pliable. Also, don’t rush the drying—handling too soon will smudge your perfect stars and stripes.
Cooking Tips & Techniques
Making sugar cookies with royal icing can seem intimidating, but a few tricks make it much easier. First, chilling the dough is essential—skip this and your cookies will spread and lose their crisp edges. I once forgot this step and ended up with flat, shapeless cookies (lesson learned!).
When it comes to royal icing, consistency is king. I like to keep two consistencies on hand: one thicker for outlines and details, and a slightly thinner one for flooding large areas. If you’re piping stars or stripes, start with outlines to create “walls” that keep the thinner icing from pooling outside the lines.
Another tip: Use gel food coloring sparingly. I used to add too much red and ended up with an overly sweet, runny icing. A tiny dab goes a long way, and you can always add more for deeper color.
Timing-wise, multitask by prepping your royal icing while cookies bake and cool. This keeps the flow smooth. Also, if you want to save time, these cookies freeze well uniced, so you can bake ahead of time and decorate closer to your event.
Variations & Adaptations
Want to switch things up? Here are some fun twists you can try on these Perfect American Flag Sugar Cookies:
- Dietary: Use almond flour or a gluten-free blend in place of regular flour for gluten-free cookies. Swap butter with coconut oil or vegan butter for dairy-free options. The texture will be a bit different but still delicious.
- Seasonal: Try swapping the royal icing colors for autumn hues—pumpkin orange and deep burgundy—or pastel shades for spring celebrations.
- Flavor Twist: Add lemon zest or a splash of almond extract to the dough for a subtle, fresh flavor. I once added a pinch of cinnamon for a cozy twist that got rave reviews.
- Cooking Method: If you want a softer cookie, bake for 8-9 minutes instead of 12. For crispier edges, leave them in the oven a minute or two longer, but watch closely to avoid burning.
- Decoration Style: Instead of royal icing, try a simple glaze with powdered sugar and milk, then use edible markers for drawing stars and stripes if you’re short on time or tools.
Serving & Storage Suggestions
These sugar cookies are best served at room temperature once the royal icing has fully dried. They make a stunning centerpiece on dessert tables or packed in patriotic-themed boxes for gifts.
Pair them with cold lemonade or a classic iced tea for a refreshing contrast, or even alongside a creamy treat like my creamy spring vegetable fettuccine alfredo for a meal that balances savory and sweet.
For storage, keep the cookies in an airtight container at room temperature for up to 5 days. Avoid stacking the decorated sides together—use parchment paper between layers to protect the icing. They also freeze well for up to 3 months if wrapped tightly.
When reheating, let frozen cookies thaw completely at room temperature before serving to preserve texture and flavor. The icing may soften slightly but will regain firmness after a short rest.
Flavors tend to mellow and meld over a day or two, making these cookies even more enjoyable if made ahead.
Nutritional Information & Benefits
Each cookie (about 3 inches wide) contains approximately 150-180 calories, with 7-9 grams of fat, 22-25 grams of carbohydrates, and 1-2 grams of protein. The butter adds richness and texture, while the powdered sugar contributes sweetness and structure to the icing.
While this treat is definitely for indulgence, it’s made with simple ingredients and no artificial preservatives. Using real vanilla extract and fresh eggs gives a wholesome flavor that store-bought varieties often lack.
For those watching allergens, this recipe contains gluten, dairy, and eggs but can be adapted as noted above. The royal icing’s meringue powder is a safe alternative to raw egg whites, making it safer for more households.
Conclusion
These Perfect American Flag Sugar Cookies with Royal Icing have become my go-to for adding a little festive joy, whether it’s a holiday or just a sweet craving. They’re approachable for anyone willing to try decorating and forgiving enough to make mistakes along the way.
Feel free to tweak the colors, shapes, or flavors to match your celebration style—this recipe invites personalization and creativity. I love how these cookies bring people together, inspiring smiles and a few “wow” moments around the kitchen table.
Give them a try, and don’t forget to share how your stars and stripes turn out! There’s something special about homemade treats that you just can’t find anywhere else.
And if you enjoy baking sweets with a bit of flair, you might appreciate my guide for creamy strawberry cream cheese stuffed French toast—another recipe that’s all about that perfect balance of flavor and presentation.
FAQs About Perfect American Flag Sugar Cookies with Royal Icing
Can I make the dough ahead of time?
Yes! The dough can be wrapped tightly and refrigerated for up to 3 days or frozen for up to 3 months. Just thaw in the fridge overnight before rolling out.
How do I prevent the royal icing from cracking?
Make sure your icing isn’t too thick and that cookies dry at room temperature in a cool, dry place. Avoid stacking cookies before the icing fully hardens, which usually takes 4-6 hours.
Can I use store-bought royal icing instead of making my own?
You can, but homemade royal icing tends to have a better texture and flavor. Plus, mixing your own lets you control the consistency for perfect decorating.
What if I don’t have a piping bag or tips?
Use a zip-top bag with a tiny corner snipped off. Toothpicks or small brushes also work for fine details or fixing mistakes.
How do I store decorated sugar cookies?
Store them in an airtight container at room temperature, with parchment paper between layers to protect the icing, for up to 5 days. For longer storage, freeze uniced cookies and decorate after thawing.
Pin This Recipe!
Perfect American Flag Sugar Cookies with Royal Icing

These festive sugar cookies feature a tender, buttery base decorated with smooth, glossy royal icing in red, white, and blue, perfect for patriotic celebrations like the Fourth of July.
- Prep Time: 1 hour 40 minutes
- Cook Time: 12 minutes
- Total Time: 2 hours 10 minutes
- Yield: 24 cookies 1x
- Category: Dessert
- Cuisine: American
Ingredients
- 2 ¾ cups (345 g) all-purpose flour, sifted
- 1 teaspoon baking powder
- ½ teaspoon salt
- 1 cup (227 g) unsalted butter, softened (room temperature)
- 1 ½ cups (300 g) granulated sugar
- 1 large egg, room temperature
- 2 teaspoons pure vanilla extract
- 4 cups (480 g) powdered sugar, sifted
- 3 tablespoons meringue powder or 2 large egg whites (pasteurized recommended)
- 6 tablespoons (90 ml) water, plus more to adjust consistency
- Gel food coloring in red, blue, and white
- Optional: A drop of lemon juice
Instructions
- Mix dry ingredients: whisk together flour, baking powder, and salt in a medium bowl; set aside.
- Cream butter and sugar: beat softened butter and granulated sugar on medium speed until pale and fluffy, about 3-4 minutes.
- Add egg and vanilla: beat in egg and vanilla extract until fully combined.
- Combine wet and dry ingredients: gradually add dry ingredients to butter mixture on low speed; mix until just combined. Chill dough if too sticky for 15 minutes.
- Chill dough: shape dough into two discs, wrap in plastic wrap, and refrigerate for at least 1 hour.
- Preheat oven to 350°F (175°C) and prepare baking sheets with parchment paper or silicone mats.
- Roll and cut dough: roll out dough to ¼ inch thickness on lightly floured surface; cut with rectangular cookie cutters about 3 inches wide. Place cookies 1 inch apart on baking sheets.
- Bake cookies for 10-12 minutes until edges are just golden; cool on sheet for 5 minutes then transfer to wire racks to cool completely.
- Prepare royal icing: beat powdered sugar, meringue powder, and water on medium-high speed until stiff peaks form (7-10 minutes). Adjust water for piping consistency. Divide and tint icing red, blue, and leave one white.
- Decorate cookies: outline each cookie with white icing and flood inside. After about 20 minutes, pipe blue stars and red stripes carefully. Use toothpick to fix bubbles or spread colors. Let dry completely for 4-6 hours or overnight.
Notes
Chill dough for at least 1 hour to prevent spreading. Use gel food coloring sparingly to avoid runny icing. Keep royal icing covered with damp towels to maintain pliability. Let decorated cookies dry fully (4-6 hours or overnight) before stacking or storing. Cookies freeze well uniced for up to 3 months.
Nutrition
- Serving Size: 1 cookie (about 3 in
- Calories: 165
- Sugar: 16
- Sodium: 90
- Fat: 8
- Saturated Fat: 5
- Carbohydrates: 24
- Protein: 2
Keywords: American flag cookies, sugar cookies, royal icing, Fourth of July, patriotic cookies, easy sugar cookies, homemade cookies, festive treats