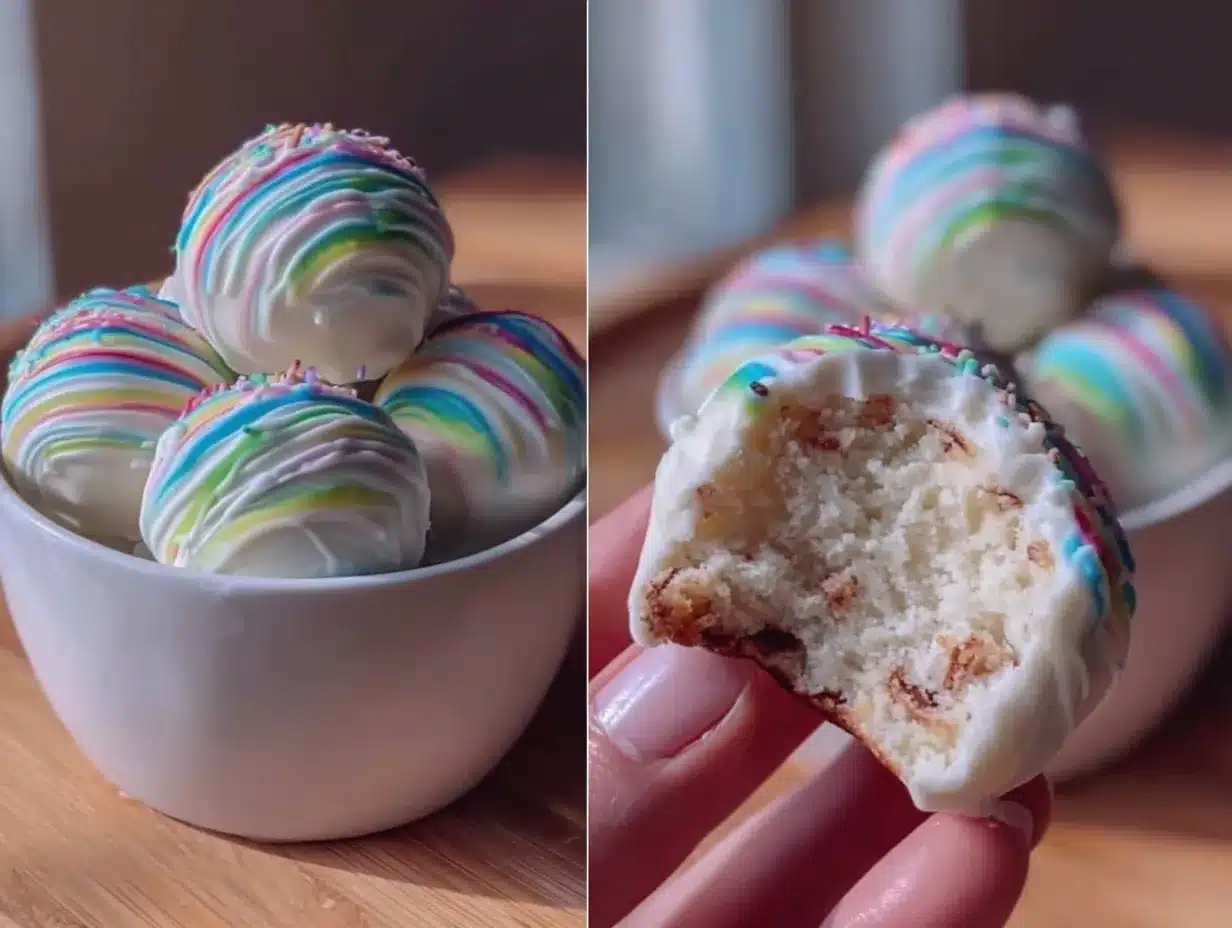
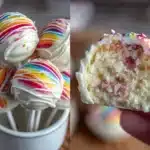
“Are you sure these are supposed to look like beach balls?” my friend asked, squinting suspiciously at the colorful spheres cooling on the rack. Honestly, I wasn’t convinced either when I first attempted these cake pops. It all started one lazy Saturday afternoon when I found a box of cake mix and a tub of white chocolate melting wafers tucked away in the pantry. I figured, why not try making something fun for the kids’ upcoming pool party? The idea was simple—bright, cheerful cake pops coated in white chocolate shells with those classic beach ball stripes. But the execution? Let’s just say I ended up with a few more “abstract art” versions before nailing the look.
The kitchen smelled like sweet vanilla and melted chocolate by the time I got it right, and the pops were actually turning out cute and sturdy enough for little hands. What really surprised me was how addictive the process became; I ended up making these more than once in a week, tweaking colors, and perfecting the shell thickness. Now, they’re a staple whenever friends drop by or when I want a playful dessert that’s both eye-catching and easy to eat.
There’s something quietly satisfying about the way the smooth white chocolate shell cracks gently when you bite in, revealing moist cake underneath. These Perfect Beach Ball Cake Pops with White Chocolate Shells aren’t just dessert; they’re a memory trigger for sunny afternoons, laughter, and a bit of kitchen chaos. If you’re anything like me, you’ll find yourself smiling as you make them, knowing the payoff is just as sweet as the treat itself.
Why You’ll Love This Recipe
After several rounds of trial and error, this recipe for Perfect Beach Ball Cake Pops with White Chocolate Shells has become a go-to for fun celebrations and casual snacking. Here’s why it stands out:
- Quick & Easy: Ready in under 90 minutes, these pops are perfect for last-minute gatherings or when you want a simple baking project without fuss.
- Simple Ingredients: No need for specialty stores—just basic pantry staples like cake mix, white chocolate, and food coloring.
- Perfect for Pool Parties & Kids’ Events: Their playful design makes them ideal for sunny days or birthday celebrations.
- Crowd-Pleaser: Kids adore the bright colors, and adults appreciate the moist cake with a smooth chocolate shell.
- Unbelievably Delicious: The white chocolate shell adds a subtle sweetness and crisp texture, balancing the rich, tender cake inside.
This isn’t your average cake pop recipe. The secret lies in the white chocolate shell—melting it just right to coat evenly without being too thick or brittle. Plus, the striped design isn’t just painted on; it’s carefully crafted with colored melts that set quickly and hold their shape, giving you that iconic beach ball look. I love how it turns a simple cake pop into a miniature piece of edible art, instantly brightening any dessert table.
Honestly, this recipe has been my secret weapon for impressing guests without stressing over complicated techniques. Whether it’s paired with a refreshing fresh pink smoothie bowl or alongside a batch of creamy beer cheese pretzel dip for the adults, these cake pops fit right into the fun and flavor.
What Ingredients You Will Need
This recipe relies on simple, wholesome ingredients to deliver bold flavor and satisfying texture without the fuss. Most are pantry staples, and there’s flexibility for substitutions if needed.
- For the Cake:
- 1 box yellow or white cake mix (about 15.25 oz / 432 g) – I prefer Betty Crocker for consistent results.
- 3 large eggs, room temperature
- 1/2 cup (120 ml) vegetable oil or melted butter (adds richness)
- 1 cup (240 ml) water or milk (use dairy-free milk if preferred)
- For the Cake Pop Mixture:
- 1/2 cup (120 g) cream cheese, softened (helps bind and adds moist texture)
- For the White Chocolate Shell:
- 16 oz (450 g) white chocolate melting wafers or white candy melts (Wilton brand works great)
- Gel food coloring in red, blue, yellow, and green (gel colors won’t thin the chocolate)
- For Assembly:
- 50-60 cake pop sticks (standard size)
- Styrofoam block or cake pop stand for drying
Ingredient tips: Choose a cake mix you enjoy since it’s the base flavor here. The softened cream cheese is key—it keeps the cake pop moist and helps the mixture stick together without crumbling. For the white chocolate shell, avoid real white chocolate bars; they often seize when melted. Candy melts or melting wafers are designed for smooth coating and easier coloring.
Equipment Needed
- Large mixing bowl for cake batter
- Electric mixer or stand mixer (hand mixing can work but takes longer)
- Baking pan (9×13 inch / 23×33 cm recommended)
- Wire rack for cooling cake
- Microwave-safe bowls for melting white chocolate
- Styrofoam block or dedicated cake pop stand to hold pops upright while drying
- Small paint brushes or toothpicks for applying colored stripes
- Measuring cups and spoons (both US and metric helpful for precision)
For budget-friendly options, you can fashion a drying stand with a block of floral foam wrapped in foil. When melting chocolate, a double boiler works well if you want to avoid the microwave, but a microwave-safe bowl with careful heating bursts is usually quicker. Make sure to stir frequently to prevent burning, which I’ve learned the hard way!
Preparation Method
- Bake the Cake: Preheat your oven to 350°F (175°C). Prepare the cake mix according to the box instructions, combining the eggs, oil, and water with the mix in a large bowl. Pour the batter into the greased 9×13 inch (23×33 cm) pan. Bake for 30-35 minutes, or until a toothpick inserted in the center comes out clean. Let the cake cool completely on a wire rack (about 1 hour).
- Crumble the Cake and Mix: Once cooled, crumble the cake into a large mixing bowl using your hands or a fork. Add the softened cream cheese and mix thoroughly with your hands or a spoon until the mixture holds together when pressed. If it feels too dry, add a teaspoon of milk at a time. This step is crucial for cake pops that don’t fall apart.
- Shape the Cake Pops: Roll the mixture into 1.5-inch (4 cm) balls and place them on a parchment-lined baking sheet. Insert a cake pop stick halfway into each ball. Chill the formed pops in the refrigerator for at least 30 minutes—this helps them firm up and reduces breakage when dipping.
- Melt the White Chocolate: In a microwave-safe bowl, heat the white chocolate wafers in 30-second bursts, stirring well between each until smooth and fully melted. Keep the bowl warm by placing it over a pot of simmering water (double boiler) if needed.
- Dip and Coat: Dip each chilled cake pop into the melted white chocolate, covering completely. Gently tap off excess chocolate and stand the pop upright in a Styrofoam block or cake pop stand. Allow the shell to set slightly but stay tacky (about 10 minutes).
- Prepare Colored Stripes: Divide small amounts of white chocolate into separate bowls. Add gel food coloring to each to create vibrant red, blue, yellow, and green melts. Use a small paintbrush or toothpick to paint the classic beach ball stripes onto each pop while the shell is still tacky. This technique helps the stripes stick well without smudging.
- Let the Pops Dry: Place the decorated pops upright and let them dry completely at room temperature or in the fridge (about 1 hour). Once fully set, the white chocolate shell should be firm and the stripes vibrant.
Pro tip: If your white chocolate thickens while decorating, gently reheat in short bursts. Also, chilling the cake pops before dipping really helps keep them intact—skip this and you’ll risk them falling apart while coating.
Cooking Tips & Techniques
Making perfect cake pops requires a little patience and a few tricks I learned the hard way. First, always cool your cake completely before crumbling it. Warm cake leads to mushy pops that won’t hold shape. Mixing cream cheese in helps with moisture and binding—don’t skip it, or you’ll be chasing crumbs everywhere.
When melting white chocolate, take it slow. Overheating makes it grainy or burnt. Stir often, and use a double boiler or microwave in 20-30 second bursts. If your melts thicken, don’t panic—just gently reheat.
Dipping is where many mess up. Dip quickly and tap off excess with gentle taps on the bowl’s edge; too much chocolate makes it clumpy and heavy. Hold the pop stick near the base to avoid warm hands melting the coating.
Painting the stripes requires a steady hand but don’t stress—it’s okay if your lines aren’t perfect. I find a small angled brush works best. You can even practice on parchment paper first to get the feel.
Timing is key. Chill the cake pops once shaped, then dip, then decorate while the shell is still tacky. This sequence helps the stripes adhere perfectly. Multitasking here is your friend: melt your colors while the pops chill, so you’re ready to go.
Variations & Adaptations
- Flavor Twists: Swap the yellow cake mix for chocolate or red velvet for a different base flavor. I once made pumpkin spice cake pops for a fall party, and the white chocolate shell paired beautifully.
- Dietary Substitutions: Use gluten-free cake mix and dairy-free cream cheese to make these suitable for gluten intolerance or dairy-free diets. Coconut-based white chocolate melts work well for a vegan version.
- Color Customization: Swap the classic beach ball colors for pastel shades for a baby shower or neon colors for a summer bash. You can even add edible glitter to the shell for some sparkle.
- Alternative Coatings: Instead of white chocolate, try candy melts in pastel colors for a different vibe, or dip in dark chocolate and paint stripes with colored white chocolate melts.
For a fun twist, I once made these cake pops with a hidden surprise inside—a small nugget of caramel or peanut butter cup before shaping. It was a hit, especially for the adults!
Serving & Storage Suggestions
Serve these Perfect Beach Ball Cake Pops chilled or at room temperature. They make a playful centerpiece at parties and pair nicely with light, refreshing drinks or fruit bowls. I often set them out alongside a fresh Greek yogurt bowl with pomegranate for a balanced dessert spread.
Store cake pops in an airtight container in the refrigerator for up to 4 days. Avoid stacking them to prevent the delicate shells from cracking. For longer storage, freeze uncoated cake balls and dip them fresh when ready to serve.
Reheat by letting cake pops sit at room temperature for about 15 minutes before serving—this helps the cake soften slightly without melting the shell. Flavors tend to develop and deepen after a day, so making them a day ahead is a smart move for parties.
Nutritional Information & Benefits
Each cake pop contains approximately 150-180 calories, depending on size and ingredients. The white chocolate shell adds a touch of sweetness and a satisfying crunch, while the cake provides carbohydrates for energy. Using cream cheese in the mixture adds a little protein and fat, which helps with satiety.
This recipe can be customized to fit gluten-free or dairy-free needs by swapping ingredients accordingly. While these are treats, using quality ingredients and portion control helps balance indulgence and wellness. Plus, making them at home means you can control sugar levels and avoid artificial additives.
Conclusion
This recipe for Perfect Beach Ball Cake Pops with White Chocolate Shells is a fun and approachable way to brighten any gathering or surprise your family with a playful treat. The balance of moist cake and crisp, colorful shell makes these pops a standout dessert that’s as enjoyable to make as it is to eat.
Feel free to tweak colors, flavors, or even the cake base to suit your mood or occasion. I’ve grown to love how these pops bring a little joy and creativity into the kitchen—and I’m confident you will too. If you have a moment, share your twists or questions below; it’s always a pleasure to hear from fellow cake pop enthusiasts.
Remember, a little patience with the chocolate and a steady hand painting those stripes will have you crafting beach ball pops that look like they belong poolside. Happy baking!
FAQs about Perfect Beach Ball Cake Pops
How do I prevent cake pops from falling off the sticks?
Chill the cake balls thoroughly before dipping and dip the stick end briefly in melted chocolate before inserting it into the cake ball. This acts like glue and helps keep them secure.
Can I use homemade cake instead of boxed mix?
Absolutely! Just make sure your homemade cake is fully cooled and not too moist. Add cream cheese or frosting to bind the crumbs similarly.
Why is my white chocolate shell cracking?
White chocolate can crack if it’s too thick or if pops are stored in very cold conditions. Try to coat evenly but not heavily, and store cake pops at cool room temperature rather than fridge if possible.
What’s the best way to color white chocolate melts?
Use gel food coloring rather than liquid to avoid seizing or thinning the chocolate. Add a tiny bit at a time until you achieve vibrant colors.
Can I prepare cake pops a day ahead?
Yes, you can prepare and dip them a day ahead. Store them in an airtight container at room temperature or in the fridge and bring to room temperature before serving.
Pin This Recipe!

Perfect Beach Ball Cake Pops with White Chocolate Shells
Bright, cheerful cake pops coated in white chocolate shells with classic beach ball stripes. These fun and easy-to-make treats are perfect for pool parties and kids’ events.
- Prep Time: 20 minutes
- Cook Time: 35 minutes
- Total Time: 1 hour 55 minutes
- Yield: 50-60 cake pops 1x
- Category: Dessert
- Cuisine: American
Ingredients
- 1 box yellow or white cake mix (about 15.25 oz / 432 g)
- 3 large eggs, room temperature
- 1/2 cup (120 ml) vegetable oil or melted butter
- 1 cup (240 ml) water or milk (use dairy-free milk if preferred)
- 1/2 cup (120 g) cream cheese, softened
- 16 oz (450 g) white chocolate melting wafers or white candy melts
- Gel food coloring in red, blue, yellow, and green
- 50–60 cake pop sticks
- Styrofoam block or cake pop stand for drying
Instructions
- Preheat oven to 350°F (175°C). Prepare cake mix according to box instructions by combining eggs, oil, and water with the mix in a large bowl. Pour batter into greased 9×13 inch (23×33 cm) pan.
- Bake for 30-35 minutes or until a toothpick inserted in the center comes out clean. Let cake cool completely on a wire rack (about 1 hour).
- Crumble cooled cake into a large mixing bowl. Add softened cream cheese and mix thoroughly until mixture holds together when pressed. Add milk teaspoon by teaspoon if too dry.
- Roll mixture into 1.5-inch (4 cm) balls and place on parchment-lined baking sheet. Insert cake pop stick halfway into each ball. Chill in refrigerator for at least 30 minutes.
- Melt white chocolate wafers in microwave-safe bowl in 30-second bursts, stirring between each until smooth. Keep warm using a double boiler if needed.
- Dip chilled cake pops into melted white chocolate, covering completely. Tap off excess chocolate and stand pops upright in Styrofoam block or cake pop stand. Let shell set slightly but stay tacky (about 10 minutes).
- Divide small amounts of white chocolate into separate bowls and add gel food coloring to create red, blue, yellow, and green melts. Use a small paintbrush or toothpick to paint classic beach ball stripes onto each pop while shell is tacky.
- Place decorated pops upright and let dry completely at room temperature or in fridge (about 1 hour) until shell is firm and stripes are vibrant.
Notes
Chill cake pops before dipping to prevent breakage. Use gel food coloring to avoid thinning chocolate. Reheat chocolate gently if it thickens. Avoid thick chocolate coating to prevent cracking. Store in airtight container in refrigerator up to 4 days. Freeze uncoated cake balls for longer storage.
Nutrition
- Serving Size: 1 cake pop
- Calories: 150180
- Sugar: 16
- Sodium: 120
- Fat: 8
- Saturated Fat: 5
- Carbohydrates: 22
- Fiber: 0.5
- Protein: 2
Keywords: cake pops, beach ball cake pops, white chocolate shell, kids dessert, party treats, easy cake pops, colorful cake pops