“Hey, can you make the graduation cake in our school colors?” my sister texted me two days before the big day. I blinked at my phone, juggling a mountain of to-dos, thinking, “Sure, why not add a two-tier cake to the chaos?” Honestly, I was skeptical. Two tiers? Custom colors? Me? But as I sifted through ingredients and mixed batter late into the night, that familiar smell of vanilla and cocoa started to calm the nerves. There’s something oddly comforting about baking when everything else feels a little wild.
That first attempt wasn’t perfect—the frosting was a bit too soft, and the colors ran a little—but that cake? It stole the show. Friends and family kept asking for the recipe, and each time I made it, I tweaked the technique just a bit. Now, it’s my go-to for any graduation celebration, especially when school pride is the centerpiece. The best part? It’s straightforward enough for a busy cook like me to pull off without losing sleep.
So, this recipe for the perfect two-tier graduation sheet cake with custom school colors isn’t just about layering cake and slapping on frosting. It’s about capturing that proud, festive feeling without a ton of fuss. And honestly, after making it a handful of times, I have a few tricks up my sleeve that make it look way more impressive than it really is. You’ll see—it turns out, custom colors and two tiers aren’t as scary as they sound.
Why You’ll Love This Recipe
Having tested this two-tier graduation sheet cake recipe through multiple celebrations, I can vouch for its reliability and crowd-pleasing charm. Here’s why it stands out:
- Quick & Easy: The cake layers come together in about 45 minutes, with frosting and assembly adding another 30, making it perfect for last-minute party prep.
- Simple Ingredients: No need to hunt down obscure baking supplies; everything is likely hanging out in your pantry or fridge already.
- Perfect for Graduation Parties: Whether it’s a small family gathering or a big send-off, the two-tier sheet cake packs a big wow factor without the hassle of a full round cake.
- Crowd-Pleaser: The moist, tender crumb combined with creamy buttercream frosting has won over kids, adults, and picky eaters alike.
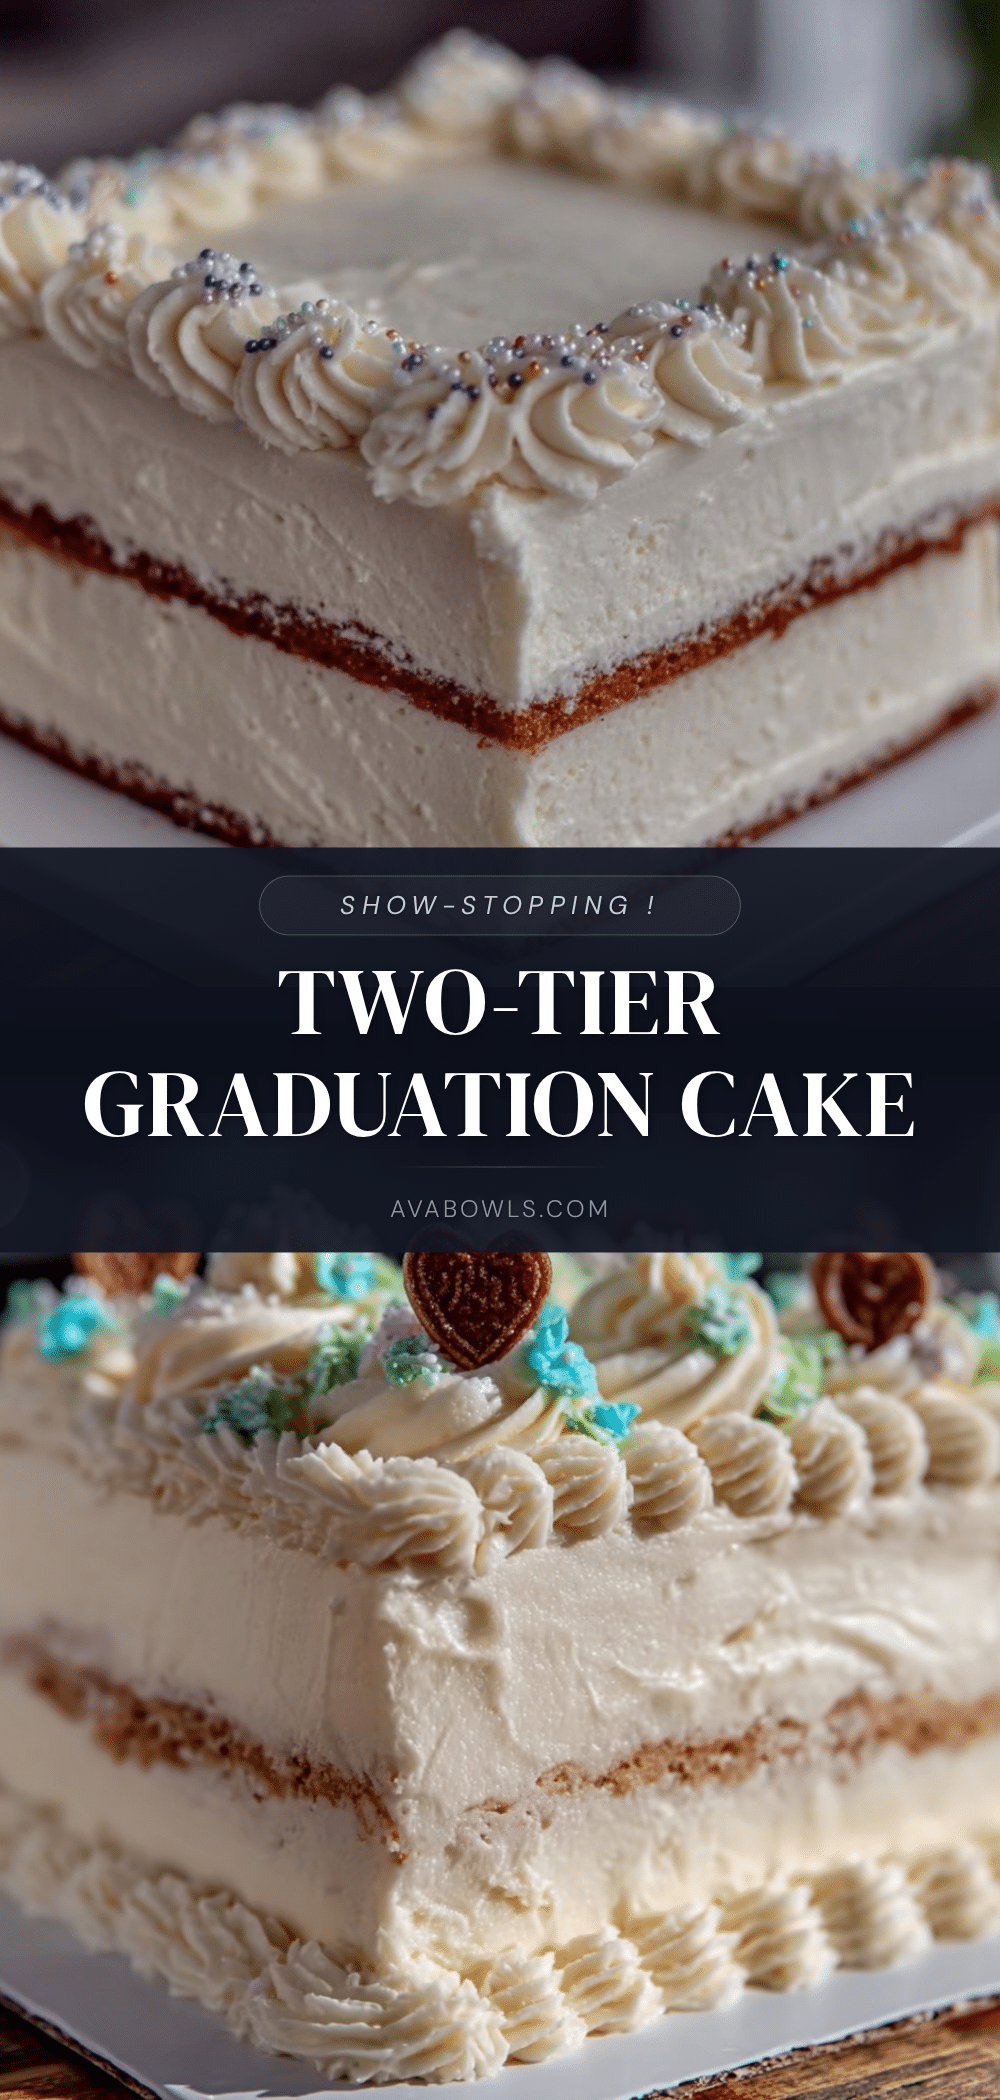
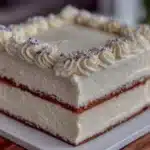
- Custom School Colors: The secret sauce is in the frosting coloring technique that keeps hues vibrant and neat—no bleeding or mixing when cutting the cake.
This isn’t just another layered cake recipe. Unlike those complicated tiered cakes requiring endless piping skills or specialty molds, this one uses simple sheet pans and a foolproof frosting method. I’ve found that mixing a bit of cream cheese into the buttercream gives it a subtle tang that cuts through the sweetness—trust me, it makes a difference.
What really makes this cake stick in my heart (and on my dessert table) is how it turns a simple celebration into something memorable. The colors pop, the layers feel substantial but not heavy, and the whole thing just screams “you made this with love and school spirit.” Honestly, that’s a feeling I want everyone to share.
What Ingredients You Will Need
This recipe uses simple, wholesome ingredients to deliver bold flavor and satisfying texture without the fuss. You’ll find most are pantry staples, and substitutions are easy if you need them.
- For the Cake Batter:
- 2¾ cups (345g) all-purpose flour, sifted (King Arthur flour works great for a tender crumb)
- 1 tbsp baking powder
- ½ tsp baking soda
- ½ tsp salt
- 1 cup (225g) unsalted butter, softened (room temperature is key for smooth mixing)
- 2 cups (400g) granulated sugar
- 4 large eggs, room temperature
- 1 tbsp pure vanilla extract
- 1 cup (240ml) buttermilk, room temperature (or 1 cup milk + 1 tbsp lemon juice, let sit 5 minutes)
- For the Buttercream Frosting:
- 1 cup (225g) unsalted butter, softened
- 4 cups (480g) powdered sugar, sifted
- 2 tbsp heavy cream or whole milk
- 1 tsp pure vanilla extract
- ¼ tsp salt
- Gel food coloring in your chosen school colors (I recommend AmeriColor gels for vibrancy and no run)
- Optional: 4 oz (115g) cream cheese, softened (for a slight tang and creaminess)
For substitutions, you can swap all-purpose flour with a gluten-free blend that’s suitable for baking. If dairy is a concern, coconut oil can replace butter in the cake, and coconut cream can be used in the frosting. For a dairy-free frosting, try a vegan butter substitute and plant-based milk. When choosing food colors, avoid liquid dyes as they can thin the frosting consistency.
Equipment Needed
- Two sheet cake pans (9×13 inches / 23×33 cm) – these are standard and easy to find; I use nonstick pans for less cleanup.
- Electric hand mixer or stand mixer – makes whipping the frosting and batter way easier and fluffier.
- Mixing bowls – at least two, for batter and frosting.
- Offset spatula – for smooth frosting application, though a butter knife can work in a pinch.
- Cooling racks – to cool the cake layers evenly and avoid sogginess.
- Piping bags and tips (optional) – for adding decorative touches in school colors.
- Measuring cups and spoons – precise measurements really help, especially for baking powder and soda.
Don’t have an offset spatula? A silicone spatula or even the back of a large spoon can get the job done. For frosting colors, I keep a small palette knife handy to mix gels without turning the frosting runny. I also recommend investing in cooling racks if you bake often; they make a huge difference in texture.
Preparation Method
- Preheat your oven to 350°F (175°C). Grease and flour your two 9×13-inch pans or line them with parchment paper for easy removal. Set aside.
- Mix dry ingredients: In a medium bowl, whisk together flour, baking powder, baking soda, and salt. This ensures the leavening agents are evenly distributed.
- Cream butter and sugar: Using a stand or hand mixer, beat the softened butter with granulated sugar on medium-high speed until pale and fluffy—about 3-4 minutes. This step traps air and helps the cake rise nicely.
- Add eggs and vanilla: Beat in eggs one at a time, making sure each is fully incorporated before adding the next. Stir in vanilla extract. If the batter looks curdled at this stage, don’t worry—it will smooth out.
- Alternate adding dry ingredients and buttermilk: With the mixer on low, add one-third of the flour mixture, followed by half the buttermilk. Repeat, ending with the flour. Mix just until combined—overmixing can make the cake tough.
- Divide and bake: Pour batter evenly into prepared pans. Tap the pans lightly on the counter to remove air bubbles. Bake for 30-35 minutes, or until a toothpick inserted in the center comes out clean.
- Cool the cakes: Let cakes cool in the pans for 10 minutes, then turn out onto cooling racks to cool completely. This prevents soggy layers under the frosting.
- Prepare the buttercream frosting: Beat softened butter (and cream cheese, if using) until smooth and creamy. Gradually add powdered sugar, alternating with heavy cream, and beat on high until fluffy—about 4-5 minutes. Add vanilla and salt, mixing well.
- Divide and color the frosting: Separate frosting into bowls for each school color. Add gel food coloring a little at a time, mixing thoroughly to reach vibrant shades.
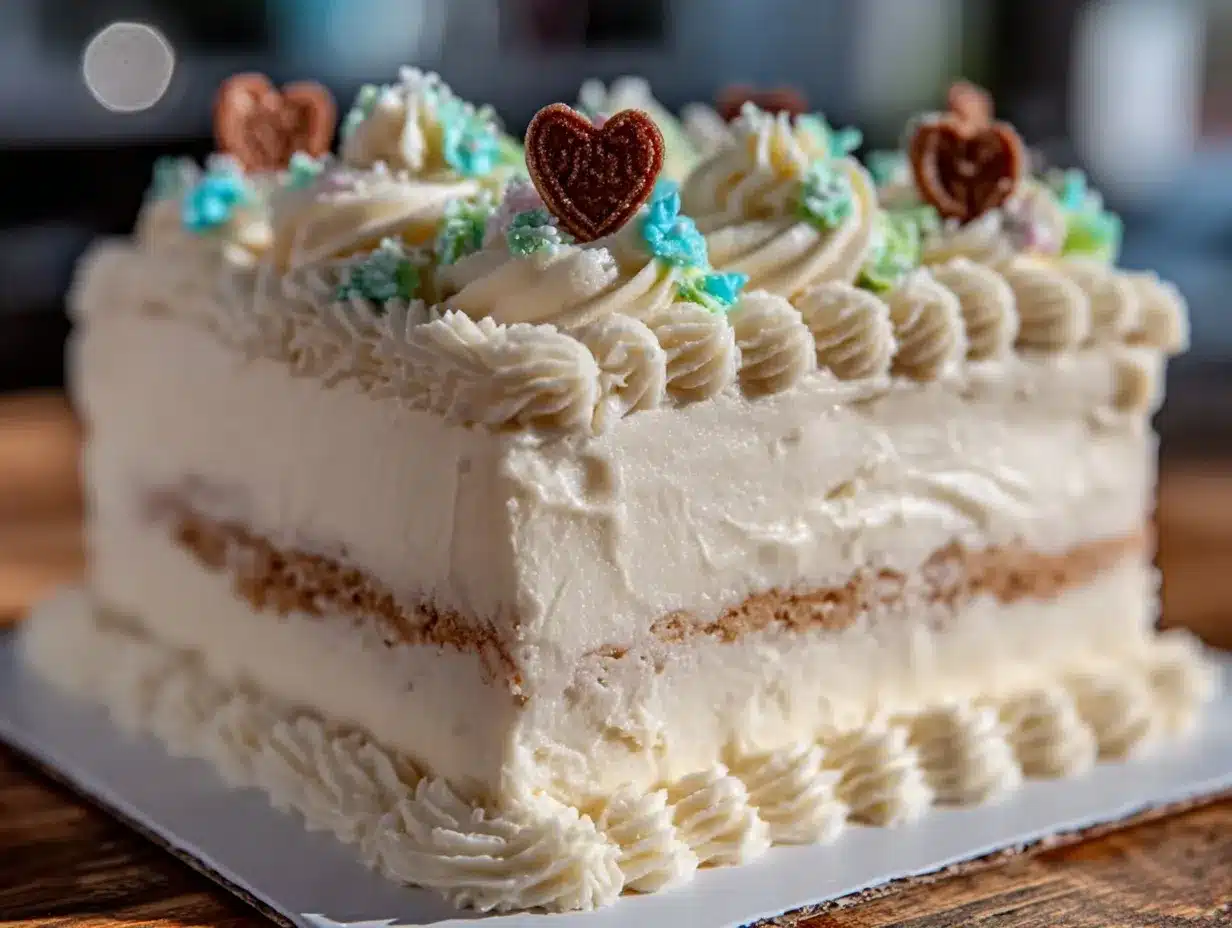
- Assemble the tiers: Place one cooled cake layer on your serving board or plate. Spread a thin, even layer of frosting. Repeat with the second layer of the bottom tier, then stack the second tier cake layers on top, frosting between layers.
- Apply crumb coat: Spread a thin layer of frosting over the entire cake to trap crumbs. Chill for 20-30 minutes to set.
- Final frosting and decoration: Use the colored frostings to create stripes, borders, or piping in your school’s colors. Use an offset spatula for smooth sides or piping bags for accents. Keep it neat and vibrant!
Pro tip: When frosting, work quickly but gently to avoid breaking the cake layers. If the frosting gets too soft, pop the cake in the fridge for a few minutes to firm up before finishing touches.
Cooking Tips & Techniques
Getting a two-tier cake right can seem intimidating, but some lessons from trial and error make all the difference.
- Room temperature ingredients: Butter, eggs, and buttermilk should be at room temperature for smooth batter. Cold ingredients can cause curdling or uneven texture.
- Don’t overmix: Once you add the flour, mix just until blended. Overmixing develops gluten and leads to a dense cake.
- Level your cake layers: Use a serrated knife or cake leveler to trim domed tops for stable stacking.
- Crumb coat is a must: It seals in crumbs and makes the final frosting layer smooth and clean—trust me, skipping this step leads to crumb chaos.
- Gel food coloring over liquid: Liquid dyes thin the frosting; gels keep it thick and vibrant.
- Chill between steps: Refrigerate the cake after crumb coating and after frosting the tiers to help frosting set and prevent sliding.
I learned the hard way that frosting too warm can turn a cake into a slippery mess. Also, when piping borders in multiple colors, clean your tips often to keep colors pure and bright. If you want to try a different frosting, Swiss meringue buttercream works well but has a steeper learning curve.
Variations & Adaptations
This two-tier graduation sheet cake recipe is flexible enough to fit different needs and tastes.
- Flavor swaps: Use chocolate cake layers instead of vanilla by substituting ½ cup cocoa powder for flour and adjusting sugar slightly. Or add a teaspoon of almond extract to the batter for a nutty twist.
- Dietary adaptations: For gluten-free, use a 1:1 gluten-free flour blend. For dairy-free, swap butter with vegan margarine and milk with almond or oat milk. Coconut cream can replace heavy cream in frosting.
- Seasonal twists: Add fresh berries between the tiers or mix lemon zest into the frosting for a bright note in spring or summer graduations.
- Decor style: Instead of smooth frosting, try a rustic, textured look with a pallet knife or use edible glitter and sprinkles in school colors for extra sparkle.
One time, I swapped the buttercream for a whipped cream cheese frosting in soft pastel school colors—it was a hit at a spring graduation party, lighter and less sweet but still festive.
Serving & Storage Suggestions
Serve the two-tier graduation sheet cake at room temperature for the best texture and flavor. If refrigerated, bring it out 30 minutes before serving to soften the frosting.
This cake pairs beautifully with fresh fruit platters or a light punch—think sparkling lemonade with a hint of mint. After indulging, any leftovers can be wrapped tightly in plastic wrap and stored in the fridge for up to 4 days.
For longer storage, freeze the cake layers separately (unfrosted) in airtight containers or wrapped in foil and plastic wrap. Thaw overnight in the fridge before frosting or serving. Frosted cake can be frozen, but texture may change slightly.
Flavors tend to mellow and deepen after a day, so if you can resist, making the cake a day ahead can actually improve the taste. Just be sure to keep it well-covered to avoid drying out.
Nutritional Information & Benefits
This cake is a treat best enjoyed in moderation, but here’s a rough nutritional snapshot per serving (based on 12 servings):
| Calories | 420 |
|---|---|
| Fat | 22g |
| Saturated Fat | 13g |
| Carbohydrates | 52g |
| Sugar | 38g |
| Protein | 4g |
Key ingredients like eggs and butter provide some protein and fat-soluble vitamins. Using high-quality butter and fresh eggs enhances flavor and texture. If you add cream cheese to your frosting, you get a slight boost of calcium and a tangy flavor that balances the sweetness.
For gluten-free or dairy-free adaptations, choose appropriate substitutes to fit dietary needs. This recipe contains common allergens like eggs, dairy, and wheat, so keep that in mind for your guests.
Conclusion
The perfect two-tier graduation sheet cake with custom school colors isn’t just about the layers or the frosting—it’s about capturing the joy and pride of a milestone. From the first crumbly attempt to the polished final product, this recipe has become a reliable companion for celebrations that matter.
Feel free to make it your own, whether that means swapping flavors, tweaking colors, or adding a personal decoration touch. I love how this cake combines simple ingredients with a big look, making it a favorite in my kitchen and at parties.
If you try this recipe, I’d love to hear how it went or see your custom color creations—sharing those moments is what makes baking so rewarding. Here’s to many more celebrations made sweeter.
FAQs
Can I make this cake ahead of time?
Yes! You can bake the cake layers up to two days ahead, wrap tightly, and store at room temperature or refrigerated. Frost and assemble on the day of serving for the best freshness.
How do I keep the school colors from bleeding into each other?
Use gel food coloring and apply each color in distinct sections or stripes. Chill the frosting slightly between colors if needed and avoid mixing the colors directly.
What if I don’t have two sheet pans?
You can bake the layers one at a time, just adjust your timing accordingly. Make sure to cool the first layer completely before baking the second.
Can I use a different frosting?
Absolutely! Swiss meringue buttercream or cream cheese frosting work well, but keep in mind the consistency may vary for decorating and color application.
How do I transport a two-tier cake safely?
Chill the assembled cake before transport to firm the frosting. Use a sturdy cake box and place the cake on a non-slip mat in your car. Drive carefully to avoid shifting.
For those who enjoy comfort food with a twist, this cake pairs nicely with lighter dishes like the creamy spring vegetable fettuccine alfredo or the fresh flavors of the creamy lemon ricotta pasta with fresh peas and mint to balance the sweetness on a celebratory menu.
Pin This Recipe!
Perfect Two-Tier Graduation Sheet Cake Recipe with Custom School Colors Made Easy
A reliable and crowd-pleasing two-tier sheet cake recipe perfect for graduation parties, featuring simple ingredients and customizable school colors with a creamy buttercream frosting.
- Prep Time: 15 minutes
- Cook Time: 35 minutes
- Total Time: 1 hour 15 minutes
- Yield: 12 servings 1x
- Category: Dessert
- Cuisine: American
Ingredients
- 2¾ cups (345g) all-purpose flour, sifted
- 1 tbsp baking powder
- ½ tsp baking soda
- ½ tsp salt
- 1 cup (225g) unsalted butter, softened (room temperature)
- 2 cups (400g) granulated sugar
- 4 large eggs, room temperature
- 1 tbsp pure vanilla extract
- 1 cup (240ml) buttermilk, room temperature (or 1 cup milk + 1 tbsp lemon juice, let sit 5 minutes)
- For the Buttercream Frosting:
- 1 cup (225g) unsalted butter, softened
- 4 cups (480g) powdered sugar, sifted
- 2 tbsp heavy cream or whole milk
- 1 tsp pure vanilla extract
- ¼ tsp salt
- Gel food coloring in your chosen school colors
- Optional: 4 oz (115g) cream cheese, softened
Instructions
- Preheat your oven to 350°F (175°C). Grease and flour two 9×13-inch pans or line them with parchment paper.
- In a medium bowl, whisk together flour, baking powder, baking soda, and salt.
- Using a mixer, beat softened butter with granulated sugar on medium-high speed until pale and fluffy, about 3-4 minutes.
- Beat in eggs one at a time, fully incorporating each before adding the next. Stir in vanilla extract.
- With mixer on low, alternately add one-third of the flour mixture and half the buttermilk, ending with flour. Mix just until combined.
- Divide batter evenly into prepared pans. Tap pans lightly to remove air bubbles. Bake 30-35 minutes or until a toothpick comes out clean.
- Cool cakes in pans for 10 minutes, then turn out onto cooling racks to cool completely.
- For frosting, beat softened butter (and cream cheese if using) until smooth. Gradually add powdered sugar alternating with heavy cream, beat on high until fluffy, about 4-5 minutes. Add vanilla and salt, mix well.
- Divide frosting into bowls for each school color. Add gel food coloring gradually to reach vibrant shades.
- Assemble tiers by placing one cooled cake layer on serving board. Spread thin layer of frosting. Repeat with second layer of bottom tier, then stack second tier layers on top with frosting between layers.
- Apply a thin crumb coat over entire cake and chill for 20-30 minutes to set.
- Use colored frostings to decorate with stripes, borders, or piping in school colors. Use offset spatula for smooth sides or piping bags for accents.
Notes
Use room temperature ingredients for smooth batter. Avoid overmixing after adding flour to prevent toughness. Use gel food coloring to prevent frosting from thinning and bleeding colors. Chill cake after crumb coating and final frosting to set layers. Level cake layers for stable stacking. If frosting softens, refrigerate briefly before finishing.
Nutrition
- Serving Size: 1 slice (1/12 of cak
- Calories: 420
- Sugar: 38
- Fat: 22
- Saturated Fat: 13
- Carbohydrates: 52
- Protein: 4
Keywords: graduation cake, two-tier cake, sheet cake, buttercream frosting, custom school colors, easy cake recipe, celebration cake