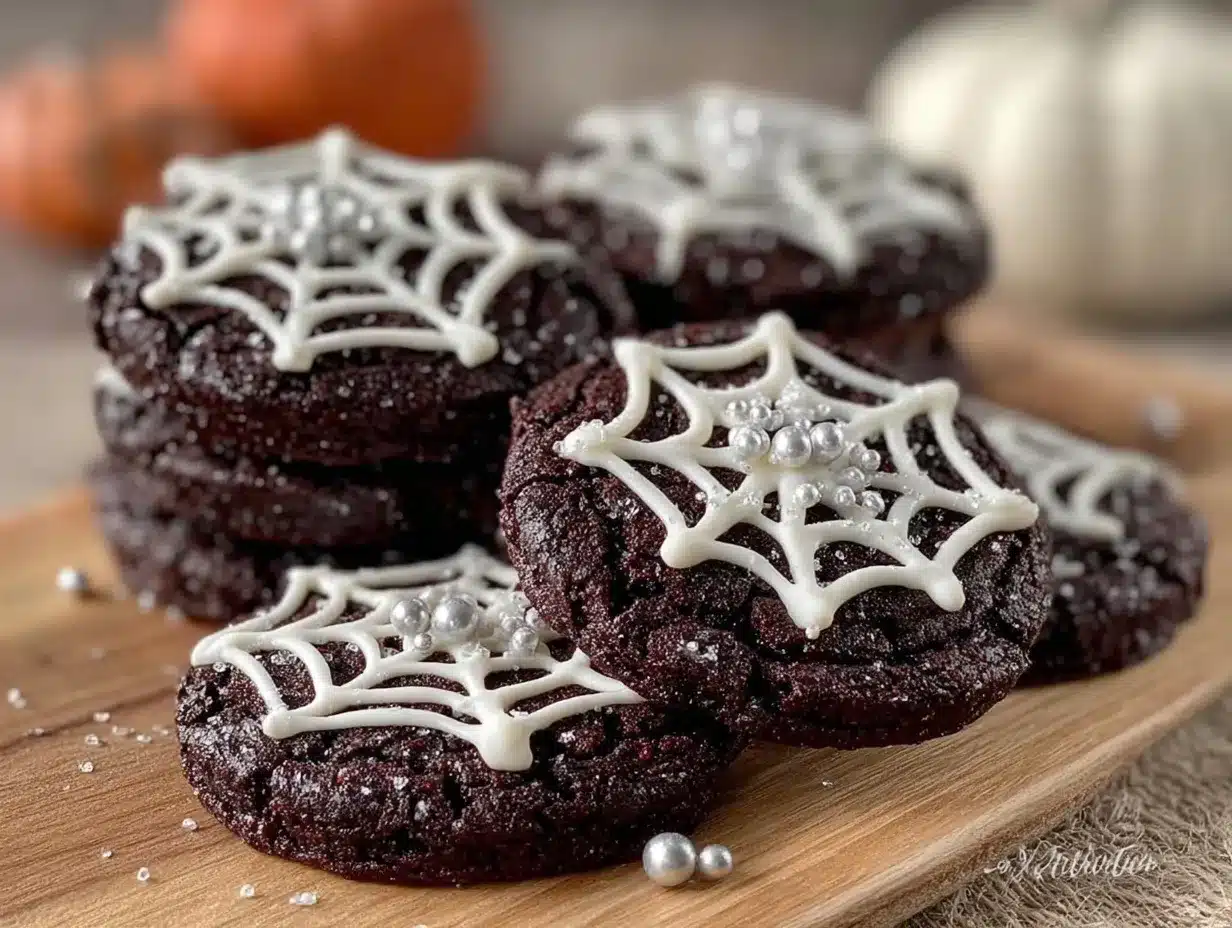
It was one of those nights when the power flickered out just as the doorbell rang. No trick-or-treaters, thankfully, but my neighbor’s two kids showed up with wide eyes and empty buckets, ready for some last-minute Halloween magic. The fridge was nearly bare except for a tub of cream cheese and a bag of black cocoa powder I’d forgotten about from a baking experiment gone sideways. In a flurry of improvisation and a bit of kitchen chaos, these Perfect Black Velvet Spider Web Cookies were born. The smell of rich cocoa and sweet vanilla filled the air as I hurriedly piped spider webs on each cookie, my hands trembling but steady enough to create something spooky yet irresistibly delicious.
Honestly, I wasn’t even sure if the cookies would turn out. But as the kids nibbled and giggled, tracing the delicate black webs with their fingers, I realized this recipe had a quiet charm that stuck with me. It’s not just the look or the taste — there’s a little thrill in making something out of nothing, a playful twist that feels right for Halloween. These cookies are my go-to whenever I want to surprise guests with a treat that’s both eerie and elegant, but without the fuss of complicated baking. They’ve got that soft black velvet crumb, a hint of cream cheese tang, and a spider web design that somehow makes everything Halloween-perfect. It’s a recipe born from the unexpected, but it’s one I keep coming back to.
Why You’ll Love This Recipe
After testing this recipe several times (sometimes with curious kids peeking over my shoulder), I can say with confidence that these Perfect Black Velvet Spider Web Cookies are a Halloween must-have. Here’s why they stand out:
- Quick & Easy: You can whip up the entire batch in under 45 minutes, perfect when time’s tight or you get surprise guests.
- Simple Ingredients: No need for specialty stores — black cocoa powder, cream cheese, and pantry basics do the trick.
- Ideal for Halloween Parties: These cookies add a spooky vibe without over-the-top effort, making them great for potlucks or last-minute treats.
- Crowd-Pleaser: Kids love the fun spider web design, and adults appreciate the soft texture and rich flavor combo.
- Unbelievably Delicious: The cream cheese keeps the cookies tender and moist, while black cocoa gives a deep, intense chocolate flavor that’s not too sweet.
This isn’t just another cocoa cookie. The trick is in balancing the black cocoa powder with cream cheese, which adds moisture and a slight tang, so your cookies never feel dry or flat. Plus, the spider web design is piped freehand, so each cookie feels like a little piece of edible art — no fancy stencil needed. If you’ve tried baking red velvet pancakes with cream cheese glaze, you’ll appreciate how this recipe plays with similar flavor profiles but turns them into a dark, Halloween-ready cookie that’s both playful and elegant.
What Ingredients You Will Need
This recipe uses straightforward, wholesome ingredients to create cookies with bold flavor and that signature soft crumb. Most are pantry staples, but a few key players make all the difference.
- For the Black Velvet Cookie Dough:
- 1 cup (226g) unsalted butter, softened (adds richness and tenderness)
- 4 oz (115g) cream cheese, softened (keeps the cookies moist and adds tang)
- 1 ½ cups (300g) granulated sugar
- 2 large eggs, room temperature
- 2 ½ cups (315g) all-purpose flour
- ½ cup (50g) black cocoa powder (for the signature dark color and intense chocolate flavor; I prefer Valrhona brand for its deep richness)
- 1 teaspoon baking powder
- ½ teaspoon salt
- 1 teaspoon vanilla extract
- For the Spider Web Decoration:
- 1 cup (120g) powdered sugar
- 2 tablespoons milk (use dairy-free milk if preferred)
- ¼ teaspoon vanilla extract
- Black food coloring or edible black gel pen for spider details (optional)
Keep in mind that black cocoa powder differs from regular cocoa powder — it’s much darker and less acidic, which gives the black velvet cookies their unique look. If you can’t find it, Dutch-processed cocoa powder is the next best option, but the color won’t be quite as striking. For a dairy-free adaptation, swap the cream cheese with vegan cream cheese and use a plant-based butter alternative.
Equipment Needed
- Stand mixer or hand mixer (to cream butter and cream cheese smoothly)
- Mixing bowls (medium and large)
- Measuring cups and spoons (precision matters for baking)
- Baking sheets lined with parchment paper or silicone baking mats
- Cooling racks (for perfect cookie texture)
- Piping bag with a small round tip or a plastic sandwich bag with a tiny corner snipped (for spider web icing)
- Spatula for folding and scraping bowl sides
If you don’t have a stand mixer, a sturdy hand mixer works fine, though it might take a little more elbow grease. When piping the spider webs, I like using a small round tip for control, but a simple plastic bag corner works just as well (and is budget-friendly!). Keeping your baking sheets cool and using parchment paper helps prevent sticking and promotes even baking. I once tried baking these on a plain metal sheet without parchment, and let’s just say the cookies didn’t part ways easily—lesson learned!
Preparation Method
- Preheat your oven to 350°F (175°C). Line two baking sheets with parchment paper or silicone mats to prevent sticking. This step ensures your cookies bake evenly and come off easily.
- Cream the butter and cream cheese in a large bowl using your mixer on medium speed until smooth and fluffy, about 2-3 minutes. The mixture should look pale and soft — this adds the tender crumb to your cookies.
- Add the granulated sugar and continue mixing until the sugar is fully incorporated and the mixture is light and airy, roughly 2 minutes. This step is key for a soft, melt-in-your-mouth texture.
- Beat in the eggs one at a time, mixing well after each addition. Then stir in the vanilla extract. The batter might look a bit curdled here — don’t worry, that’s normal with cream cheese dough.
- In a separate bowl, sift together the all-purpose flour, black cocoa powder, baking powder, and salt. This ensures even distribution and prevents lumps in the dough.
- Gradually add the dry ingredients to the wet mixture, mixing on low speed until just combined. Avoid overmixing — you want the dough to be soft but not tough.
- Using a tablespoon or cookie scoop, drop dough balls onto the prepared baking sheets, spacing them about 2 inches apart. The dough will be soft and slightly sticky — that’s perfect.
- Bake for 10-12 minutes, rotating the sheet halfway through for even baking. The cookies should be set but still soft to the touch — they’ll firm up as they cool.
- Remove the baking sheets from the oven and let the cookies cool on the sheets for 5 minutes before transferring to wire racks to cool completely. This prevents breakage and helps maintain the soft texture.
- Prepare the spider web icing: whisk powdered sugar, milk, and vanilla extract until smooth. If the icing feels too thick, add milk a few drops at a time; too thin, add more powdered sugar.
- Fill a piping bag fitted with a small round tip with the white icing. Pipe a spiral starting from the center of each cookie outward.
- Using a toothpick or skewer, drag lines from the center of the spiral out to the edges to create the spider web effect. This step is surprisingly relaxing and makes the cookies look beautifully spooky.
- Allow the icing to set at room temperature for about 30 minutes. If you want to add little spider decorations, use black food coloring or an edible gel pen to draw tiny spiders on top.
Keep an eye on your oven’s quirks — mine bakes a bit hot, so I check the cookies at 9 minutes to avoid overbaking. The key is to pull them out when they’re still soft but not raw. This recipe pairs well with the rich, cheesy flavors of dishes like creamy beer cheese pretzel dip if you’re thinking about a full spooky party spread.
Cooking Tips & Techniques
When making these Perfect Black Velvet Spider Web Cookies, a few tips can really save your sanity and improve your results:
- Room temperature ingredients: Butter, cream cheese, and eggs should all be at room temp. It helps everything come together smoothly and prevents lumps.
- Don’t overmix the dough: Once you add the dry ingredients, mix just until combined. Overworking can make cookies tough instead of tender.
- Chill the dough if you have time: Though not required, a 30-minute chill can help cookies hold their shape better when baking.
- Practice piping the spider web: If you’re nervous, practice on parchment paper first. The spiral and drag technique is easier than it looks once you get the hang of it.
- Keep your icing consistency right: Too runny and the web will lose shape, too thick and it won’t pipe smoothly. Adjust by adding milk or powdered sugar slowly.
- Use a toothpick gently: When dragging lines for the web, don’t press too hard — just enough to pull the icing.
In my first attempt, I piped the spider webs too quickly and ended up with blobs instead of delicate lines. Lesson learned: slow and steady wins the web! And if you want a fun twist, try adding a tiny drop of orange food coloring to the icing for a pumpkin-colored web that pops.
Variations & Adaptations
You can customize these Perfect Black Velvet Spider Web Cookies in several ways, depending on tastes or dietary needs:
- Gluten-Free Option: Swap all-purpose flour for a 1:1 gluten-free baking flour blend. The texture will be slightly different but still delicious.
- Vegan Adaptation: Use vegan cream cheese, plant-based butter, and a flax egg (1 tbsp ground flaxseed + 3 tbsp water) instead of eggs.
- Flavor Twists: Add a teaspoon of instant espresso powder to the dry mix for a mocha spider web cookie, or a pinch of cinnamon for a subtle warm spice.
- Different Decorations: Instead of white icing webs, try a royal icing spider web with colored piping gels for a glossy finish.
- Seasonal Variation: For a fall-inspired look, swap black cocoa for regular cocoa and tint the icing orange or purple.
Once, I experimented by folding mini chocolate chips into the dough — they disappeared into the black velvet but gave a delightful surprise bite. It was a hit at my Halloween movie night! If you like more savory snacks alongside, these cookies contrast nicely with cheesy dips like the creamy slow cooker queso blanco dip.
Serving & Storage Suggestions
These cookies look best when served at room temperature so the spider web icing is firm but the cookie remains soft. Arrange them on a platter with a few candy spiders or faux cobwebs for a festive touch. For drinks, they pair surprisingly well with a warm cup of spiced apple cider or a rich hot chocolate — perfect for cozy Halloween gatherings.
Store leftover cookies in an airtight container at room temperature for up to 4 days. If you want to keep them longer, freeze the baked cookies (without icing) in a sealed bag for up to 3 months. When ready to enjoy, thaw at room temperature and add the icing fresh. I’ve found that reheating cookies slightly in a warm oven (about 300°F or 150°C for 5 minutes) brings back that just-baked softness.
Flavors tend to mellow and deepen after a day, so if you can resist, letting the cookies rest overnight actually improves the taste. It’s a nice way to prep ahead for Halloween parties or a spooky afternoon treat.
Nutritional Information & Benefits
These Perfect Black Velvet Spider Web Cookies offer a moderate treat option. Each cookie (based on 24 cookies per batch) has approximately:
| Calories | 140 kcal |
|---|---|
| Fat | 7g |
| Carbohydrates | 19g |
| Protein | 2g |
| Sugar | 11g |
The cream cheese adds a bit of protein and calcium, while the black cocoa powder is rich in antioxidants and gives a deep chocolate flavor without excessive sugar. If you’re mindful of allergens, note the recipe contains dairy, eggs, and gluten — but substitutions can accommodate many diets.
From my wellness perspective, these cookies balance indulgence with simple, real ingredients. They’re a nice way to enjoy a festive treat without artificial colors or fillers, especially compared to store-bought Halloween sweets. Plus, making them yourself means you control the sweetness and portion sizes.
Conclusion
These Perfect Black Velvet Spider Web Cookies are proof that sometimes the best recipes come from unexpected moments and a little kitchen improvisation. They bring a perfect mix of spooky charm and delicious softness that’s hard to resist. Whether you’re baking for a Halloween party, last-minute guests, or just to satisfy your own sweet tooth, these cookies deliver a memorable treat with surprisingly simple ingredients and technique.
Feel free to personalize the spider web design or add your favorite twists — this recipe is flexible and forgiving. Honestly, I love how these cookies bring a bit of fun and creativity to the kitchen, making Halloween a little sweeter every year. If you’re looking for savory bites to complement, the loaded nachos supreme make a great pairing for a spooky snack spread.
Give these a try, and I’d love to hear how your spider webs turned out — sharing those baking adventures is half the fun!
FAQs
What is black cocoa powder, and can I use regular cocoa instead?
Black cocoa powder is a very dark, Dutch-processed cocoa with a rich color and milder, less acidic flavor. Regular cocoa powder can be used but expect a lighter color and slightly different taste.
Can I make these cookies ahead of time?
Yes! You can bake the cookies a day in advance and store them in an airtight container. Add the spider web icing the day you plan to serve for best presentation.
How do I pipe the spider web design if I’m not confident?
Practice piping the spiral on parchment paper first. Use a steady hand and drag lines gently with a toothpick to form the web. It’s easier with a small round piping tip or a plastic bag corner.
Are these cookies suitable for freezing?
You can freeze the baked cookies without icing in a sealed bag for up to 3 months. Thaw and decorate with icing fresh before serving.
Can I make these cookies vegan?
Yes. Use vegan cream cheese, plant-based butter, and a flax egg substitute to make this recipe vegan-friendly with similar results.
Pin This Recipe!

Perfect Black Velvet Spider Web Cookies

These Halloween-themed cookies feature a soft black velvet crumb with a hint of cream cheese tang and a spooky spider web decoration. Quick and easy to make, they are perfect for last-minute treats or parties.
- Prep Time: 15 minutes
- Cook Time: 12 minutes
- Total Time: 42 minutes
- Yield: 24 cookies 1x
- Category: Dessert
- Cuisine: American
Ingredients
- 1 cup (226g) unsalted butter, softened
- 4 oz (115g) cream cheese, softened
- 1 ½ cups (300g) granulated sugar
- 2 large eggs, room temperature
- 2 ½ cups (315g) all-purpose flour
- ½ cup (50g) black cocoa powder
- 1 teaspoon baking powder
- ½ teaspoon salt
- 1 teaspoon vanilla extract
- 1 cup (120g) powdered sugar
- 2 tablespoons milk (dairy-free milk optional)
- ¼ teaspoon vanilla extract
- Black food coloring or edible black gel pen (optional)
Instructions
- Preheat your oven to 350°F (175°C). Line two baking sheets with parchment paper or silicone mats.
- Cream the butter and cream cheese in a large bowl using a mixer on medium speed until smooth and fluffy, about 2-3 minutes.
- Add the granulated sugar and continue mixing until fully incorporated and light, about 2 minutes.
- Beat in the eggs one at a time, mixing well after each addition. Stir in the vanilla extract.
- In a separate bowl, sift together the all-purpose flour, black cocoa powder, baking powder, and salt.
- Gradually add the dry ingredients to the wet mixture, mixing on low speed until just combined. Avoid overmixing.
- Drop dough balls using a tablespoon or cookie scoop onto the prepared baking sheets, spacing about 2 inches apart.
- Bake for 10-12 minutes, rotating the sheet halfway through. Cookies should be set but still soft to the touch.
- Let the cookies cool on the baking sheets for 5 minutes before transferring to wire racks to cool completely.
- Prepare the spider web icing by whisking powdered sugar, milk, and vanilla extract until smooth. Adjust consistency as needed.
- Fill a piping bag fitted with a small round tip with the icing. Pipe a spiral from the center outward on each cookie.
- Use a toothpick or skewer to drag lines from the center of the spiral to the edges to create the spider web effect.
- Allow the icing to set at room temperature for about 30 minutes. Optionally, add spider decorations with black food coloring or edible gel pen.
Notes
Use room temperature ingredients for best results. Avoid overmixing the dough to keep cookies tender. Practice piping spider webs on parchment paper if needed. Chilling dough for 30 minutes is optional but helps cookies hold shape. Adjust icing consistency carefully to pipe smooth webs. Cookies can be frozen without icing for up to 3 months.
Nutrition
- Serving Size: 1 cookie
- Calories: 140
- Sugar: 11
- Fat: 7
- Carbohydrates: 19
- Protein: 2
Keywords: Halloween cookies, black velvet cookies, spider web cookies, cream cheese cookies, black cocoa cookies, easy Halloween treats


