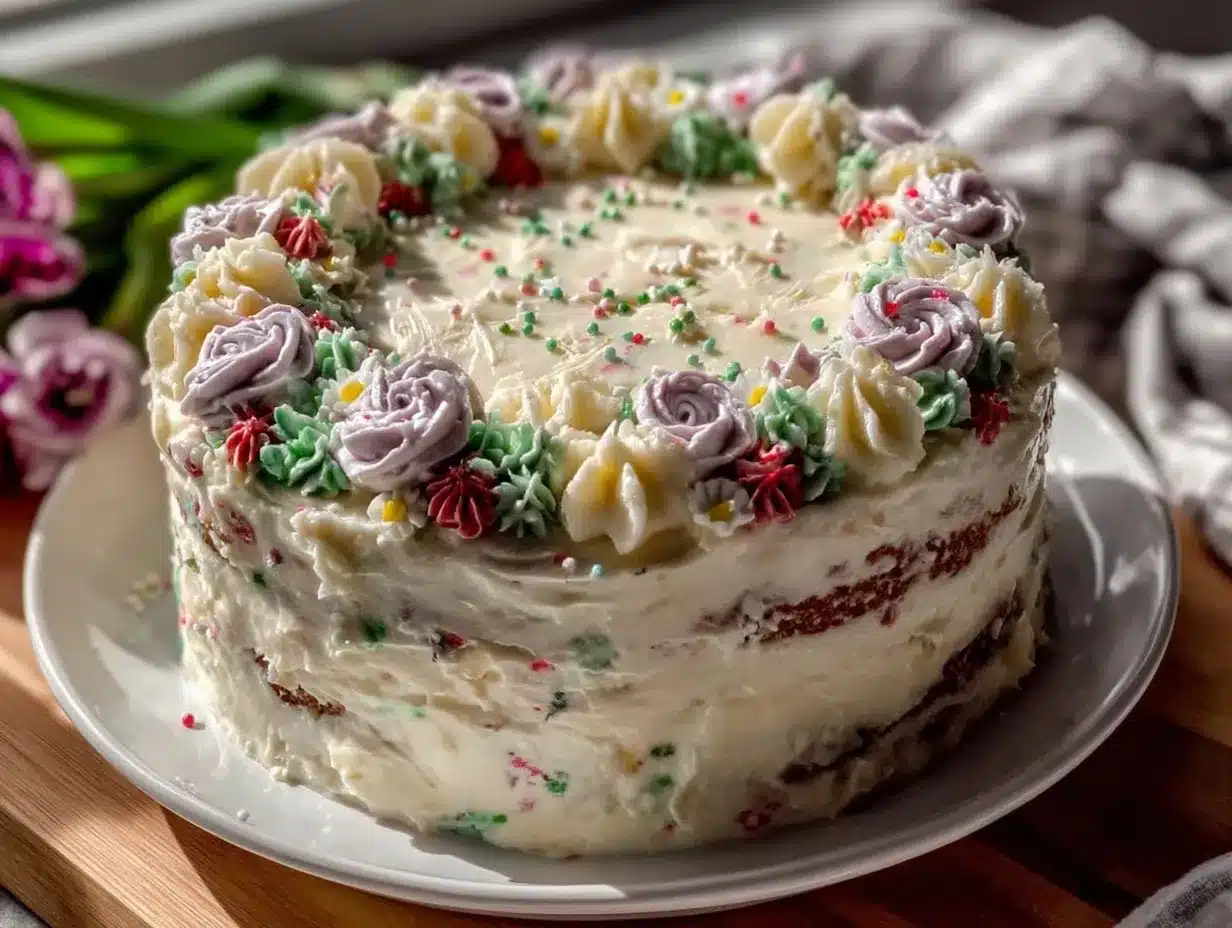
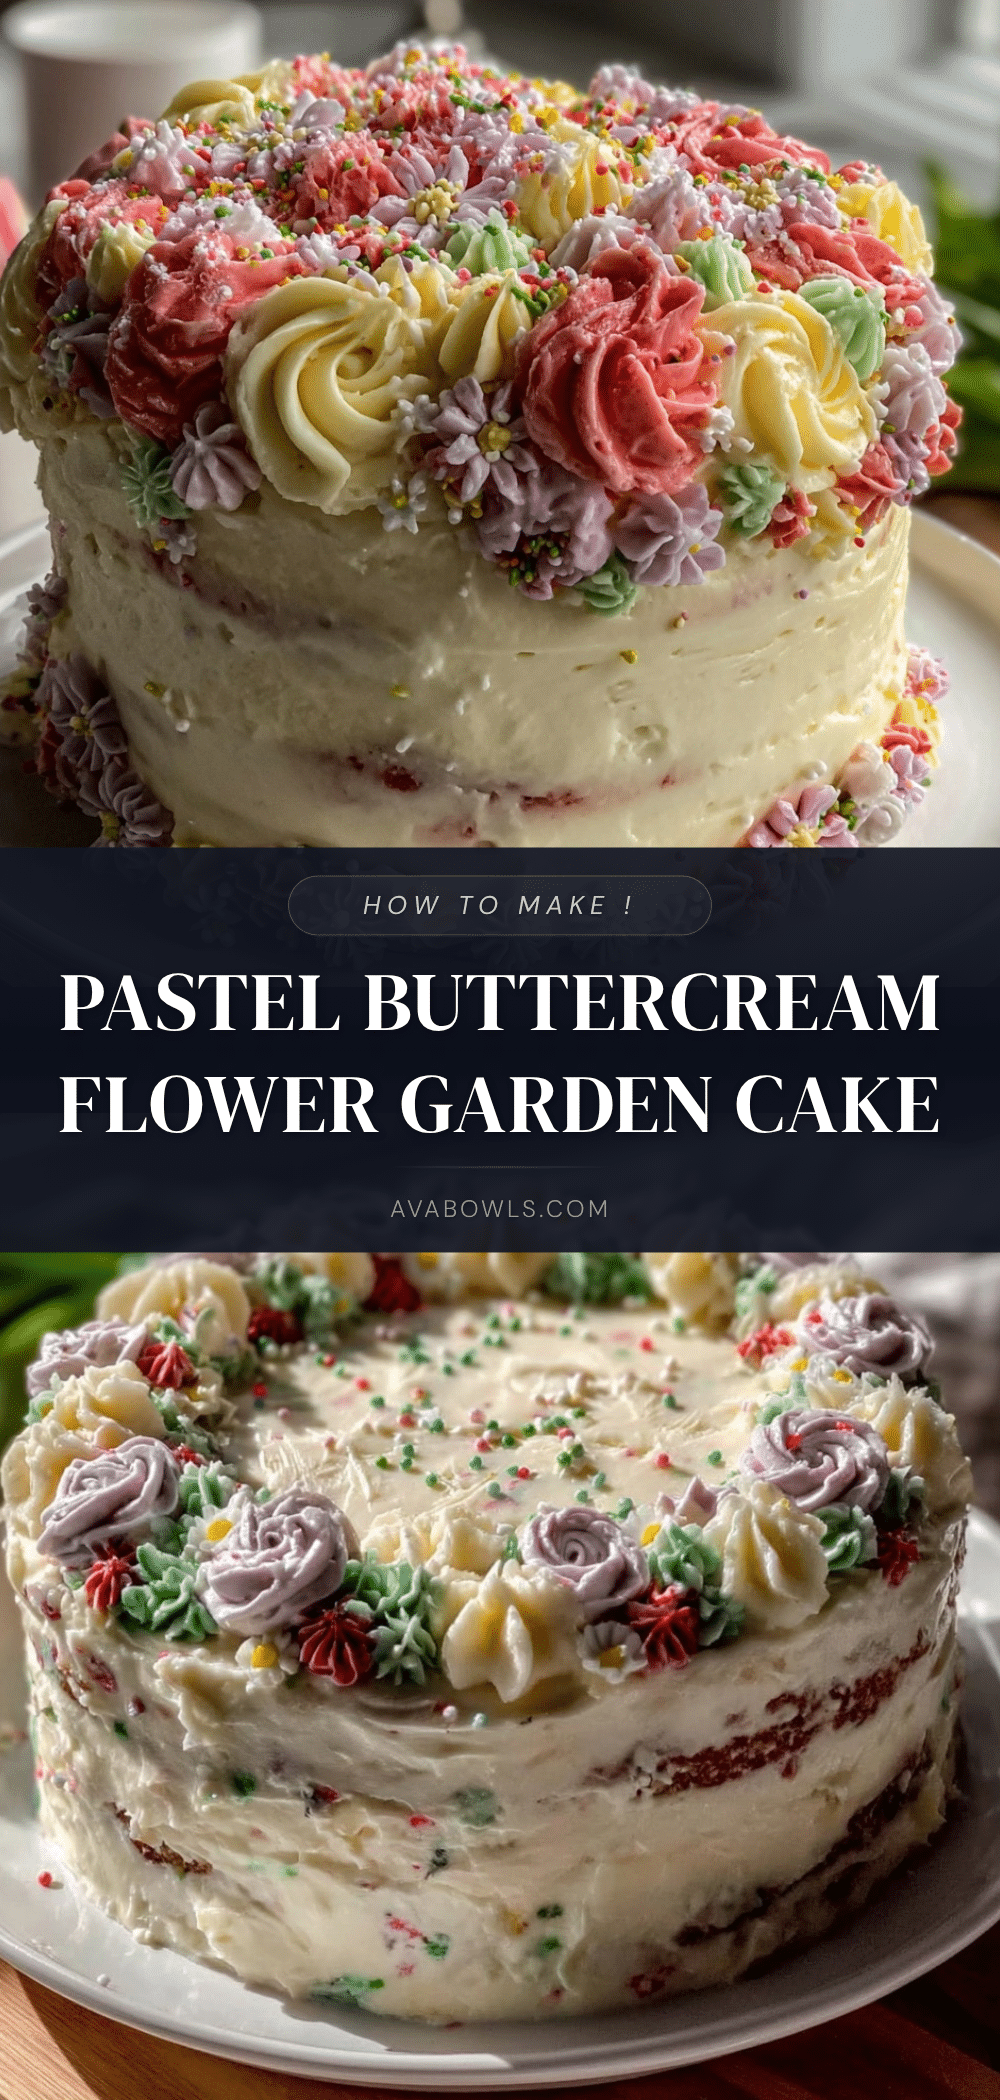
That afternoon, the kitchen smelled like a spring garden in full bloom—sweet sugar mingling with soft butter and just a hint of vanilla. I remember glancing at the pastel colors of the buttercream flowers I’d piped onto the cake, thinking, “Did I really just pull this off?” Honestly, the Perfect Pastel Buttercream Flower Garden Layer Cake for Spring wasn’t part of any grand plan. It started as a quick idea to bring a little sunshine to a gloomy day, something easy but cheerful enough to brighten the mood after a hectic morning. I was skeptical at first, thinking a homemade buttercream garden might look more like a toddler’s art project than the delicate floral masterpiece I imagined.
But as I stacked the layers and added those soft, swirled blossoms in gentle pinks, lavenders, and pale greens, the cake transformed. It reminded me of the time I made that creamy lemon ricotta pasta with fresh peas and mint—simple ingredients that somehow made a meal feel like a celebration. This cake became more than just a dessert; it was a little moment of calm, a sweet pause in an otherwise busy week. And honestly, it stuck with me because it’s just so easy to make look stunning without needing a degree in decorating. If you want a spring centerpiece that tastes as good as it looks, this cake might just be your new go-to.
Why You’ll Love This Recipe
Creating the Perfect Pastel Buttercream Flower Garden Layer Cake for Spring is one of those wins that feels both special and totally doable. After several rounds of testing and tweaking, I can say this recipe delivers on all fronts:
- Quick & Easy: The buttercream comes together in about 15 minutes, and the cake layers bake in under 30 minutes. Perfect when you want a showstopper without staying in the kitchen all day.
- Simple Ingredients: You probably already have all the pantry staples—flour, sugar, butter, eggs, and vanilla. No fancy or hard-to-find items here.
- Perfect for Spring Occasions: Whether it’s a birthday, a brunch, or just a Sunday treat, this cake fits right in with the fresh, optimistic vibe of the season.
- Crowd-Pleaser: From kids to adults, everyone loves the light crumb of the cake paired with the creamy, not-too-sweet buttercream. Bonus: the pastel flowers always spark compliments.
- Unbelievably Delicious: The balance between the moist, tender cake and the smooth, rich buttercream is just right. It’s the kind of dessert that makes you close your eyes after the first bite (in a good way!).
What sets this cake apart is the little technique I picked up to get the buttercream extra smooth—whipping it just right with a splash of cream and a touch of almond extract for depth. Plus, the pastel palette isn’t just for show. It’s carefully mixed to stay soft and inviting, not harsh or overly sweet. This cake is a gentle reminder that comfort food can be pretty, too—without all the fuss.
What Ingredients You Will Need
This recipe depends on straightforward, wholesome ingredients that come together to create a light, flavorful cake with a dreamy buttercream garden on top. Most are pantry staples, and the few special touches make a world of difference.
- For the Cake Layers:
- All-purpose flour, 2 ½ cups (312 g) – sifted for a tender crumb
- Baking powder, 2 ½ tsp – to give the cake a nice lift
- Salt, ½ tsp – balances the sweetness
- Unsalted butter, 1 cup (227 g), softened – I prefer Plugrá for its richness
- Granulated sugar, 1 ¾ cups (350 g)
- Large eggs, 4, room temperature – helps with cake structure
- Whole milk, 1 cup (240 ml), room temperature – keeps the cake moist
- Pure vanilla extract, 2 tsp – the flavor backbone
- For the Pastel Buttercream:
- Unsalted butter, 1 ½ cups (340 g), softened – again, quality butter really shines here
- Powdered sugar, 5 cups (600 g), sifted – to avoid lumps
- Heavy cream, 3-4 tbsp (45-60 ml) – for creaminess and smooth texture
- Pure vanilla extract, 2 tsp
- Almond extract, ½ tsp (optional) – adds subtle warmth
- Gel food coloring in pastel shades: pink, lavender, mint green, and pale yellow – gel colors keep the buttercream from thinning out
When picking flour, I recommend using a trusted brand like King Arthur for consistent results. For the milk, whole milk gives that tender crumb, but you can swap in almond or oat milk if you’re going dairy-free (though the buttercream will still have dairy). If you want a dairy-free frosting, substituting the butter with a vegan spread and coconut cream can work, but it takes some practice to get the texture just right.
Equipment Needed
- Two 8-inch (20 cm) round cake pans – non-stick or lined with parchment paper
- Mixing bowls – at least two, medium and large
- Electric mixer – stand mixer preferred for ease, but a hand mixer works fine too
- Rubber spatula – for folding and scraping
- Offset spatula – essential for smooth buttercream application
- Piping bags and assorted piping tips (round, petal, and leaf tips) – to create the flower garden effect
- Turntable (optional but helpful) – makes decorating smoother and less messy
- Cooling racks – to let the cakes cool evenly
If you don’t have a turntable, no worries; just rotating the cake carefully with your hands works too. For piping bags, reusable silicone ones are budget-friendly and easy to clean, but disposable bags work perfectly well for this project. I learned early on that trying to pipe flowers without the right tips is like trying to paint without brushes—it’s doable but more frustrating than it needs to be.
Preparation Method
- Preheat and Prepare Pans: Preheat your oven to 350°F (175°C). Grease the two 8-inch pans, line the bottoms with parchment, and grease the parchment for easy release. This takes about 10 minutes including prep.
- Mix Dry Ingredients: In a medium bowl, whisk together the sifted flour, baking powder, and salt. Set aside.
- Cream Butter and Sugar: Using a stand mixer with a paddle attachment (or hand mixer), beat the softened butter on medium speed until creamy, about 2 minutes. Gradually add sugar and beat until light and fluffy, about 4 minutes more. This step is crucial for a light texture.
- Add Eggs: Add eggs one at a time, mixing well after each addition. Scrape down the sides to keep everything incorporated evenly.
- Alternate Adding Dry Ingredients and Milk: Reduce mixer speed to low. Add dry ingredients in three parts, alternating with milk in two parts, beginning and ending with dry ingredients. Mix just until combined after each addition to avoid overmixing, which can toughen the cake.
- Stir in Vanilla: Add the vanilla extract and mix until just blended.
- Divide and Bake: Pour batter evenly into prepared pans, smoothing the tops with a spatula. Bake for 28-32 minutes, or until a toothpick inserted into the center comes out clean. Rotate pans halfway through baking for even color.
- Cool Completely: Let cakes cool in pans for 15 minutes, then invert onto cooling racks. Wait until fully cool before frosting—this is key to avoid melting your buttercream.
- Prepare Buttercream: Beat softened butter on medium speed until creamy (about 2 minutes). Gradually add powdered sugar, one cup at a time, alternating with heavy cream. Add vanilla and almond extracts. Beat on high speed for 3-4 minutes until light and fluffy. Divide buttercream into separate bowls to tint with gel colors.
- Color the Buttercream: Use toothpicks to add gel food coloring to each bowl, mixing until you hit soft pastel shades. Remember, a little color goes a long way!
- Assemble the Cake: Level each cake layer with a serrated knife if needed. Place one layer on your cake board or plate. Spread an even layer of buttercream over the top. Add the second cake layer on top and apply a thin crumb coat all over. Chill 20 minutes to set.
- Decorate with Buttercream Flowers: Fill piping bags fitted with petal, round, and leaf tips with the pastel buttercream colors. Pipe flowers and leaves all over the cake to create the garden effect. It’s okay if it’s not perfect—imperfections add charm!
- Final Chill and Serve: Chill the cake for at least 30 minutes before serving so the buttercream firms up and the flowers hold their shape.
Pro tip: If your buttercream feels too stiff while piping, add a splash of cream to soften. And while assembling, keep your kitchen cool to prevent melting. I’ve learned the hard way that warm kitchens + buttercream = sad flowers.
Cooking Tips & Techniques
One of the biggest challenges with a layered buttercream cake is getting even layers and smooth frosting. Here’s what I’ve learned after a few too many cracked cakes:
- Don’t Skip Sifting: Sifting flour and powdered sugar helps avoid lumps that can ruin texture or smoothness.
- Room Temperature Ingredients Matter: Eggs, butter, and milk should all be at room temp for best mixing. Cold ingredients can lead to curdling or dense crumb.
- Don’t Overmix Batter: Mix just until ingredients come together. Overmixing develops gluten, which makes cake tough.
- Level Your Cakes: Use a serrated knife or cake leveler to trim domed tops. It makes stacking easier and the final cake more stable.
- Chill Between Frosting Steps: Crumb coat and final cake chill help set the buttercream so it doesn’t slide or smudge when you pipe flowers.
- Practice Piping: If you’re new to piping flowers, practice on parchment first. It builds confidence and saves cake.
- Keep Buttercream Cool But Pliable: If too warm, buttercream melts; too cold, it cracks. Adjust by adding cream or chilling briefly.
Honestly, I used to panic over crumbly edges or uneven flowers, but once I embraced the imperfect charm and learned these little tricks, baking this cake became a joy instead of a stress test.
Variations & Adaptations
Want to make the Perfect Pastel Buttercream Flower Garden Layer Cake your own? Here are some ways to switch things up:
- Flavor Variations: Add lemon zest to the batter for a citrus twist or swap vanilla extract with almond or rose water for floral notes.
- Dietary Adjustments: Use gluten-free flour blends for a gluten-free cake. For vegan buttercream, try a coconut oil-based frosting though it will change the texture slightly.
- Color Themes: Change the pastel palette to match seasons or events—soft peach and coral for summer, icy blues and whites for winter.
- Alternative Decorations: Instead of piped flowers, use fresh edible flowers or candied petals for a natural look.
- Cooking Method: This cake can be baked in a sheet pan and cut into layers if you don’t have round pans—just adjust baking time accordingly.
Personally, I once tried a version with lavender-infused buttercream and it was a subtle, delightful surprise—perfect for a quiet spring afternoon tea. If you want to explore more fresh spring flavors, you might enjoy the creamy lemon ricotta pasta with fresh peas and mint, which also celebrates the season’s bounty in a simple way.
Serving & Storage Suggestions
This cake shines best served at room temperature so the buttercream is soft and the layers tender. I like to slice it on a warm knife to keep clean edges. It pairs beautifully with light beverages like jasmine tea or a sparkling elderflower drink.
For storage, keep the cake covered in the refrigerator for up to 3 days. Bring it back to room temperature before serving to enjoy the full flavor and texture. You can freeze individual layers wrapped tightly in plastic wrap for up to 2 months—just thaw overnight in the fridge.
The flavors and colors actually mellow and deepen a bit after a day, making the cake even more luscious. And if you want a cozy spring brunch idea to go alongside, the creamy spring vegetable fettuccine Alfredo offers a rich and comforting savory balance.
Nutritional Information & Benefits
While this cake is a treat, it’s made with real butter and fresh ingredients, so you know what’s going in. Each serving contains roughly 350-400 calories, with a good balance of fats and sugars typical for buttercream cakes.
The butter provides vitamin A and some healthy fats, while eggs add protein and essential nutrients. Using quality vanilla and almond extract adds flavor complexity without extra calories.
For those watching gluten or dairy, substitutions can be made as mentioned earlier. This cake isn’t low-carb or sugar-free, but it’s a satisfying indulgence that pairs well with an otherwise balanced diet.
Personally, I find that having a slice of something homemade like this makes celebrations feel more meaningful—comfort food with a conscience.
Conclusion
The Perfect Pastel Buttercream Flower Garden Layer Cake for Spring is more than just a pretty dessert. It’s a recipe that invites you to slow down, enjoy the process, and share something joyful with others. The balance of simple ingredients, easy techniques, and stunning results makes it a keeper in any home baker’s repertoire.
Feel free to tweak the flavors, colors, and decorations to fit your style—this cake is a canvas. I love how it transforms an ordinary day into a celebration with its soft pastels and delicate blooms. If you try it, I’d love to hear how your garden grows! Baking, after all, is sweeter when shared.
Frequently Asked Questions
Can I make this cake ahead of time?
Yes, you can bake the layers up to 2 days in advance and keep them wrapped tightly at room temperature or refrigerated. Frost and decorate the day you plan to serve for best freshness.
What if I don’t have gel food coloring?
Gel colors work best for vibrant pastels without thinning the buttercream, but you can use liquid food coloring sparingly. Just add a tiny bit at a time and mix well.
How do I prevent the buttercream from melting?
Keep your kitchen cool, use chilled tools if needed, and refrigerate the cake briefly between frosting steps. Avoid frosting in very warm environments.
Can I substitute the almond extract?
Absolutely, vanilla extract works perfectly on its own. You can also try a hint of rose water or lemon extract for different flavor profiles.
Is this recipe suitable for beginners?
Definitely! The instructions are straightforward, and while decorating flowers takes some practice, the cake tastes amazing even if your piping isn’t perfect. Just have fun with it!
Pin This Recipe!
Perfect Pastel Buttercream Flower Garden Layer Cake
A light and flavorful spring layer cake decorated with pastel buttercream flowers, perfect for celebrations and easy to make with simple ingredients.
- Prep Time: 15 minutes
- Cook Time: 30 minutes
- Total Time: 45 minutes
- Yield: 12 servings 1x
- Category: Dessert
- Cuisine: American
Ingredients
- 2 ½ cups (312 g) all-purpose flour, sifted
- 2 ½ tsp baking powder
- ½ tsp salt
- 1 cup (227 g) unsalted butter, softened
- 1 ¾ cups (350 g) granulated sugar
- 4 large eggs, room temperature
- 1 cup (240 ml) whole milk, room temperature
- 2 tsp pure vanilla extract
- 1 ½ cups (340 g) unsalted butter, softened (for buttercream)
- 5 cups (600 g) powdered sugar, sifted
- 3–4 tbsp (45–60 ml) heavy cream
- 2 tsp pure vanilla extract (for buttercream)
- ½ tsp almond extract (optional)
- Gel food coloring in pastel shades: pink, lavender, mint green, pale yellow
Instructions
- Preheat oven to 350°F (175°C). Grease two 8-inch round cake pans, line bottoms with parchment paper, and grease parchment.
- Whisk together sifted flour, baking powder, and salt in a medium bowl; set aside.
- Beat softened butter on medium speed until creamy, about 2 minutes. Gradually add sugar and beat until light and fluffy, about 4 minutes.
- Add eggs one at a time, mixing well after each addition. Scrape down sides as needed.
- Reduce mixer speed to low. Add dry ingredients in three parts, alternating with milk in two parts, beginning and ending with dry ingredients. Mix just until combined.
- Add vanilla extract and mix until blended.
- Divide batter evenly into prepared pans and smooth tops. Bake 28-32 minutes or until toothpick inserted in center comes out clean. Rotate pans halfway through baking.
- Cool cakes in pans for 15 minutes, then invert onto cooling racks. Cool completely before frosting.
- Beat softened butter for buttercream on medium speed until creamy, about 2 minutes. Gradually add powdered sugar one cup at a time, alternating with heavy cream.
- Add vanilla and almond extracts. Beat on high speed for 3-4 minutes until light and fluffy.
- Divide buttercream into separate bowls and tint with gel food coloring to soft pastel shades.
- Level cake layers if needed. Place one layer on cake board or plate and spread an even layer of buttercream on top.
- Add second cake layer and apply a thin crumb coat all over. Chill 20 minutes to set.
- Fill piping bags with pastel buttercream colors using petal, round, and leaf tips. Pipe flowers and leaves all over the cake to create a garden effect.
- Chill cake at least 30 minutes before serving to firm buttercream and hold flower shapes.
Notes
Use room temperature ingredients for best results. Sift flour and powdered sugar to avoid lumps. Chill cake between frosting steps to prevent melting. Practice piping flowers on parchment before decorating the cake. Keep kitchen cool to avoid buttercream melting.
Nutrition
- Serving Size: 1 slice (1/12 of cak
- Calories: 375
- Sugar: 35
- Sodium: 210
- Fat: 22
- Saturated Fat: 13
- Carbohydrates: 45
- Fiber: 0.5
- Protein: 4
Keywords: buttercream cake, pastel cake, spring cake, flower cake, layer cake, easy cake recipe, buttercream flowers