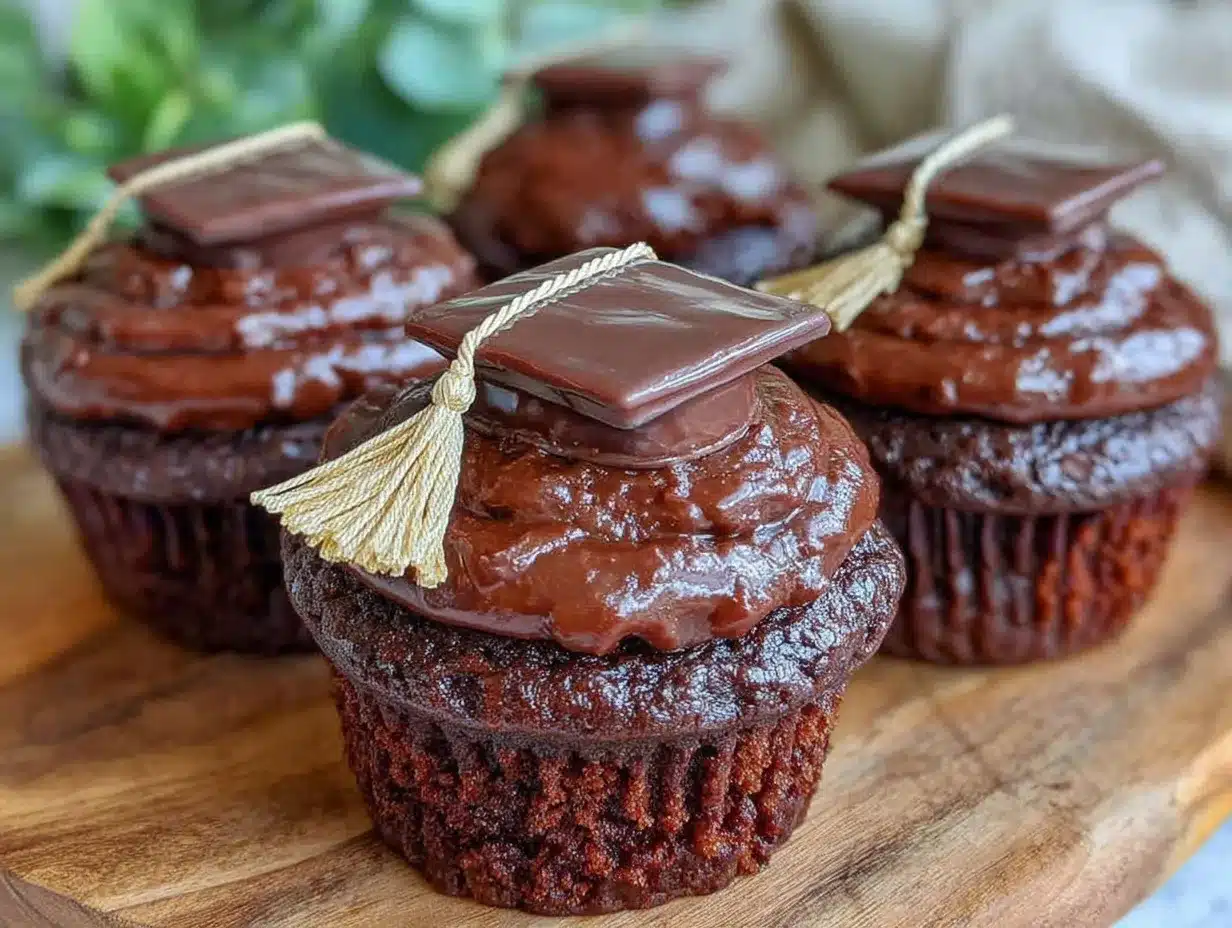
Let me tell you, the moment I pulled these Easy Festive Graduation Cap Cupcakes out of the oven, the sweet smell of vanilla and cocoa filled the room, making it impossible not to smile. The first time I baked these, I was prepping for my niece’s graduation party, and honestly, the way those tiny caps sat proudly atop each cupcake was the kind of moment where you pause, take a deep breath, and just smile because you know you’re onto something truly special. When I was knee-high to a grasshopper, my grandma baked the simplest vanilla cupcakes for celebrations, but these graduation cap cupcakes add that fun, festive twist that makes any grad feel like a star.
Years ago, I stumbled upon the idea while scrolling through a late-night Pinterest rabbit hole, trying to find a unique graduation treat that wouldn’t have me slaving away for hours. My family couldn’t stop sneaking them off the cooling rack (and I can’t really blame them). You know what? These cupcakes are dangerously easy to make and perfect for potlucks, sweet treats for your kids’ friends, or even to brighten up your Pinterest cookie board with something a little more playful.
Honestly, I’ve tested this recipe more times than I can count—in the name of research, of course—and it’s become a staple for family gatherings, gifting, and any celebration that calls for a bit of fun and flair. If you’re looking for a recipe that feels like a warm hug wrapped in frosting, you’re going to want to bookmark this one.
Why You’ll Love This Recipe
After countless trials in my kitchen, I can say these Easy Festive Graduation Cap Cupcakes are the real deal. Here’s why they stand out:
- Quick & Easy: Comes together in under an hour, perfect for last-minute celebrations or busy days when you still want to wow.
- Simple Ingredients: No fancy grocery store runs needed; your pantry probably already has everything on hand.
- Perfect for Graduations & Parties: Great for school celebrations, family get-togethers, and even casual weekend fun.
- Crowd-Pleaser: Kids and adults alike rave about them—those little caps aren’t just cute, they’re delicious!
- Unbelievably Delicious: The blend of moist cupcake base with creamy frosting and that crisp, chocolate cap makes for next-level comfort food.
What sets this recipe apart? It’s all in the creative yet simple technique of crafting those tiny graduation caps from chocolate squares and a piped tassel. Plus, the frosting is whipped just right—not too sweet, not too stiff—giving you that perfect balance every time.
This recipe isn’t just good—it’s the kind that makes you close your eyes after the first bite, savoring every crumb. It turns a simple cupcake into a statement piece, perfect for impressing guests without all the stress. Honestly, it’s comfort food reimagined with a festive twist, making every celebration just that bit more memorable.
What Ingredients You Will Need
This recipe uses simple, wholesome ingredients to deliver bold flavor and that satisfying, festive texture without the fuss. Most of these are pantry staples, and substitutions are easy if you’re working with dietary needs.
- For the Cupcakes:
- All-purpose flour (1 ½ cups / 190g) – makes the cupcakes tender
- Granulated sugar (1 cup / 200g) – for sweetness
- Baking powder (1 ½ teaspoons) – the lift you need
- Baking soda (½ teaspoon) – helps with rise and texture
- Salt (¼ teaspoon) – balances the flavors
- Unsalted butter (½ cup / 115g), softened – adds richness
- Large eggs (2), room temperature – binds and enriches
- Whole milk (¾ cup / 180ml), room temperature – keeps it moist (use almond or oat milk for dairy-free)
- Pure vanilla extract (2 teaspoons) – for that warm, familiar flavor
- For the Frosting:
- Unsalted butter (1 cup / 230g), softened – the creamy base
- Powdered sugar (4 cups / 480g), sifted – for smooth sweetness
- Pure vanilla extract (1 teaspoon) – enhances the flavor
- Whole milk or cream (2-3 tablespoons / 30-45ml) – to thin the frosting to perfect spreadable consistency
- Black gel food coloring (optional) – for the tassels if you want that classic graduation look
- For the Graduation Caps:
- Chocolate wafer squares or chocolate bark (1 package, about 24 pieces) – easy to shape into caps (I recommend Ghirardelli for best texture)
- Licorice strings or thin piped frosting – for the tassel detail
Substitutions: Use gluten-free flour blend if needed, and swap butter for coconut oil for a dairy-free option. In summer, you might want to add a splash of lemon zest to the batter for a fresh twist.
Equipment Needed
- Standard 12-cup muffin tin – nothing fancy, just your reliable workhorse
- Paper cupcake liners – helps with easy removal and cute presentation
- Mixing bowls – one large for batter, one medium for frosting
- Electric hand mixer or stand mixer – trust me, this makes frosting so much easier
- Measuring cups and spoons – precision is your friend here
- Offset spatula or butter knife – perfect for frosting each cupcake evenly
- Piping bag with a small round tip (for tassels) – optional but adds that professional touch
If you don’t have a piping bag, a zip-top bag with a tiny corner snipped off works just as well. For a budget-friendly alternative, any sturdy spoon or knife can do the frosting job. I’ve made these cupcakes in everything from basic muffin tins to fancy silicone molds, and they come out great every time. Just keep your tools clean and dry for best results.
Preparation Method
- Preheat your oven to 350°F (175°C). Line your muffin tin with cupcake liners. This usually takes about 5 minutes.
- Mix the dry ingredients: In a large bowl, whisk together 1 ½ cups (190g) all-purpose flour, 1 cup (200g) granulated sugar, 1 ½ teaspoons baking powder, ½ teaspoon baking soda, and ¼ teaspoon salt. Set aside.
- Cream the butter and eggs: Using an electric mixer, beat ½ cup (115g) softened unsalted butter on medium speed until smooth and creamy, about 2-3 minutes. Add 2 large eggs, one at a time, beating well after each addition.
- Add the wet ingredients: Mix in ¾ cup (180ml) room temperature whole milk and 2 teaspoons pure vanilla extract. Beat until combined but don’t overmix.
- Combine wet and dry ingredients: Gradually add the dry mixture to the wet, mixing on low speed until just combined. The batter should be smooth but not overworked. Overmixing can make cupcakes tough.
- Fill cupcake liners: Spoon the batter evenly into the 12 liners, about ⅔ full. This helps prevent overflow and gives you that perfect dome.
- Bake: Place the tin in the oven and bake for 18-22 minutes, or until a toothpick inserted comes out clean. The tops should spring back lightly when touched.
- Cool: Let cupcakes cool in the tin for 5 minutes, then transfer to a wire rack to cool completely before frosting. This can take about 30 minutes. Don’t rush this step or your frosting will melt!
- Make the frosting: In a medium bowl, beat 1 cup (230g) softened butter on medium speed until creamy. Gradually add 4 cups (480g) sifted powdered sugar, mixing on low. Add 1 teaspoon vanilla extract and 2-3 tablespoons (30-45ml) milk or cream, beating on high until fluffy and smooth. Adjust milk to get your desired spreading consistency.
- Frost cupcakes: Use an offset spatula or a piping bag to swirl frosting on each cupcake. Keep it neat but don’t stress the perfect swirl—it’s charmingly homemade!
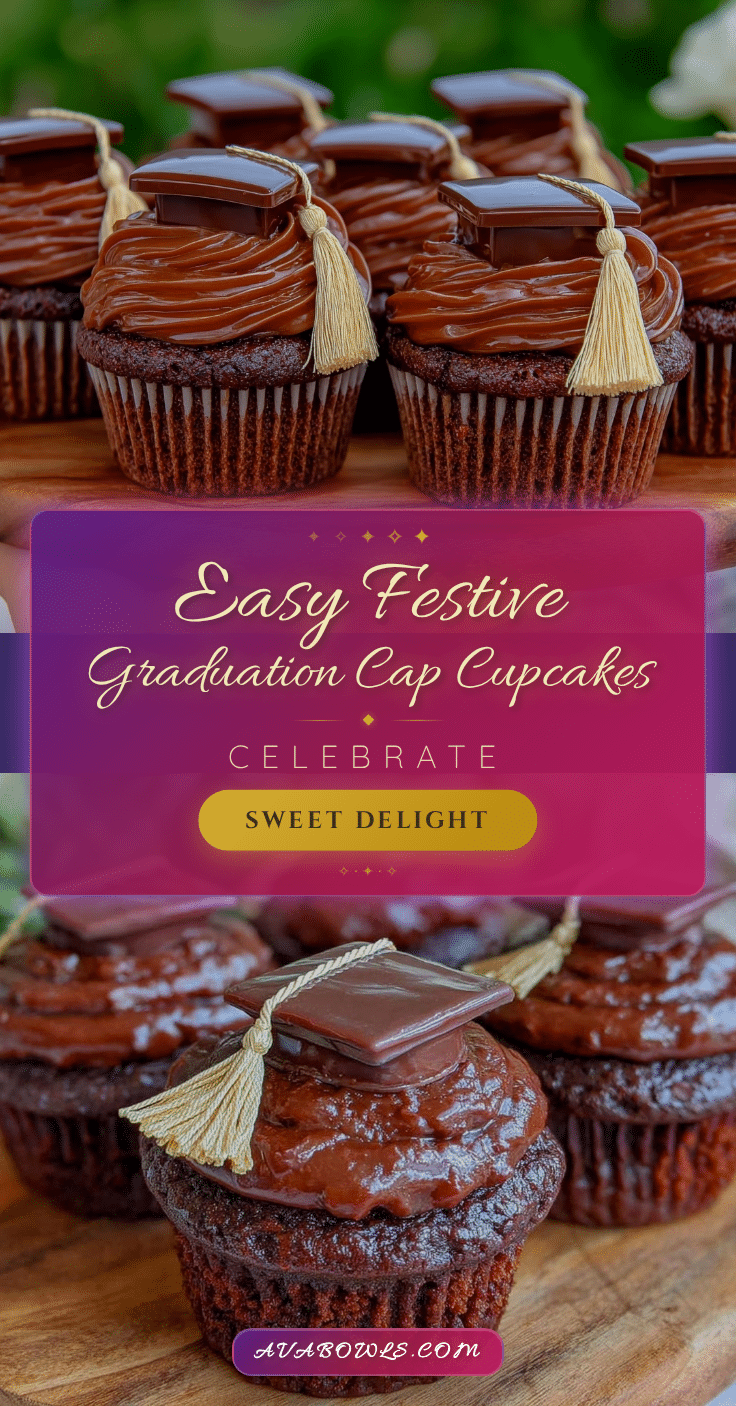
- Prepare the caps: Place a chocolate wafer square gently on top of each frosted cupcake. Attach a licorice string or pipe a small tassel with black gel food coloring tinted frosting on one corner of the wafer. This little detail brings the whole graduation vibe to life.
- Final touch: Give the cupcakes a gentle press to secure the caps but don’t push too hard or the frosting will squish out. Let them rest at room temperature for 15 minutes before serving.
Cooking Tips & Techniques
One trick I learned the hard way—always make sure your butter and eggs are at room temperature before mixing. Cold ingredients don’t blend well and can lead to a lumpy batter. Also, don’t skip sifting your powdered sugar; it makes the frosting silky smooth, which is worth the extra step.
When placing those chocolate caps, handle them gently because they can break easily. If they get a little crack, just nudge the frosting over it to hide imperfections—nobody’s perfect, right? For the tassels, if you’re piping them, keep the tip small and practice a few on parchment before decorating the cupcakes.
Timing is key. I sometimes bake the cupcakes the day before and frost them the morning of the party. This way, they stay fresh, and the frosting has time to set nicely. If you’re multitasking, whip up the frosting while cupcakes cool—it saves precious time.
Variations & Adaptations
Feel like mixing things up? Here are a few fun ways to make these cupcakes your own:
- Flavor Twist: Add a tablespoon of cocoa powder to the batter for chocolate cupcakes. Swap vanilla extract with almond extract for a nutty note.
- Diet-Friendly: Use gluten-free flour blend to make cupcakes safe for gluten-sensitive friends. Swap butter with coconut oil and use dairy-free milk to go vegan.
- Seasonal Flair: In spring or summer, top cupcakes with fresh berries or edible flowers alongside the graduation caps for a fresh look.
- Different Cap Materials: Instead of chocolate wafers, use fondant squares or even small cookies for a crunchier cap.
- Personal Touch: For my nephew’s graduation, I piped the tassels in school colors and added a small edible glitter dust for some sparkle. It was a hit!
Serving & Storage Suggestions
Serve these cupcakes at room temperature for that perfect moist texture and smooth frosting feel. They pair wonderfully with a cold glass of milk or a cup of coffee for the grown-ups. If you’re planning a full celebration spread, these cupcakes go nicely alongside fresh fruit platters or light finger sandwiches.
Store leftover cupcakes in an airtight container at room temperature for up to two days, or refrigerate for up to five days. If refrigerated, bring them back to room temperature before serving to soften the frosting. For longer storage, freeze cupcakes (without caps) wrapped tightly in plastic wrap and foil for up to three months. Thaw overnight in the fridge, then frost and decorate when ready.
Flavors tend to meld and deepen after a day, so if you can plan ahead, these cupcakes taste even better the next day. Just don’t wait too long or they’ll disappear faster than you can say “congratulations!”
Nutritional Information & Benefits
Each Easy Festive Graduation Cap Cupcake provides approximately 280-320 calories, depending on frosting amount. They contain about 12 grams of fat, 40 grams of carbs, and 3 grams of protein per serving. Key ingredients like eggs and milk add protein and vitamins, while the simple flour and sugar base keep it classic.
If you’re mindful of allergens, these cupcakes contain dairy, eggs, and gluten but can be adapted with gluten-free flour and dairy-free alternatives. The recipe’s flexibility means you can enjoy a festive treat without feeling guilty or sidelined. Plus, making homemade cupcakes means you control the ingredients, avoiding preservatives and artificial additives often found in store-bought options.
Conclusion
If you’re after a crowd-pleasing, fun, and easy-to-make treat that screams celebration, these Easy Festive Graduation Cap Cupcakes are your go-to. They’re customizable, approachable, and honestly, just pure joy in cupcake form. I love how they bring a smile to everyone’s face, turning a simple party into something memorable and sweet.
Give these a try, tweak the flavors and decorations to your liking, and watch how they become the highlight of your next graduation bash. Don’t forget to share your own versions or tips—I’d love to hear how you make them your own!
Happy celebrating, and here’s to many more delicious moments ahead!
FAQs
Can I make these cupcakes ahead of time?
Absolutely! You can bake the cupcakes up to two days in advance and frost them the day of the event for the freshest taste.
What if I don’t have chocolate wafers for the caps?
Try using small square cookies, fondant squares, or chocolate bark cut into squares. Just make sure they’re sturdy enough to hold their shape.
How do I keep the frosting from melting in warm weather?
Keep the cupcakes refrigerated until about 30 minutes before serving. Using a frosting with less butter and a bit more powdered sugar can help it hold up better in heat.
Can I use a boxed cake mix instead of making cupcakes from scratch?
Yes, a good-quality boxed mix works fine and saves time. Just follow the package instructions and top with the homemade frosting and caps for that festive look.
Is there a way to make the tassels without piping?
Yes! You can use thin licorice strings or even small strips of fruit leather as tassels for an easy, no-piping option.
Pin This Recipe!
Easy Festive Graduation Cap Cupcakes Recipe for Perfect Celebration Treats
These easy and festive graduation cap cupcakes combine a moist vanilla base with creamy frosting and a fun chocolate cap decoration, perfect for celebrations and parties.
- Prep Time: 15 minutes
- Cook Time: 22 minutes
- Total Time: 52 minutes
- Yield: 12 servings 1x
- Category: Dessert
- Cuisine: American
Ingredients
- 1 ½ cups (190g) all-purpose flour
- 1 cup (200g) granulated sugar
- 1 ½ teaspoons baking powder
- ½ teaspoon baking soda
- ¼ teaspoon salt
- ½ cup (115g) unsalted butter, softened
- 2 large eggs, room temperature
- ¾ cup (180ml) whole milk, room temperature (or almond/oat milk for dairy-free)
- 2 teaspoons pure vanilla extract
- 1 cup (230g) unsalted butter, softened (for frosting)
- 4 cups (480g) powdered sugar, sifted
- 1 teaspoon pure vanilla extract (for frosting)
- 2–3 tablespoons (30-45ml) whole milk or cream (for frosting)
- Black gel food coloring (optional, for tassels)
- 1 package chocolate wafer squares or chocolate bark (about 24 pieces)
- Licorice strings or thin piped frosting (for tassels)
Instructions
- Preheat your oven to 350°F (175°C). Line a 12-cup muffin tin with cupcake liners.
- In a large bowl, whisk together flour, sugar, baking powder, baking soda, and salt.
- Using an electric mixer, beat ½ cup softened butter on medium speed until creamy, about 2-3 minutes. Add eggs one at a time, beating well after each addition.
- Mix in milk and 2 teaspoons vanilla extract until combined, do not overmix.
- Gradually add dry ingredients to wet ingredients, mixing on low speed until just combined.
- Spoon batter evenly into cupcake liners, filling about ⅔ full.
- Bake for 18-22 minutes or until a toothpick inserted comes out clean and tops spring back lightly.
- Cool cupcakes in the tin for 5 minutes, then transfer to a wire rack to cool completely (about 30 minutes).
- For frosting, beat 1 cup softened butter until creamy. Gradually add powdered sugar, mixing on low. Add vanilla extract and milk or cream, beat on high until fluffy and smooth. Adjust milk for spreading consistency.
- Frost cupcakes using an offset spatula or piping bag.
- Place a chocolate wafer square on top of each frosted cupcake. Attach a licorice string or pipe a small tassel with black gel food coloring tinted frosting on one corner of the wafer.
- Gently press the caps to secure without squishing the frosting. Let cupcakes rest at room temperature for 15 minutes before serving.
Notes
Use room temperature butter and eggs for best batter consistency. Sift powdered sugar for smooth frosting. Handle chocolate caps gently to avoid breakage. Cupcakes can be baked a day ahead and frosted the day of the event. For dairy-free, substitute butter with coconut oil and milk with plant-based milk. For gluten-free, use gluten-free flour blend.
Nutrition
- Serving Size: 1 cupcake
- Calories: 300
- Sugar: 28
- Sodium: 150
- Fat: 12
- Saturated Fat: 7
- Carbohydrates: 40
- Fiber: 1
- Protein: 3
Keywords: graduation cupcakes, festive cupcakes, easy cupcakes, vanilla cupcakes, party treats, chocolate caps, celebration desserts